
Document conventions
용어
MOML은 Mobile Object Markup Language의 약자입니다.
element는 XML에서
<BUTTON>와 같이 tag 형식으로 사용하는 개체나 구문을 뜻합니다.attribute는 XML에서
<BUTTON text="value">형식으로 사용하거나 스크립트 내에서 button1.text='value' 형식으로 사용합니다.
값 표기법
[ ] 안의 내용은 값의 자료형을 설명합니다.
ex) "[identifier]"| 는 이들 중 하나를 사용할 수 있음을 나타냅니다.
ex) "visible" | "invisible" -> visible="visible", visible="invisible"""안의 | 는 여러개의 값을 |를 사용하여 지정할 수 있음을 나타냅니다.
ex) "zoom | progress | home" -> option="zoom", option="zoom|home", option="progress|home", ...
약식 표현법
보통 element 이름은 모두 대문자로 표기하고, attribute 이름은 첫문자가 소문자로 시작합니다. 별도로 element나 attribute를 명시하지 않은 경우는 대소문자를 보고 구분합니다.
element나 object의 함수는 object.function(parameter count) 형식으로 표기합니다.
가변 인자를 갖는 함수는 object.function(v)로 표기합니다.
element나 object의 속성은 object.attribute 형식으로 표기합니다.
element나 object의 읽기 전용 속성은 object.attribute() 형식으로 표기합니다.
element의 부모와 자식 관계는 PARENT/CHILD 형식으로 표기합니다.
| 약식 표현 | 설명 |
|---|---|
| LABEL.textAlign | 'LABEL' element의 textAlign attribute |
| CONTAINER.open(2) | 'CONTAINER' element의 인자가 2개인 open 함수 |
| device.log(2) | 'device' object의 인자가 2개인 log 함수 |
| NAVIGATIONCONTAINER/VIEWITEM | 'NAVIGATIONCONTAINER' element의 VIEWITEM 자식 element |
UI elements
▹ ACCELHOLEIN (dev)
<?xml version="1.0" encoding="utf-8"?>
<MOML version="1.1.4">
  <UILAYOUT portrait="300,250" landscape="300,250">
    <ACCELHOLEIN id="ahi" layout="0,0,300,250" defaultImg="grass.png"

      onGoalIn="function.container.container.onGoleIn()"

      onHoleIn="function.container.container.onHoleIn()" >
      <HOLE defaultImg="pond.png" layout="30,30,30,30" tolerance="8"/>
      <HOLE defaultImg="bomb.png" layout="50,15,10,10" />
      <HOLE defaultImg="devil.png" layout="15,70,10,10" />
      <HOLE defaultImg="fire.png" layout="60,85,10,10" />
      <HOLE defaultImg="blowfish.png" layout="70,30,10,10" />
      <GOAL defaultImg="house1.png" layout="80,80,20,20" />
      <GOAL defaultImg="house1.png" layout="80,10,20,20" />
      <OBJECT defaultImg="object1.png" layout="10,10,8,10" />
    </ACCELHOLEIN>
  </UILAYOUT>
</MOML>
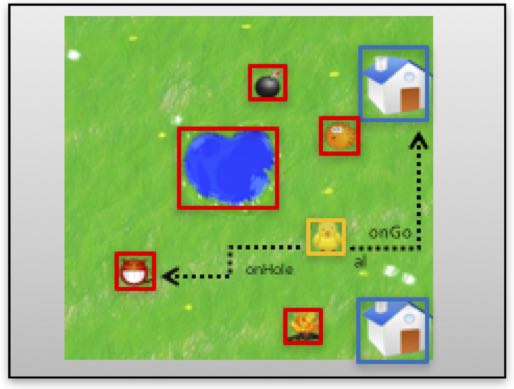
ACCEHOLEIN은 가속도 센서를 이용하여 자식 OBJECT element를 움직이고, OBJECT element가 자식 HOLE, GOAL element들의 영역과 겹쳤을 때 사용자가 정의 한 명령을 수행할 수 있는 UI element입니다. 간단한 게임에 응용할 수 있습니다.
다음 그림은 위 예제 코드의 실행 화면으로 노락색 OBJECT element가 가속도 센서에 따라 움직이면서 빨간색 HOLE element의 영역과 겹치면 onHoleIn attribute에 설정한 명령을 수행하고 파란색 GOAL element의 영역과 겹치면 onGoalIn attribute에 설정한 명령을 수행합니다.
Inherited from WINDOW
[attr] onGoalIn
<ACCELHOLEIN onGoalIn="function.onGoleIn()" />
OBJECT element의 영역과 GOAL element의 영역이 겹쳤을 때 수행할 명령
Values
"[script]"
[attr] onHoleIn
<ACCELHOLEIN onGoalIn="function.onHoleIn()" />
OBJECT element의 영역과 HOLE element의 영역과 겹쳤을 때 수행할 명령
Values
"[script]"
[func] void start()
<ACCELHOLEIN id="ahi" ...>
...
</ACCELHOLEIN>
<BUTTON onClick="ahi.start()" />
가속도 센서 감지를 시작하고 감지된 가속도 센서 정보에 따라 OBJECT element를 움직입니다.
Related ACCELHOLEIN.stop(0)
[func] void stop()
<ACCELHOLEIN id="ahi" ...>
...
</ACCELHOLEIN>
<BUTTON onClick="ahi.stop()" />
가속도 센서 감지를 중단하고 OBJECT element의 움직임을 멈춥니다.
Related ACCELHOLEIN.start(0)
▹ BUTTON
<?xml version="1.0" encoding="utf-8"?>
<MOML>
  <UILAYOUT portrait="300,300" landscape="300,300">
    <WINDOW layout="0,0,300,300" align="linear:vertical|center">
      <BUTTON layout="100,100" text="default button" />
      <BUTTON layout="100,100" text="color button" defaultImg="#ff00ff"/>
    </WINDOW>
  </UILAYOUT>
</MOML>
BUTTON은 사용자로부터 click과 같은 상호작용을 할 수 있는 UI element입니다.
textAlign attribute의 기본값은 center이며, defaultImg attribute 를 설정하지 않았을 경우 platform 에 따른 기본 버튼으로 표시됩니다.
| 유형 | 화면 |
|---|---|
| Android platform 기본 버튼 |  |
| iOS platform 기본 버튼 |  |
| 색상 버튼 |  |
Inherited from LABEL
▹ CALENDAR (dev)
<?xml version="1.0" encoding="utf-8"?>
<MOML>
  <UILAYOUT portrait="480,480" landscape="480,480">
    <WINDOW layout="0,0,480,480" defaultImg="#ffffff" align="linear:vertical">
      <CALENDAR id="calendar" layout="460,auto" listYear="./year/text()"
          listDate="./date/text()" dateFormat="yyyyMMdd"
          listMonth="./month/text()" listDay="./day/text()"
          listContent="./value/text()" dataSource="calendar_data.xml"
          dataList="/DATA/ROW" hasControlBar="false"
          defaultImg="#ff0000" margin="10,0,0,0"/>
    </WINDOW>
  </UILAYOUT>
</MOML>
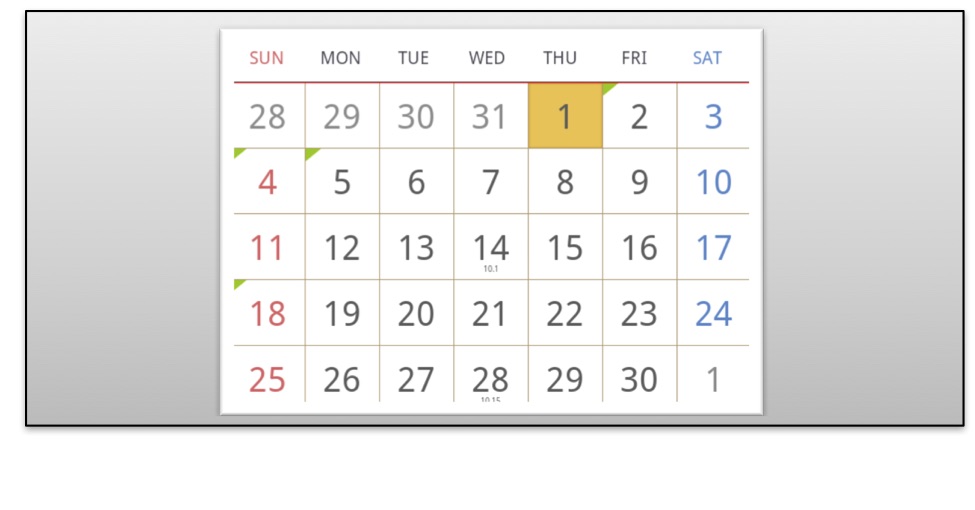
CALENDAR는 기본적인 년, 월, 일을 표시해주는 UI element입니다.
dataSource attribute 를 이용하여 사용자가 지정한 스케줄을 표시할 수 있습니다.
각 월마다 표시되는 주별 라인 수(4-6)가 다를 수 있기 때문에 layout attribute 를 설정할 때 세로의 크기를 auto 로 설정하길 권장합니다. (ex. layout='0,0,300,auto')
Inherited from WINDOW
[attr] day
<CALENDAR layout="0,0,320,auto" dataSource="schedule.xml" day="12"/>
calendar 에 표시 될 일자
Values
"[number]"
[attr] dataSource
<CALENDAR layout="0,0,320,auto" dataSource="schedule.xml" />
달력에 표시할 스케줄 정보
Values
"[url path]" | "[DATA xml text]"
Related CALENDAR.dataList
[attr] dataList
CONTAINER에 schedule.xml에 반복되는 dataList(xml path)를 지정하는 예제입니다.
<CALENDAR layout="0,0,320,auto" dataSource="schedule.xml" dataList="/DATA/ROW" />
schedule.xml 구성내용
<?xml version="1.0" encoding="UTF-8"?>
<!-- 반복되는 xml path /DATA/ROW -->
<DATA>
  <ROW>
    <date>2012112</date>
    <value>이순신</value>
  </ROW>
  <ROW>
    <date>2012114</date>
    <value>류관순</value>
  </ROW>
  <ROW>
    <date>2012115</date>
    <value>이유진</value>
  </ROW>
  <ROW>
    <date>20121118</date>
    <value>홍금보</value>
  </ROW>
</DATA>
달력에 표시할 스케줄 정보의 기준 xml path
Values
"[xml path]"
Related CALENDAR.dataList, CALENDAR.listYear, CALENDAR.listMonth, CALENDAR.listDay, CALENDAR.listContent, CALENDAR.listDate
[attr] dateForamt
<CALENDAR layout="0,0,320,auto" dataSource="schedule.xml" dataList="/DATA/ROW"
listDate="./date/text()" dateFormat="yyyyMMdd"/>
지정해준 schedule에 대한 날짜를 listDate(년, 월, 일 모두)로 지정했을 때 날짜에 대한 format
Values
"[dateFormat]"
Related CALENDAR.listDate
[attr] hasControlBar
<CALENDAR layout="0,0,320,auto" dataSource="schedule.xml" dataList="/DATA/ROW" hasControlBar="true"/>
월별 이동 버튼, 현재 년, 월 정보를 표시하는 controlBar 표시 유무
Values
"true" | "false", default: "false"
[attr] listContent
<CALENDAR layout="0,0,320,auto" dataSource="schedule.xml" dataList="/DATA/ROW"
listContent="./content/text()" />
지정해준 schedule에 설명에 대한 경로 지정
Values
"[relative xml path]"
Related CALENDAR.dataSource, CALENDAR.dataList
[attr] listDate
<CALENDAR layout="0,0,320,auto" dataSource="schedule.xml" dataList="/DATA/ROW"
listDate="./date/text()" />
지정해준 schedule에 날짜(년, 월, 일 모두)에 대한 경로 지정
Values
"[relative xml path]"
Related CALENDAR.dataSource, CALENDAR.dataList
[attr] listDay
<CALENDAR layout="0,0,320,auto" dataSource="schedule.xml" dataList="/DATA/ROW"
listDay="./date/day/text()" />
지정해준 schedule에 일자에 대한 경로 지정
Values
지정해준 schedule에 일자에 대한 경로 지정
Related CALENDAR.dataSource CALENDAR.dataList
[attr] listMonth
<CALENDAR layout="0,0,320,auto" dataSource="schedule.xml" dataList="/DATA/ROW"
listMonth="./date/month/text()" />
지정해준 schedule에 월에 대한 경로 지정
Values
"[relative xml path]"
Related CALENDAR.dataSource CALENDAR.dataList
[attr] listYear
<CALENDAR layout="0,0,320,auto" dataSource="schedule.xml" dataList="/DATA/ROW"
listYear="./date/year/text()" />
지정해준 schedule에 년에 대한 경로 지정
Values
"[relative xml path]"
Related CALENDAR.dataSource, CALENDAR.dataList
[attr] month
<CALENDAR layout="0,0,320,auto" dataSource="schedule.xml" month="3"/>
calendar가 표시될 월 지정
Values
"[number]"
[attr] onChange
<CALENDAR layout="0,0,320,auto" dataSource="schedule.xml" dataList="/DATA/ROW"
onChange="function.calendarChange" />
calendar가 변화 될 때 실행할 script를 지정합니다.
Values
"[script]"
[attr] year
<CALENDAR layout="0,0,320,auto" dataSource="schedule.xml" year="2013"/>
calendar가 표시될 년도 지정
Values
"[number]"
[func] int lineCount()
<CALENDAR id="calendar" layout="0,0,320,auto" dataSource="schedule.xml"
 dataList="/DATA/ROW" />
<BUTTON onClick="calendar.lineCount()" />
calendar의 세로 라인 수를 가져옵니다.
[func] void moveDate(year, month, day)
<CALENDAR id="calendar" layout="0,0,320,auto" dataSource="schedule.xml"
 dataList="/DATA/ROW" />
<BUTTON onClick="calendar.moveDate(2013, 3, 3)" />
calendar를 지정한 parameter의 년, 월, 일로 이동하여 표시합니다.
| Parameter | Type | 설명 |
|---|---|---|
| year | "[number]" | |
| month | "[number]" | |
| day | "[number]" |
[func] void nextMonth()
<CALENDAR id="calendar" layout="0,0,320,auto" dataSource="schedule.xml"
 dataList="/DATA/ROW" />
<BUTTON onClick="calendar.nextMonth()" />
calendar를 다음달로 이동하여 표시합니다.
[func] void prevMonth()
<CALENDAR id="calendar" layout="0,0,320,auto" dataSource="schedule.xml"
 dataList="/DATA/ROW" />
<BUTTON onClick="calendar.prevMonth()" />
calendar를 이전달로 이동하여 표시합니다.
▹ CAMERA
<?xml version="1.0" encoding="utf-8"?>

<MOML>
   <UILAYOUT portrait="320,480">
       <WINDOW layout="10,10,300,220" align="linear:horizontal">
           <CAMERA layout="240,180" margin="5,5,5,5" />
       </WINDOW>
   </UILAYOUT>
</MOML>
Device에 있는 Camera를 구동시켜서 설정한 layout에 보여주는 UI element입니다.
| Camera closed UI | Camera opened UI |
|---|---|
 |
 |
Inherited from WINDOW
Related
Android:
<uses-permission android:name="android.permission.CAMERA" />
<uses-feature android:name="android.hardware.camera" />
<uses-feature android:name="android.hardware.camera.autofocus" />
[attr] maxMegaPixels
최대 100만 화소로 설정합니다.
xml
<CAMERA layout="240,180" type="back" maxMegaPixels="1"/>
해상도를 100만 화소 단위로 설정합니다.
"default"를 지정하면 카메라에 설정된 기본 해상도로 촬영됩니다. 제조사에 따라 대부분 최대 혹은 최소 해상도로 설정됩니다.
"0"이나 음수를 지정하면 최대 해상도를 사용합니다.
양수를 지정하면 지정한 해상도와 같거나 작은 해상도 중 가장 큰 해상도를 사용합니다.
Values
"[float]" | "default" | "0", default: "default"
[attr] onSavePicture
<CAMERA layout="240,180" type="back" savePath="sdcard/camera/save" onSavePicture="savePicture"/>
사진 파일 저장 후 실행할 script를 설정합니다.
Values
"[script]"
Related CAMERA.save(0)
[attr] savePath
<CAMERA layout="240,180" type="back" savePath="sdcard/camera/save"/>
사진 촬영 후 저장할 파일 경로를 지정해 줍니다.
Android의 경우 path를 지정해 주기 전에 device의 sdcard유무를 꼭 확인해야 합니다.
Values
"[local path]"
Related CAMERA.save(0)
Android:
<uses-permission android:name="android.permission.WRITE_EXTERNAL_STORAGE"/>
[attr] scaleType
<CAMERA layout="240,180" type="back" scaleType="clip"/>
이미지 채움 방식을 설정합니다.
fill은 카메라 촬영 영상의 가로나 세로축을 늘리거나 줄여서 꽉 채웁니다. 카메라 해상도와 가로 세로 비율 차이가 크면 찌그러져 보일 수 있습니다.
clip은 카메라 촬영 영상의 가로 세로 비율을 유지하면서 화면에 보여주고 넘치는 영역을 자릅니다.
Values
"clip" | "fill", default : "fill"
[attr] type
<CAMERA layout="240,180" type="back"/>
카메라 유형으로 전면(front) 과 후면(back) 으로 분류됩니다.
Values
"front" | "back", default : "back"
[func] string antibanding()
<CAMERA id="camera" layout="0,0,300,200" />
<LABEL id="antiText"/><BUTTON onClick="antiText.text=camera. antibanding()" />
camera의 antibanding 정보를 가져옵니다.
Related CAMERA.open(0), CAMERA.close(0)
[func] void close()
<CAMERA id="camera" layout="0,0,300,200" />
<BUTTON onClick="camera.close()" />
camera 구동을 종료하고 표시 화면을 닫습니다.
Related CAMERA.open(0)
[func] void open()
<CAMERA id="camera" layout="0,0,300,200" />
<BUTTON onClick="camera.open()" />
camera를 구동시키고 화면에 표시합니다.
Related CAMERA.close(0)
[func] string colorEffect()
<CAMERA id="camera" layout="0,0,300,200" />
<BUTTON onClick="camera.colorEffect())" />
camera의 colorEffect값을 가져옵니다.
Related CAMERA.open(0), CAMERA.close(0)
[func] string flashMode()
<CAMERA id="camera" layout="0,0,300,200" />
<BUTTON onClick="camera.flashMode())" />
camera의 flashMode값을 가져옵니다.
Related CAMERA.open(0), CAMERA.close(0)
[func] float focalLength()
<CAMERA id="camera" layout="0,0,300,200" />
<BUTTON onClick="camera.focalLength())" />
camera의 focalLength값을 가져옵니다.
Related CAMERA.open(0), CAMERA.close(0)
[func] string focusMode()
<CAMERA id="camera" layout="0,0,300,200" />
<BUTTON onClick="camera.focusMode())" />
camera의 focusMode값을 가져옵니다.
Related CAMERA.open(0), CAMERA.close(0)
[func] string horizontalViewAngle()
<CAMERA id="camera" layout="0,0,300,200" />
<BUTTON onClick="camera.horizontalViewAngle())" />
camera의 horizontalViewAngle값을 가져옵니다.
Related CAMERA.open(0), CAMERA.close(0)
[func] int jpegQuality()
<CAMERA id="camera" layout="0,0,300,200" />
<BUTTON onClick="camera.jpegQuality())" />
camera의 jpegQuality값을 가져옵니다.
Related CAMERA.open(0), CAMERA.close(0)
[func] int maxZoom()
<CAMERA id="camera" layout="0,0,300,200" />
<BUTTON onClick="camera.maxZoom())" />
camera의 maxZoom값을 가져옵니다.
Related CAMERA.open(0), CAMERA.close(0)
[func] int pictureFormat()
<CAMERA id="camera" layout="0,0,300,200" />
<BUTTON onClick="camera.pictureFormat())" />
camera의 pictureFormat값을 가져옵니다.
Related CAMERA.open(0), CAMERA.close(0)
[func] int previewFrameRate()
<CAMERA id="camera" layout="0,0,300,200" />
<BUTTON onClick="camera.previewFrameRate())" />
camera의 previewFrameRate(frames per second)값을 가져옵니다.
Related CAMERA.open(0), CAMERA.close(0)
[func] bool save()
<CAMERA id="camera" layout="0,0,300,200" savePath="sdcard/camera/save"/>
<BUTTON onClick="camera.save())" />
savePath attribute에 지정한 경로로 촬영한 이미지를 저장 하고 저장 성공 유무를 리턴 합니다.
savePath attribute 에 저장 경로가 설정되어 있는 경우에만 사진을 저장합니다.
Related CAMERA.savePath, CAMERA.takePicture(0)
[func] string sceneMode()
<CAMERA id="camera" layout="0,0,300,200" savePath="sdcard/camera/save"/>
<BUTTON onClick="camera.sceneMode())" />
camera의 sceneMode값을 가져옵니다.
Related CAMERA.open(0), CAMERA.close(0)
[func] void takePicture()
<CAMERA id="camera" layout="0,0,300,200" savePath="sdcard/camera/save"/>
<BUTTON onClick="camera.takePicture())" />
camera view에 보여지는 이미지를 capture합니다.
takePicture() 함수를 실행한다고 이미지가 바로 저장되지 않습니다. 저장을 원하시면 save()함수를 이용하세요.
Related CAMERA.open(0), CAMERA.close(0), CAMERA.save(0)
▹ CHART (dev)
<?xml version="1.0" encoding="utf-8"?>

<MOML>
   <UILAYOUT portrait="300,300" landscape="300,300">
       <CHART layout="0,0,300,300" type="bar3d" legend="legendTitle">
           <LEGENDLIST>
               <LEGEND title="Jan"/>
               <LEGEND title="Feb"/>
               <LEGEND title="Mar"/>
               <LEGEND title="Apr"/>
               <LEGEND title="May"/>
               <LEGEND title="Jun"/>
               <LEGEND title="Jul"/>
               <LEGEND title="Aug"/>
               <LEGEND title="Sep"/>
               <LEGEND title="Oct"/>
           </LEGENDLIST>
           <DATAGROUPLIST>
               <DATAGROUP>
                   <DATA value="100"/>
                   <DATA value="300"/>
                   <DATA value="200"/>
                   <DATA value="245"/>
                   <DATA value="200"/>
                   <DATA value="100"/>
                   <DATA value="240"/>
                   <DATA value="130"/>
                   <DATA value="220"/>
                   <DATA value="90"/>
               </DATAGROUP>
           </DATAGROUPLIST>
       </CHART>
   </UILAYOUT>
</MOML>
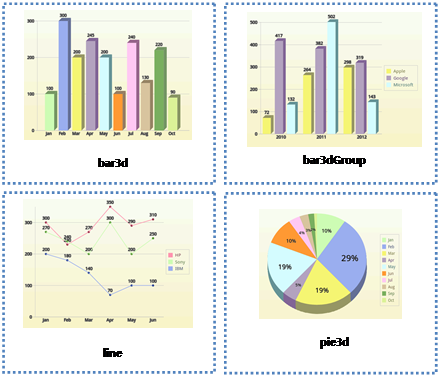
CHART는 데이터들을 다양한 그래프 형태로 도식화하여 보여주는 UI element입니다.
다음 그림은 CHART element 의 type attribute 에 설정 된 값에 따른 모습을 보여줍니다.
Inherited from WINDOW
Related
iOS:
CoreGraphics.framework
[attr] type
<CHART layout="0,0,300,300" type="bar3d" legend="legendTitle">
...
</CHART>
표시할 차트 유형
Values
"bar3d" | "bar3dGroup" | "line" | "pie3d", default : bar3dGroup
[attr] effect
효과를 선택합니다.
start는 처음 차트가 나타날 때 한번 효과를 줍니다.
redraw를 주면 주기적으로 start 효과를 반복합니다.
Values
"all | start | redraw | ambient | none", default : all
[attr] axis
축 표시 여부
Values
"true" | "false", default : true
[attr] legendAlign
축 표시 여부
auto인 경우 bar3d type은 none을 사용하며, bar3dGroup, line, pie3d type은 right 값을 사용합니다.
Values
"auto" | "none" | "right", default : auto
[attr] min
차트에 표시할 값의 범위 중 최소 값
막대 형태의 차트에서만 동작합니다.
Values
"auto" | "[float number]", default : 0
[attr] max
차트에 표시할 값의 범위 중 최대 값
막대 형태의 차트에서만 동작합니다.
Values
"auto" | "[float number]", default : auto
[attr] dataSource
<CHART id="B" layout="0,0,480,275" defaultImg1="#00ff00"
            type="line"
            legend="legendTitle"
            effect="start"
            axis="true"
            max="400"
            min="0"
            dataSource="{saveVariable.bloodGraphListData}" dataList="/DATA/LIST">
        <LEGENDLIST titlePath="ACT_DT/text()">
          <LEGEND title="" color="" />
        </LEGENDLIST>
        <DATAGROUPLIST>
          <DATAGROUP title="혈당" color="#ff0000" valuePath="BST_VAL/text()">
            <DATA value="0" />
          </DATAGROUP>
        </DATAGROUPLIST>
      </CHART>
차트에 표시할 데이터
Values
"[data xml string]" | "[url]"
[attr] dataList
dataSource에서 데이터 값들의 기준이 될 element 위치를 지정합니다.
xpath는 element의 위치를 지정하는 구문이어야 합니다.
Values
"[xpath list]"
[attr] LEGEND title
<CHART layout="0,0,300,300" type="bar3d" legend="legendTitle">
  <LEGENDLIST>
    <LEGEND title="Jan"/>
  </LEGENDLIST>
</CHART>
범례로 표시할 문자열
Values
"[string]"
[attr] LEGEND color
<CHART layout="0,0,300,300" type="bar3d" legend="legendTitle">
  <LEGENDLIST>
    <LEGEND title="Jan" color="green"/>
  </LEGENDLIST>
</CHART>
범례 색
Values
"[#RGB]" | "[#ARGB]" | "[#RRGGBB]" | "[#AARRGGBB]" | "[color name]"
[attr] DATAGROUP valuePath
값 경로
dataSouce의 dataList 위치에 대한 상대 위치입니다.
child element로 DATA의 value 값은 xpath의 값들을 순서대로 사용합니다.
Values
"[xpath text]"
[attr] DATAGROUP title
데이터 값들의 제목
Values
"[string]"
[attr] DATAGROUP color
데이터 값들의 제목
Values
"[#RGB]" | "[#ARGB]" | "[#RRGGBB]" | "[#AARRGGBB]" | "[color name]"
▹ CHECKBOX
<?xml version="1.0" encoding="utf-8"?>

<MOML>
  <UILAYOUT portrait="300,300" landscape="300,300">
    <WINDOW layout="0,0,300,300" align="linear:horizontal|center">
      <CHECKBOX layout="100,100" selected="true" text="Apple" />
      <CHECKBOX layout="100,100" text="Banana"/>
    </WINDOW>
  </UILAYOUT>
</MOML>
CHECKBOX는 선택 및 해제 상태를 갖는 UI element입니다. 주로 사용자로부터 각각의 옵션을 선택할 수 있도록 구성하는데 많이 사용합니다.
다음 그림은 platform 별로 CHECKBOX 모습을 보여줍니다.
| platform | 화면 |
|---|---|
| Android |  |
| iOS |  |
Inherited from BUTTON
[attr] checkedImg
<CHECKBOX layout="100,100" text="Apple" checkedImg="checked.png"/>
check된 이미지를 변경할 때 이미지의 url을 지정합니다.
Values
"[image url]"
[attr] selected
<CHECKBOX layout="100,100" text="Remember" selected="true"/>
선택 유무
Values
"true" | "false"
default : "false"
▹ CONTAINER
BUTTON을 눌렀을 때 main CONTAINER에 main.xml 파일을 로드 하는 예제입니다.
<?xml version="1.0" encoding="utf-8"?>

<MOML>
  <UILAYOUT portrait="300,300" landscape="300,300">
    <CONTAINER id="main" layout="0,0,300,200" />
    <BUTTON id="btn" layout="0,200,300,100" text="open main!"
      onClick="main.open('main.xml', 'main')" />
  </UILAYOUT>
</MOML>
CONTAINER는 어떤 한 화면을 이루는 UI element들의 집합입니다. 주로 UI XML file을 로드하여 사용하지만, 팝업 창이나 NAVIGATIONCONTAINER 의 VIEWITEM, LIST의 셀로 사용하기도 합니다.
CONTAINER 내에서 UI element들은 id로 구분하므로 unique 한 id를 가집니다.
MOMLView의 초기 상태는 id가 root이고 align이 relative인 CONTAINER 하나로 이루어져 있습니다. 최초로 로딩한 UI XML file은 이곳에 그려지게 됩니다.
다음 그림은 위 예제의 계층 구조를 시각적으로 보여줍니다.

Inherited from WINDOW
[attr] onLoad
CONTAINER가 로드될 때 처리할 script를 설정합니다.
Values
"[script code]"
[attr] src
CONTAINER에 main.xml 파일을 로드 하는 예제입니다.
<CONTAINER id="main" layout="0,0,300,300" src="main.xml" />
FUNCTION Script를 사용해 로드할 수도 있습니다.
<CMD cmd="main.src = 'main.xml'" />
UI xml text로 로드하는 예입니다.
<CMD cmd="xml = file.read('main.xml')" />
<CMD cmd="main.src = xml" />
로드 될 xml 정보
CONTAINER의 자식 UI element가 존재하는 상태에서 src를 지정하면 UI xml 파일이 로딩될 때 자식 element 들은 모두 지워집니다.
현재 CONTAINER의 align값이 로드할 UI xml의 기본 align으로 적용됨을 유의하십시오. CONTAINER의 align값과 UI xml 파일에서 가정한 align이 다르면 올바로 표시되지 않습니다.
CONTAINER.src 값으로 UI xml text 를 사용한 경우 로드된 UI element들의 documentUrl은 CONTAINER의 documentUrl과 id를 조합하여 생성합니다. 위의 ex 3)과 같은 경우 id가 "main"인 CONTAINER의 documentUrl이 "embed:/ui/start.xml"이라고 가정한다면, CONTAINER에 로딩한 UI element들의 documentUrl은 "embed:/ui/start.xml#main.src"가 됩니다.
Values
"[url path]" | "[UI xml text]"
Related CONTAINER.open(2)
FUNC: void clear()
<CONTAINER id="main" layout="0,0,300,200" />
<BUTTON onClick="main.clear()" />
container 내 자식 element 들을 모두 지웁니다.
Related CONTAINER.close(0)
[func] void close()
<CONTAINER id="main" layout="0,0,300,200" />
<BUTTON onClick="main.close()" />
container 자신을 부모로부터 지웁니다. 자식 element 들도 같이 지워집니다.
close가 호출되면 함수도 같이 지워지며, 해당 container의 element를 caller나 parent로 참조하고 있던 모든 함수 실행이 불가능하게 됩니다. 필요한 모든 작업을 마친 후 close를 마지막에 호출하십시오.
해당 container의 delay를 사용한 함수 역시 close 호출 후에는 동작하지 않습니다. delay 함수를 다른 document에 선언한 후 WINDOW.runScript(1)을 사용하여 caller 를 변경한 후 호출해야 합니다. (WINDOW.runScript(1)의 Example을 참고하십시오.)
Related CONTAINER.clear(0)
[func] bool isExist(id)
id를 갖는 UI element가 존재하는지를 리턴합니다.
id는 절대 경로 id(fullId)와 상대 경로 id 모두 사용 가능합니다.
상대 경로 id인 경우 현재 CONTAINER를 parent로 간주하므로 현재 CONTAINER의 자식부터 검색됩니다.
| Parameter | Type | 설명 |
|---|---|---|
| id | "[identifier]" | UI element의 id |
Related
[func] void open(url, target)
id 가 info 인 CONTAINER에 info.xml 파일을 로드 하는 예제입니다.
<CMD cmd="root.open('info.xml', 'info')" />
해당 target container에 url에 해당하는 UI xml 파일을 로드합니다.
target으로 상대 위치를 지정한 경우 parent와 caller를 현재 open함수를 호출한 CONTAINER로 간주하고 target CONTAINER를 찾습니다.
target이 존재하지 않는 경우는 자동으로 생성합니다.
| Parameter | Type | 설명 |
|---|---|---|
| url | "[url path]" ⎮ "[UI xml text]" | 로드할 UI xml의 위치 |
| target | "[identifier]" | 로드 될 CONTAINER의 id |
Related CONTAINER.src
▹ COVERFLOW (dev)
<?xml version="1.0" encoding="utf-8"?>

<MOML>
   <UILAYOUT portrait="300,300" landscape="300,300">
       <COVERFLOW id="obj1" layout="0,0,300,200" text="CoverFlow" defaultImg="#000000" dataSource="data.xml" dataList="/IMAGELIST/ITEM" imagePath="./@src" titlePath="./@name" shadow="mirror" onClick="{label.text=xpath.evaluate('./@name') + obj1.index}" onChange="{label.text=xpath.evaluate('./@name') + obj1.index}" />
       <LABEL id ="label" text="CoverFlow Label" layout="0,200,300,50" defaultImg="#ffffff" />
   </UILAYOUT>
</MOML>
data.xml file
<?xml version="1.0" encoding="UTF-8"?>

<IMAGELIST>
   <ITEM src="img/apple.png" name="Apple"/>
   <ITEM src="img/bear.png" name="Bear"/>
   <ITEM src="img/cat.png" name="Cat"/>
</IMAGELIST>
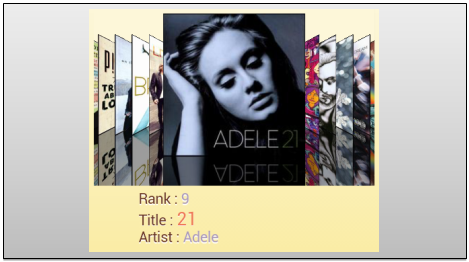
여러 이미지를 보여줄 때 선택된 이미지를 중앙에 배치하고 나머지 이미지들을 좌우로 중앙쪽으로 기울여서 배치하여 보여줍니다. 좌우로 이미지 목록들을 스크롤하여 중앙에 배치할 이미지를 선택할 수 있습니다.
defaultImg 속성의 기본값은 "#000000"(black)입니다. 이는 Android OpenGL surface와의 호환성을 위한 것입니다.
추가적인 사항은 zOrderTop 속성을 참고하십시오.
다음 그림은 COVERFLOW 실행 화면 입니다.
Inherited from WINDOW
[attr] dataSource
사용할 datasource 주소 또는 xml 데이터
Values
"[datasource url]" | "[xml code]"
[attr] dataList
dataSource XML 내에서 이미지 목록이 위치한 위치에 대한 xpath 표현식
Values
"[element list node xpath]"
[attr] imagePath
dataList의 위치를 기준으로 이미지의 url 값에 대한 xpath 표현식
Values
"[value xpath]"
[attr] index
중앙에 위치한 이미지의 index
Values
"[number]", default: "0"
[attr] onChange
이미지 목록이 이동되어 중앙에 위치한 이미지가 바뀔 때 실행할 script를 지정합니다.
Values
"[script]"
[attr] onClick
중앙에 위치한 이미지를 선택했을 때 실행할 script를 지정합니다.
Values
"[script]"
[attr] coverScale
중앙에 위치한 이미지를 선택했을 때 실행할 script를 지정합니다.
크기값은 좌우에 위치한 이미지들의 크기 차이를 나타내며 화면 전체 크기를 100으로 본 상대값입니다.
크기값을 0으로 하면 좌우에 위치한 이미지와 같은 크기를 갖습니다.
크기값을 100으로 하면 컨트롤 영역 전체를 완전히 채웁니다.
Values
"[0-100]", default:50
[attr] scaleType
이미지 채움 방식
fit은 가로 세로 크기를 유지하면서 이미지 크기를 cover에 맞게 조절합니다.
fill은 이미지를 cover에 가득 채움니다.
Values
"fit" | "fill", default: fit
[attr] shadow
그림자 형태
Values
"none" | "normal" | "mirror", default: none
[attr] zOrderTop
zOrder을 최상위로 변경하여 투명 배경색이 동작하도록 합니다.
Android 의 OpenGL surface 의 특성상 zOrder가 최상위인 경우에만 배경 투명 처리가 가능합니다.
이 속성을 사용하게 되면 일반적인 WINDOW의 부모 자식간의 포함 구조에 의한 zOrder처리가 무시되므로 다른 WINDOW가 위에 올 수 없습니다.
iOS에서는 이 속성은 의미가 없으며 일반적인 WINDOW와 마찬가지로 배경 투명 처리가 항상 동작합니다.
Values
"true" | "false"
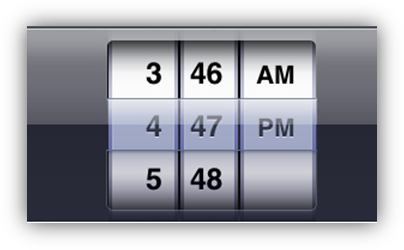
▹ DATETIMEPICKER
<?xml version="1.0" encoding="utf-8"?>

<MOML>
   <UILAYOUT portrait="320,480">
       <WINDOW layout="0,0,320,480"  align="linear:vertical">
             <DATETIMEPICKER id="datePik" layout="320,150" type="date"/>
       </WINDOW>
   </UILAYOUT>
</MOML>
DATETIMEPICKER 는 날짜, 시간을 설정할 수 있는 화면을 보여주는 picker UI element입니다.
다음 그림은 platform 별로 type에 따른 DATATIMEPICKER 모습을 보여줍니다.
| Android type="date" | iOS type="date" |
|---|---|
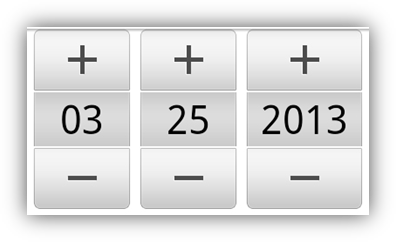 |
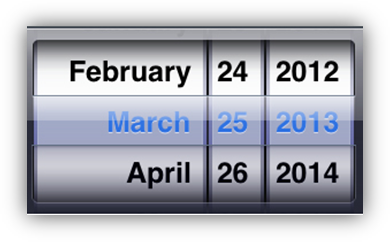 |
| Android type="time" | iOS type="time" |
|---|---|
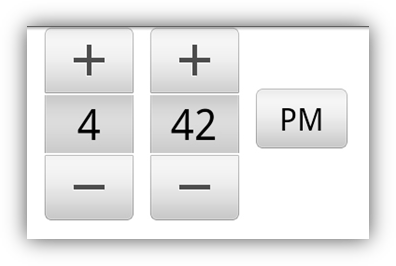 |
 |
Inherited from WINDOW
[attr] ampm
<DATETIMEPICKER id="datePik" layout="320,150" type="time" ampm="am" hour="11"/>
12시간 기준으로 오전(am) 오후(pm)를 지정해 줍니다.
type attribute가 time일 경우에만 쓰이는 속성입니다.
Values
"am" | "pm", default : "[current time]"
[attr] day
<DATETIMEPICKER id="datePik" layout="320,150" type="date" day="24"/>
date picker에 표시될 날/일을 지정합니다.
type attribute가 date일 경우에만 쓰이는 속성입니다.
Values
"[number]", default : "[current time]"
[attr] hour
<DATETIMEPICKER id="datePik" layout="320,150" type="time" ampm="am" hour="08"/>
time picker에 표시될 시간을 지정합니다.
type attribute가 time일 경우에만 쓰이는 속성입니다.
Values
"[number]", default : "[current time]"
[attr] minute
<DATETIMEPICKER id="datePik" layout="320,150" type="time" ampm="am" minute="58"/>
time picker에 표시될 시간을 지정합니다.
type attribute가 time일 경우에만 쓰이는 속성입니다.
Values
"[number]", default : "[current time]"
[attr] month
<DATETIMEPICKER id="datePik" layout="320,150" type="date" month="3"/>
date picker에 표시될 월을 지정합니다.
type attribute가 date일 경우에만 쓰이는 속성입니다.
Values
"[number]", default : "[current time]"
[attr] type
<DATETIMEPICKER id="datePik" layout="320,150" type="date" />
dateTime picker에 표시될 picker type을 지정합니다.
Values
"date" | "time" | "datetime", default : "date"
"date"=datePicker, "time"=timePicker, "datetime"=dateTimePicker
"datetime"은 iOS만 지원 가능한 type입니다.
[attr] year
<DATETIMEPICKER id="datePik" layout="320,150" type="date" year="2013"/>
date picker에 표시될 년도를 지정합니다.
type attribute가 date일 경우에만 쓰이는 속성입니다.
Values
"[number]", default : "[current time]"
[func] void setDate()
<DATETIMEPICKER id="datePik" layout="320,150" type="date"/>
<BUTTON onClick="datePik.year=2013, ditePik.month=3, datePik.day=25, datePik.setDate()" />
date picker를 지정한 year, month, day attribute로 다시 보여줍니다.
type attribute가 date일 경우에만 쓰이는 function입니다.
Related DATETIMEPICKER.type, DATETIMEPICKER.year, DATETIMEPICKER.month, DATETIMEPICKER.day
[func] void setDate(year, month, day)
<DATETIMEPICKER id="datePik" layout="320,150" type="date"/>
<BUTTON onClick="datePik.setDate(2013, 3, 25)" />
date picker를 지정한 year, month, day parameter로 다시 보여줍니다.
type attribute가 date일 경우에만 쓰이는 function입니다.
| Parameter | Type | 설명 |
|---|---|---|
| year | "[number]" | |
| month | "[number]" | |
| day | "[number]" |
Related DATETIMEPICKER.type
[func] void setTime()
<DATETIMEPICKER id="datePik" layout="320,150" type="time"/>
<BUTTON onClick="datePik.ampm='am', ditePik.hour=11, datePik.minute=25, datePik.setTime(}" />
time picker를 지정한 ampm, hour, minute attribute로 다시 보여줍니다.
type attribute가 time일 경우에만 쓰이는 function입니다.
Related DATETIMEPICKER.type, DATETIMEPICKER.ampm, DATETIMEPICKER.hour, DATETIMEPICKER.minute
[func] void setTime(ampm, hour, minute)
<DATETIMEPICKER id="datePik" layout="320,150" type="time"/>
<BUTTON onClick="datePik.setDate('am', 11, 25)" />
date picker를 지정한 ampm, hour, minute parameter로 다시 보여줍니다.
type attribute가 time일 경우에만 쓰이는 function입니다.
| Parameter | Type | 설명 |
|---|---|---|
| ampm | "am" or "pm" | |
| hour | "[number]" | |
| minute | "[number]" |
Related DATETIMEPICKER.type
▹ EDIT
<?xml version="1.0" encoding="utf-8"?>

<MOML version="1.0.2">
  <EDIT fontColor="#ff0000ff" fontSize="15" fontStyle="bold" />
</MOML>
사용자가 직접 문자를 입력하고 수정할 수 있는 UI element입니다.
| Camera closed UI | Camera opened UI |
|---|---|
|
|
Inherited from LABEL
[attr] focused
<EDIT focused="true"/>
포커스 유무
Values
"true" | "false"
[attr] keyboardMargin
<EDIT layout="200,30" keyboardMargin="60" />
입력 키패드가 나타날 때 EDIT 사이의 여백
keyboardMargin을 설정하지 않은 경우 키패드가 나타나면 EDIT가 키패드 바로 위에 위치하도록 화면 전체를 스크롤합니다.
keyboardMargin 값이 EDIT 아래 남아 있는 화면 영역보다 크면 화면의 끝까지만 스크롤합니다.
Values
"true" | "false"
[attr] onReturnKey
<EDIT returnKeyType="search" onReturnKey="function.search(caller.text)"/>
입력기 키패드의 return 키를 눌렀을 때 이벤트 처리
Values
"[script code]"
[attr] placeholder
<EDIT placeholder="input your id"/>
미 입력 상태일 때 표시할 글자 설정
Values
"[scripted text]"
[attr] placeholderColor
<EDIT placeholder="input your id" placeholderColor="#80808080"/>
placeholder 글자의 색상을 설정
Values
"[#RGB]" | "[#ARGB]" | "[#RRGGBB]" | "[#AARRGGBB]" | "[color name]"
[attr] returnKeyType
<EDIT returnKeyType="search" onReturnKey=" function.search(caller.text)"/>
입력 키패드의 return 키 종류
Values
"default" | "done" | "go" | "search" | "send" | "next", default : "default"
[attr] textFormat
<EDIT textFormat="text"/>
LABEL.textFormat 참조.
▹ FRAMEANIMATION
<?xml version="1.0" encoding="utf-8"?>

<MOML>
   <UILAYOUT portrait="300,270" landscape="300,270">
       <FRAMEANIMATION layout="10,10,280,200" repeat="true" >
           <ITEM src="embed:/img/bg1.png" duration="100" />
           <ITEM src="embed:/img/bg2.png" duration="100" />
           <ITEM src="embed:/img/bg3.png" duration="100" />
           <ITEM src="embed:/img/bg4.png" duration="100" />
           <ITEM src="embed:/img/bg5.png" duration="100" />
           <ITEM src="embed:/img/bg6.png" duration="100" />
       </FRAMEANIMATION>
   </UILAYOUT>
</MOML>
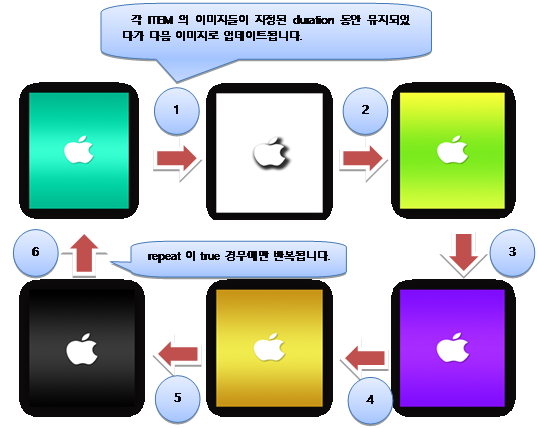
FRAMEANIMATION은 여러 개의 이미지를 지정하여 마치 애니메이션 GIF 이미지와 같은 효과를 보여주는 UI element입니다.
다음 그림은 예제에서 FRAMEANIMATION 동작 방법을 도식화 하였습니다.
Inherited from WINDOW
[attr] autoStart
<FRAMEANIMATION layout="10,10,280,200" autoStart="false" />
frame animation 자동 시작 여부
Values
"true" | "false", default : true
[attr] duration
<FRAMEANIMATION layout="10,10,280,200" duration="100" />
frame(이미지) 당 시간 간격의 기본값을 지정해 줍니다.
FRAMEANIMATION.druration은 모든 frame(이미지)에 동일한 시간 간격을 지정할 경우 유용합니다.
FRAMEANIMATION.duration 은 자식 ITEM의 duration 값이 존재하지 않는 frame(이미지)애 대해서만 사용되므로 자식 ITEM의 duration이 존재하지 않았을 때의 기본값을 지정하는 용도로 사용할 수 있습니다.
Values
"[milliseconds]", default : 100
[attr] first
src 파일에 사용할 인덱스의 시작 번호
Values
"[number]"
Related FRAMEANIMATION.last, FRAMEANIMATION.src
[attr] last
src 파일에 사용할 인덱스의 마지막 번호
Values
"[number]"
Related FRAMEANIMATION.first, FRAMEANIMATION.src
[attr] repeat
<FRAMEANIMATION layout="10,10,280,200" repeat="true" />
frame animation 반복 여부를 지정해 줍니다.
Values
"true" | "false", default : false
[attr] src
<FRAMEANIMATION layout="10,10,280,200" src="/res/frame%02d.png" first="1" last="15"/>
이미지 파일 이름의 형식을 설정합니다.
src에는 string.format처럼 %d 형식으로 인덱스를 전달하여 실제 파일이름을 구합니다.
파일 이름이 "001"처럼 앞에 0이 붙고 자리수가 정해진 경우는 "%03d"와 같은 형식을 사용할 수 있습니다.
src 속성이 있는 경우 자식 ITEM은 모두 무시됩니다.
frame(이미지) 별로 duration이나 파일 이름이 크게 다를 때는 FRAMEANIMATION/ITEM을 사용하십시오.
Values
"[format string]"
Related FRAMEANIMATION.first, FRAMEANIMATION.last
[func] void start()
<FRAMEANIMATION id="frameAni" layout="10,10,280,200" repeat="true" >
   <ITEM src="embed:/img/bg1.png" duration="100" />
   <ITEM src="embed:/img/bg2.png" duration="100" />
</FRAMEANIMATION>

<BUTTON onClick="frameAni.start()" />
frame animation을 시작합니다.
Related FrameAnimation.stop(0)
[func] void stop()
<FRAMEANIMATION id="frameAni" layout="10,10,280,200" repeat="true" >
   <ITEM src="embed:/img/bg1.png" duration="100" />
   <ITEM src="embed:/img/bg2.png" duration="100" />
</FRAMEANIMATION>

<BUTTON onClick="frameAni.stop()" />
frame animation을 멈추고 첫번째 frame(이미지)를 표시합니다.
Related FrameAnimation.start(0)
[attr] ITEM duration
<FRAMEANIMATION layout="10,10,280,200" repeat="true" >
   <ITEM src="embed:/img/bg1.png" duration="100" />
   <ITEM src="embed:/img/bg2.png" duration="100" />
</FRAMEANIMATION>
frame(이미지) 당 시간 간격을 지정해 줍니다.
Values
"[milliseconds]"
[attr] ITEM src
<FRAMEANIMATION layout="10,10,280,200" repeat="true" >
   <ITEM src="embed:/img/bg1.png" duration="100" />
   <ITEM src="embed:/img/bg2.png" duration="100" />
</FRAMEANIMATION>
이미지 file이 있는 경로 또는 색상을 지정해 줍니다.
Values
"[#RGB]" | "[#ARGB]" | "[#RRGGBB]" | "[#AARRGGBB]" | "[color name]" | "[image url]"
▹ GALLERY(dev)
<?xml version="1.0" encoding="utf-8"?>

<MOML>
   <UILAYOUT portrait="300,300" landscape="300,300">
       <GALLERY id="obj1" layout="0,0,300,200" text="CoverFlow" defaultImg="#000000" dataSource="data.xml" dataList="/IMAGELIST/ITEM" imagePath="./@src" titlePath="./@name" previewStyle="dot" playDuration="1" onClick="{label.text=xpath.evaluate('./@name') + obj1.index}" onChange="{label.text=xpath.evaluate('./@name') + obj1.index}" />
       <LABEL id ="label" text="CoverFlow Label" layout="0,200,300,50" defaultImg="#ffffff" />
   </UILAYOUT>
</MOML>
data.xml
<?xml version="1.0" encoding="UTF-8"?>

<IMAGELIST>
   <ITEM src="img/apple.png" name="Apple"/>
   <ITEM src="img/bear.png" name="Bear"/>
   <ITEM src="img/cat.png" name="Cat"/>
</IMAGELIST>
여러 이미지를 보여줄 때 이미지를 좌우로 드래그하여 이전이다 다음 이미지로 이동할 수 있습니다. 화면 하단에 thumbnail 형식으로 미리보기를 제공할 수 있습니다.
Inherited from WINDOW
[attr] dataSource
사용할 datasource 주소 또는 xml 데이터
Values
"[datasource url]" | "[xml code]"
[attr] dataList
dataSource XML 내에서 이미지 목록이 위치한 위치에 대한 xpath 표현식
Values
"[element list node xpath]"
[attr] imagePath
dataList의 위치를 기준으로 이미지의 url 값에 대한 xpath 표현식
Values
"[value xpath]"
[attr] index
현재 이미지의 index
Values
"[number]", default: "0"
[attr] onChange
이미지 목록이 이동되어 현재 보이는 이미지가 바뀔 때 실행할 script를 지정합니다.
Values
"[script]"
[attr] onClick
현재 이미지를 클릭했을 때 실행할 script를 지정합니다.
Values
"[script]"
[attr] previewType
미리보기 표시 방식
Values
"none" | "dot" | "thumbnail"
[attr] scaleType
이미지 채움 방식
fit은 가로 세로 크기를 유지하면서 이미지 크기를 개체 크기에 맞게 조절합니다.
fitTop은 fit과 동일하지만 위쪽에 정렬합니다.
fill은 이미지를 개체 크기만큼 가득 채웁니다.
Values
"fit" | "fitTop" | fill" | "zoom", default: fit
▹ IMAGE
<?xml version="1.0" encoding="UTF-8"?>

<MOML version="1.1.4">
   <UILAYOUT portrait="300,300" landscape="300,300">
       <WINDOW layout="0,0, 300,300" align="linear:vertical|center">
           <IMAGE layout="100,50" defaultImg="#ffff00"/>
           <IMAGE layout="100,50" defaultImg="embed:/image/flower.png"/>
           <IMAGE layout="100,50" defaultImg="http://mospi.org/image/tree.png"/>
           <IMAGE layout="100,50" defaultImg="storage:image/butterfly.png"/>
       </WINDOW>
  </UILAYOUT>
</MOML>
IMAGE는 그림을 표시해주는 UI element입니다.
색상([#RGB], [#ARGB], [#RRGGBB], [#AARRGGBB], [color name])을 지정하거나, 내장이미지(embed:~), 웹이미지(http:~, https:~), 외장이미지(storage:~) 파일들을 사용할 수 있습니다.
layout width 나 height 값이 auto인 경우 경우 실제 이미지의 pixel 크기를 사용합니다.
Inherited from WINDOW
▹ LABEL
<?xml version="1.0" encoding="UTF-8"?>

<MOML version="1.1.4">
   <UILAYOUT portrait="320,460" landscape="320,460">
      <WINDOW layout="0,0,320,460" defaultImg="#000000" align="linear:vertical|center">
         <LABEL layout="150,50" text="Hello MosPi!" fontColor="#0000ff" textAlign="center" fontSize="20" defaultImg="#ffffff"/>
      </WINDOW>
   </UILAYOUT>
</MOML>
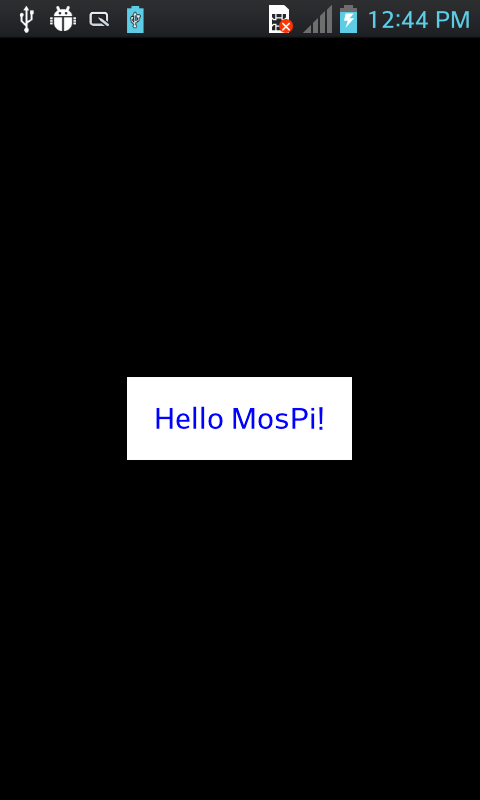
LABEL은 글자를 표시하는 UI element입니다.
예제의 실행 화면입니다.
Inherited from WINDOW
[attr] ellipsis
<LABEL layout="50,20" text="This is sample!" ellipsis="none" minFontSize="0" />

<LABEL layout="50,20" text="This is sample!" ellipsis="start" minFontSize="0" />

<LABEL layout="50,20" text="This is sample!" ellipsis="middle" minFontSize="0" />

<LABEL layout="50,20" text="This is sample!" ellipsis="end" minFontSize="0" />

LABEL 의 영역보다 글자 길이가 길 때의 생략 표시 방법을 결정합니다.
ellipsis 속성은 글자 크기를 LABEL.minFontSize로 줄인 이후에 동작합니다. 만약 글자 크기를 변경하고 싶지 않다면 minFontSize="0"을 사용하십시오.
Values
"none" | "start" | "middle" | "end", default : end
Related LABEL.minFontSize
[attr] fontFace
<LABEL fontFace="embed:/font/chopinScript.ttf|Snell Roundhand|serif" text="custom font" />
LABEL 의 글자 글꼴
"|" 를 사용하여 여러 글꼴을 나열하면 앞에서부터 순서대로 검색하여 사용가능한 글꼴을 사용합니다.
글꼴은 True type font(*.ttf)파일을 바로 사용하거나 시스템이 지원하는 글꼴 명을 사용할 수 있습니다.
Android system font : "default", "serif", "sans-serif", "monospace"
iOS system font : http://support.apple.com/kb/HT4980
같은 TTF 글꼴을 사용하더라도 OS에 따라 글꼴을 해석하는 방법이 다르므로 글꼴에 따라 다르게 보일 수 있습니다.
글꼴 내 OS/2 matrix 정보가 올바르지 않은 경우 iOS에서는 글꼴의 상단이나 하단이 잘리게 됩니다.
Values
"[font file name.ttf] | [system font name] | ..."
[attr] fontSize
<LABEL text="This is sample!" fontSize="20" />
LABEL 의 글자 크기
moml value, cm, in, px, pt 단위를 지원합니다.
Values
"[font size]", default : 14
[attr] fontStyle
<LABEL text="This is sample!" fontStyle="italic" />
LABEL 의 글자 스타일
| font style 유형 | 설명 |
|---|---|
| normal | 보통 |
| bold | 굵게 |
| italic | 기울임 |
| underline | 밑줄 |
Values
"normal" | "bold" | "italic" | "underline", default : "normal"
[attr] minFontSize
<LABEL text="This is sample!" minFontSize="14" />
LABEL 의 글자 최소 사이즈
0 이하일 경우 사이즈를 줄이지 않고 fontSize와 동일한 값을 사용함을 의미하며 moml value, cm, in, px, pt 단위를 지원합니다.
Values
"[font size]", default : "14px"
[attr] multiLine
<LABEL text="This is sample!" multiLine="true" />
LABEL 의 text 글자 multiLine 사용 유무
multiLine 속성이 true 일 경우, LABEL 의 영역보다 글자가 길면 다음 라인으로 자동 개행 되어 표시됩니다.
"auto"인 경우 text에 줄바꿈 문자("\n")가 포함되어 있거나 layout으로 지정한 높이가 글자 크기보다 3배 이상 크면 "true"로 간주합니다.
Values
"true" | "false" | "auto", default : "auto"
[attr] pressedTextColor
<LABEL text="This is sample!" pressedTextColor="#ff0000" />
눌린 상태에서의 글자 색상
Values
"[#RGB]" | "[#ARGB]" | "[#RRGGBB]" | "[#AARRGGBB]" | "[color name]"
[attr] text
<LABEL text="This is sample!" pressedTextColor="#ff0000" />
LABEL 의 text 글자
Values
"[scripted text]"
[attr] textAlign
<LABEL text="This is sample!" textAlign="center" />
LABEL 의 text 글자 정렬 방법
| textAlign 유형 | 설명 |
|---|---|
| left | 왼쪽 |
| right | 오른쪽 |
| top | 위 |
| bottom | 아래 |
| center | 가운데 (vCenter |
| vCenter | 수직가운데 |
| hCenter | 수평가운데 |
Values
"[left | right | top | bottom | center | vCenter | hCenter]", default : "top | left"
[attr] textColor
<LABEL text="This is sample!" textColor="#ff0000" />
LABEL 의 글자 색상
Values
"[#RGB]" | "[#ARGB]" | "[#RRGGBB]" | "[#AARRGGBB]" | "[color name]"
[attr] textFormat
<LABEL textFormat="password" />
입력 및 출력할 글자 형식을 지정합니다. 지정한 형식에 따라 키패드의 출력 형태가 결정됩니다.
입력이나 키패드와 관련된 textFormat type들은 EDIT를 위한 것입니다. LABEL에서는 표시 속성만 유효합니다.
| textFormat 유형 | 설명 |
|---|---|
| 이메일을 입력받음 | |
| none | 포멧 지정하지 않음(기본값) |
| number | 숫자를 입력받음 |
| numberPassword | 숫자를 입력받고 입력된 문자를 암호문자로 표시 |
| password, textPassword | 일반적인 문자를 입력받고 입력된 문자를 암호문자(***)로 표시 |
| phone | 전화 숫자를 입력받음 |
| text | 일반적인 문자를 입력받음 |
| textCapCharacters | 입력된 모든 문자를 대문자로 표시 |
| textCapWords | 입력된 단어의 모든 첫 문자만 대문자로 표시 |
| url | 웹 주소를 입력받음 |
Values
"password" | "number" | ... | "textCapWords", default: "none"
[attr] textShadow
<LABEL text="This is sample!" defaultImg="#ffffff" textColor="#000000" textShadow="#0000ff" />

LABEL 의 글자 그림자 효과
Values
"[#RGB]" | "[#ARGB]" | "[#RRGGBB]" | "[#AARRGGBB]" | "[color name]"
▹ LIST
listData.xml
<?xml version="1.0" encoding="UTF-8"?>

<DATA>
    <ITEM group="1">
        <NAME>John</NAME>
    </ITEM>
    <ITEM group="2">
        <NAME>Tom</NAME>
    </ITEM>
    <ITEM group="1">
        <NAME>Jane</NAME>
    </ITEM>
</DATA>
listUi.xml
<?xml version="1.0" encoding="UTF-8"?>

<MOML version="1.1.4">
    <UILAYOUT portrait="320,300" landscape="320,300" >
        <WINDOW layout="0,0,320,300" >
            <LIST id="list" layout="320,300" dataSource="listData.xml" dataList="/DATA/ITEM" >
                <LISTLAYOUT condition="xpath.evaluate('./@group')=='1'">
                    <LABEL layout="0,0,320,80" defaultImg="g1_bg.png" text="{xpath.evaluate('./NAME/text()')}" />
                </LISTLAYOUT>
                <LISTLAYOUT condition="xpath.evaluate('./@group')=='2'">
                    <LABEL layout="0,0,320,80" defaultImg="g2_bg.png"  text="{xpath.evaluate('./NAME/text()')}" />
                </LISTLAYOUT>
            </LIST>
        </WINDOW>
    </UILAYOUT>
</MOML>
LIST는 수직 스크롤이 되는 리스트에 여러 아이템목록을 보여주는 UI element입니다.
리스트 내 표시되는 각각의 아이템은 독립적인 CONTAINER를 각각 생성하여 LISTLAYOUT에서 정의한대로 UI 를 구성합니다.
리스트 아이템에서 필요한 데이터는 xpath를 사용하여 지정할 수 있습니다. xpath 관하여는 해당object api 설명을 참고하시기 바랍니다.
Inherited from WINDOW
[attr] bounce
<LIST dataSource="listData.xml" dataList="/DATA/ITEM" bounce="false" >
...
</LIST>
LIST를 끝까지 스크롤 했을 때 나타나는 bounce 효과를 설정합니다.
Values
"true" | "false", default: "true"
[attr] dataList
<LIST dataSource="listData.xml" dataList="/DATA/ITEM" >
...
</LIST>
LIST에 아이템으로 출력할 기준 Path
Values
"true" | "false", default: "true"
[attr] dataSource
<LIST dataSource="listData.xml" dataList="/DATA/ITEM" >
...
</LIST>
LIST에서 사용할 datasource 주소 또는 xml 데이터
dateSource를 변경하면 LIST를 재구성하여 출력합니다.
Values
"[datasource address]" | "[xml code]"
[func] int dataSourceCount()
<LIST id="list" ... />
<LABEL text="{list.dataSourceCount()}" />
아이템 개수
[func] string dataSourceId()
<LIST id="list" ... />
<LABEL text="{list.dataSourceId()}" />
datasource id
[func] items[index]
<CMD cmd="list.items[0].name.text = 'Tom'" >
...
<LIST id="list" layout="320,300" dataSource="listData.xml" dataList="/DATA/ITEM" >
    <LISTLAYOUT>
       <LABEL id="name" layout="0,0,320,80" defaultImg="g1_bg.png" text="{xpath.evaluate('./NAME/text()')}" />
    </LISTLAYOUT>
</LIST>
LIST에 각 ITEM에 해당하는 CONTAINER를 접근
[attr] LISTLAYOUT condition
<LIST id="list" layout="320,300" dataSource="listData.xml" dataList="/DATA/ITEM" >
   <LISTLAYOUT condition="xpath.evaluate('./@group')=='1'">
       <LABEL layout="0,0,320,80" defaultImg="g1_bg.png" text="{xpath.evaluate('./NAME/text()')}" />
   </LISTLAYOUT>
   <LISTLAYOUT condition="xpath.evaluate('./@group')=='2'">
       <LABEL layout="0,0,320,80" defaultImg="g2_bg.png"  text="{xpath.evaluate('./NAME/text()')}" />
   </LISTLAYOUT>
</LIST>
조건에 따라 LIST에 출력할 UI를 변경할 경우 필요한 조건을 설정합니다.
Values
"[script]"
▹ LIST2
LIST와 동일하지만 셀을 재사용합니다.
Inherited from LIST
▹ MAPVIEW
mapview.xml
<?xml version="1.0" encoding="UTF-8"?>

<MOML version="1.0">
  <UILAYOUT portrait="320,300" landscape="320,300">
    <MAPVIEW id="mapview" layout="0,0,320,300" mapkey="keyValue"
           mapType="default" dataSource="mapViewData.xml" dataList="/MAPDATA/MARKERITEM"
           myLocation="default" moveIndex="1"
           latitudePath="./@lat" longitudePath="./@lon"
           titlePath="./@title" snippetPath="./@snippet" imagePath="./@markerImg"/>
  </UILAYOUT>
</MOML>
mapviewdata.xml
<?xml version="1.0" encoding="utf-8"?>

<MAPDATA>
   <MARKERITEM lat="37.456736770757715" lon="127.16634035110474"
    title="1호점" snippet="서울시 강남점" markerImg="image/flag-2.png"/>
   <MARKERITEM lat="37.51622769566558" lon="127.0201063156128"
    title="2호점" snippet="서울시 역삼점" markerImg="image/flag-blue.png"/>
</MAPDATA>
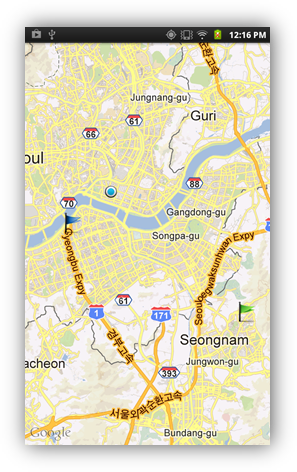
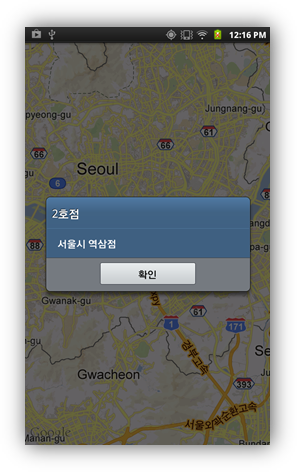
MAPVIEW는 사용자에게 지도 화면을 보여주는 UI element입니다.
예제로 만든 실행화면입니다. 깃발 이미지를 클릭했을 때 알림 창이 뜨게 됩니다.
Google Maps Android v2 API
- API 키 획득을 위해서는 Google APIs console에 project를 등록하고, 앱에 대해 서명된 인증을 얻어야 합니다.
- AndroidManifest.xml 의 application 태그 안에
<meta-data>를 선언합니다. <meta-data android:name="com.google.android.maps.v2.API_KEY" android:value="AIzaSyBdVl-cTICSwYKrZ95SuvNw7dbMuDt1KG0"/>- AndroidManifest.xml 의 application 태그 안에
<uses-library android:name="com.google.android.maps" />를 선언합니다. - MOMLFragmentActivity 를 상속 받습니다.
Google Maps Android v1 API (deprecated)
- google map 키 발급 (mapKey attribute 설정 시 사용됩니다.)
- Google APIs Project 생성
- AndroidManifest.xml 의 application 태그 안에
<uses-library android:name="com.google.android.maps" />를 선언합니다. - MOMLMapActivity 를 상속 받습니다.
- google map 키 발급 (mapKey attribute 설정 시 사용됩니다.)
Inherited from WINDOW
Related
Android:
<uses-library android:name="com.google.android.maps" />
iOS:
MapKit.framework
[attr] center
맵의 중앙 위치 (위도, 경도)
Values
"[-90~90], [-180~180]"
[attr] centerLatitude
맵의 중앙 위치 - 위도
Values
"[-90~90]"
[attr] centerLongitude
맵의 중앙 위치 – 경도
Values
"[-180~180]"
[attr] dataList
dataSource에서 마커 목록 xpath
Values
"[item list xpath]"
[attr] dataSource
마커 목록으로 사용할 datasource 주소 또는 xml 데이터
Values
"[datasource address]" | "[xml code]"
[attr] latitudePath
dataList에서 마커의 위도 값의 상대 xpath
Values
"[relative xpath]"
[attr] longitudePath
dataList에서 마커의 경도 값의 상대 xpath
Values
"[relative xpath]"
[attr] mapType
맵 화면 보기 종류
| mapType 유형 | 설명 |
|---|---|
| default | 일반 도로 지도 |
| satellite | 위성 촬영 이미지 지도 |
| default ⎮ satellite | 위성 촬영 이미지 지도 위에 도로를 표시합니다. |
Values
"default" | "satellite" | "default|satellite", default: "default"
[attr] snippetPath
dataList에서 마커의 부가 정보 값의 상대 xpath
Values
"[relative xpath]"
[attr] titlePath
dataList에서 마커의 제목 값의 상대 xpath
Values
"[relative xpath]"
[attr] zoomLevel
확대 단계
Values
"[number]"
[func] String addMarker(latitude, longitude, title, snippet, image)
지도에 마커를 추가하고 마커의 id를 리턴합니다/
| Parameter | Type | 설명 |
|---|---|---|
| latitude | "[-90~90]" | 위도 |
| longitude | "[-180~180]" | 경도 |
| title | "[string]" | 제목 |
| snippet | "[string]" | 부가 정보 |
| image | "[image url]" | 마커에 사용할 이미지 위치 |
[func] removeMarker(id)
지도에 마커를 추가하고 마커의 id를 리턴합니다/
| Parameter | Type | 설명 |
|---|---|---|
| id | "[-90~90]" | 지울 마커의 id |
▹ NAVIGATIONCONTAINER
<?xml version="1.0" encoding="UTF-8"?>
<MOML version="1.1.4">
   <UILAYOUT portrait="300,300" landscape="300,300" >
      <NAVIGATIONCONTAINER id="navigation" layout="0,0,300,300" selectedItem="group1" >
         <VIEWITEMGROUP id="group1">
            <VIEWITEM id="group1-1" src="group1-1.xml">
               <VIEWITEM id="group1-1-1" src="group1-1-1.xml" />
            </VIEWITEM>
         </VIEWITEMGROUP>
         <VIEWITEMGROUP id="group2">
            <VIEWITEM id="group2-1" src="group2-1.xml" />
        </VIEWITEMGROUP>
    </NAVIGATIONCONTAINER>
  </UILAYOUT>
</MOML>
NAVIGATIONCONTAINER는 계층적 화면 이동 시나리오를 여러 CONTAINER를 사용하여 그룹별로 관리할 수 있는 UI element입니다.
다음 그림은 위 예제의 계층 구조를 시각적으로 보여줍니다.
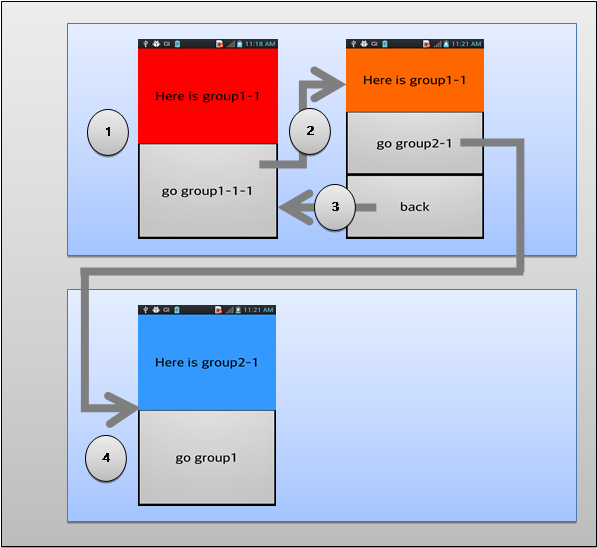
다음 표는 시점에 따른 group 별 selectedItem 위치 값을 나열합니다.
| 시점 | group1 | group2 |
|---|---|---|
| 1 | group1-1 | - |
| 2 | group1-1-1 | - |
| 3 | group1-1 | - |
| 4 | group1-1-1 | group2-1 |
- XML 에서의 VIEWITEMGROUP, VIEITEM element 의 포함관계는 화면 이동을 tree 형태로 나타낸 것입니다. (CONTAINER의 화면 구조상의 부모 자식관계가 아닙니다). 모든 VIEWITEM은 내부적으로 tree형태와 상관없이 NAVIGATIONCONTAINER의 직접적인 자식으로 수평적으로 생성되어 관리 됩니다.
- VIEWITEM은 각각의 CONTAINER에 해당하며 selectedItem과 동일한 VIEWITEM.id 의 CONTAINER가 화면에 보이게 됩니다.
- VIEWITEMGROUP은 VIEWITEM 집합을 의미하며 (실제 CONTAINER가 아닙니다.) selectItem 으로 VIEWITEMGROUP.id를 지정하면 해당 group에서 마지막으로 지정된 VIEWITEM이 화면에 보이게 됩니다.
- 현재 선택된 selectedItem 부모 노드에 있는 VIEWITEM들은 화면에 로드된 적이 있다면 언로드되지 않고 invisible 상태로 존재하며 다른 VIEWITEM은 언로드 상태가 됩니다.
Transition Effect 표
| effect | option | description |
|---|---|---|
| 공통 | forward | 정 방향으로 이동할 때 적합한 효과를 나타내기 위한 옵션이 선택됩니다. 실제 선택되는 옵션은 effect 마다 다릅니다. |
| back | 되돌아가는 방향으로 이동할 때 적합한 효과를 나타내기 위한 옵션이 선택됩니다. 실제 선택되는 옵션은 effect 마다 다릅니다. | |
| move | left/forward | 현재화면이 왼쪽으로 빠져나가면서 다음 화면이 오른쪽에서 들어옵니다. |
| right/back | 현재화면이 오른쪽으로 빠져나가면서 다음 화면이 왼쪽에서 들어옵니다. | |
| up | 현재화면이 위쪽으로 빠져나가면서 다음 화면이 아래쪽에서 들어옵니다. | |
| down | 현재화면이 아래쪽으로 빠져나가면서 다음 화면이 위쪽에서 들어옵니다. | |
| slide | forward | leftIn ⎮ stayOut |
| back | stayIn ⎮ rightOut | |
| leftIn | 다음 화면이 왼쪽으로 이동하면서 오른쪽에서 들어옵니다. | |
| rightIn | 다음 화면이 오른쪽으로 이동하면서 왼쪽에서 들어옵니다. | |
| upIn | 다음 화면이 위쪽으로 이동하면서 아래쪽에서 들어옵니다. | |
| downIn | 다음 화면이 아래쪽으로 이동하면서 위쪽에서 들어옵니다. | |
| stayIn | 다음 화면이 정지상태로 나타납니다. | |
| leftOut | 현재 화면이 왼쪽으로 빠져 나갑니다. | |
| rightOut | 현재 화면이 오른쪽으로 빠져 나갑니다. | |
| upOut | 현재 화면이 위쪽으로 빠져 나갑니다. | |
| downOut | 현재 화면이 아래쪽으로 빠져 나갑니다. | |
| stayOut | 현재 화면이 정지상태로 있습니다. | |
| zoom | in/forward | 확대합니다. |
| out/back | 축소합니다. |
Inherited from CONTAINER
[attr] onBackKey
<?xml version="1.0" encoding="utf-8"?>

<MOML version="1.1.7" >
   <UILAYOUT portrait="300,300" landscape="300,300" >
       <NAVIGATIONCONTAINER id="navigation" layout="0,0,300,300" onBackKey="function.navBack">
           <VIEWITEM id="main" src="main.xml">
               <VIEWITEM id="backKey" src="backKey.xml"/>
           </VIEWITEM>
       </NAVIGATIONCONTAINER>
   </UILAYOUT>

   <FUNCTION id="navBack" >
       <RETURN condition="caller.selectedItem != 'backKey'" cmd="caller.back"/>
       <RETURN cmd="function.caller.backKey.navBackKey"/>
   </FUNCTION>
</MOML>
뒤로가기 키를 눌렀을 때 동작할 script를 설정합니다.
true를 리턴하면 해당 NAVIGATIONCONTAINER가 키를 처리하는 것으로 간주하고 다른 개체에게 키 처리를 넘기지 않습니다.
false를 리턴하면 해당 NAVIGATIONCONTAINER는 더이상 키를 처리하지 않는 것으로 간주하고 다른 개체가 키를 처리합니다.
caller.back을 호출하지 않고, true를 리턴하면 NAVIGATIONCONTAINER의 화면전환을 막을 수 있습니다.
Values
"[script code]", default: "caller.back;"
[attr] onFinishTransition
화면 전환이 끝날 때 공통으로 실행할 명령을 지정합니다.
[script code]를 함수인자가 없는 단순 function 호출 구문으로 구성한 경우 해당 funtion의 첫번째 파라미터로 현재 VIEWITEM의 id를 넘겨줍니다.
VIEWITEM.onFinishTransition을 사용하면 VIEWITEM 별로 각각 명령을 지정할 수 있습니다.
Values
"[script code]"
[attr] onStartTransition
화면 전환이 시작할 때 공통으로 실행할 명령을 지정합니다.
[script code]를 함수인자가 없는 단순 function 호출 구문으로 구성한 경우 해당 funtion의 첫번째 파라미터로 현재 VIEWITEM의 id를 넘겨줍니다.
VIEWITEM.onStartTransition을 사용하면 VIEWITEM 별로 각각 명령을 지정할 수 있습니다.
Values
"[script code]"
[attr] selectedItem
<BUTTON onClick="navigation.selectedItem='group1-1'" />
NAVIGATIONCONTAINER에 보여줄 VIEWITEM 이나 VIEWGROUP 의 id
VIEWGROUP id를 설정한 경우 가장 마지막에 선택한 VIEWITEM 가 설정됩니다. 만약 한번도 선택 된 적이 없다면 해당 VIEWGROUP 의 첫 번째 VIEWITEM 이 설정됩니다.
VIEWITEM의 id가 동일한 값으로 여러개가 존재하는 경우 현재 selectedItem의 자식, 부모, 전체 순서로 VIEWITEM을 검색합니다.
Values
"[identifier]", default : [첫번째 VIEWITEM의 id]
[func] void addItem(parentId, id, src)
현재 선택된 VIEWITEM 내의 UI XML에서 현재 VIEWITEM id 밑에 'setting' 노드를 추가하고 이동합니다.
<BUTTON onClick="navigation.addItem(container.id, 'setting', 'setting.xml'), navigation.selectedItem='setting'" />
VIEWGROUP 이나 VIEWITEM 노드를 추가합니다.
| Parameter | Type | 설명 |
|---|---|---|
| parentId | "[identifier]" ⎮ "" | 추가할 노드의 부모 VIEWGROUP이나 VIEWITEM id, 최상위인 경우 빈문자열("")로 지정합니다. |
| id | "[identifier]" | 새로 추가할 노드의 VIEWGORUP나 VIEWITEM id |
| src | "[url path]" ⎮ "" | 추가할 VIEWITEM의 UI XML 파일의 경로, 빈문자열("")인 경우 VIEWGROUP으로 추가됩니다. |
[func] void back()
<BUTTON onClick="navigation.back()" />
현재 선택된 group 내에서의 화면을 상위 화면으로 이동합니다.
[func] bool canBack()
<BUTTON onClick="navigation.back()" />
상위 노드로 이동 가능한지를 리턴합니다.
Related NAVIGATIONCONTAINER.back(0)
[func] String findItem(parentId, id)
VIEWGROUP 이나 VIEWITEM 노드를 찾습니다.
findItem은 addItem과 동일한 방식으로 노드를 검색합니다.
parentId는 최상위부터 자식 노드들을 재귀적으로 검색합니다.
id 는 해당 부모 노드의 직계 자식 노드들만 검색합니다.
| Parameter | Type | 설명 |
|---|---|---|
| parentId | "[identifier]" ⎮ "" | 찾을 노드의 부모 VIEWGROUP이나 VIEWITEM id, 최상위인 경우 빈문자열("")로 지정합니다. |
| id | "[identifier]" ⎮ "" | 찾을 노드의 VIEWGORUP나 VIEWITEM id, 빈문자열("")인 경우 parentId로 찾습니다. |
[func] void modifyItem(id, attr, value)
VIEWITEM 노드의 속성을 변경합니다.
| Parameter | Type | 설명 |
|---|---|---|
| id | "[identifier]" | 변경할 VIEWITEM의 id |
| attr | "cacheMode" ⎮ "src" ⎮ "onFinishTransition" ⎮ "onStartTransition" ⎮ "transitionInEffect" ⎮ "transitionOutEffect" | 변경할 속성 명 |
| value | "[url path]" ⎮ "[string]" | 변경속성에 새로 적용할 값 |
[func] void removeItem(id)
VIEWITEM 노드를 제거합니다.
| Parameter | Type | 설명 |
|---|---|---|
| id | "[identifier]" | 제거할 VIEWITEM의 id |
[attr] VIEWITEMGROUP id
<VIEWITEMGROUP id="group1" />
VIEWITEMGROUP id
Values
"[identifier]"
[attr] VIEWITEM cacheMode
<VIEWITEM id="main" src="main.xml" cacheMode="always"/>
VIEWITEM의 캐시 방식을 설정합니다.
"always"로 설정하면 한번 로드하면 계속 유지합니다. 자주 사용하하거나 로딩 시간이 오래 걸리는 경우 유용합니다.
"childSelected"로 설정하면 자식 노드의 화면으로 이동한 경우에는 유지합니다. 자식 노드로 이동한 다음 다시 되돌아오는 경우에 유용합니다. (기본값으로 설정되어 있으므로 cacheMode속성이 없거나 잘못된 값을 사용한 경우에도 이 방식으로 동작합니다.)
"none"으로 설정하면 매번 새로 로드합니다. 로딩 시간이 매우 짧거나 매번 화면을 갱신해야하는 경우 유용합니다.
이 속성은 NAVIGATIONCONTAINER.modofyItem(3)로 변경할 수 있습니다.
Values
"always" | "childSelected" | "none", default: "childSelected"
[attr] VIEWITEM id
<VIEWITEM id="main" />
VIEWITEM id
Values
"[identifier]"
[attr] VIEWITEM onFinishTransition
VIEWITEM의 화면 전환이 끝날 때 실행할 명령을 지정합니다.
[script code]를 함수인자가 없는 단순 function 호출 구문으로 구성한 경우 해당 funtion의 첫번째 파라미터로 현재 VIEWITEM의 id를 넘겨줍니다.
이 속성은 NAVIGATIONCONTAINER.modofyItem(3)로 변경할 수 있습니다.
Values
"[script code]"
[attr] VIEWITEM onStartTransition
VIEWITEM의 화면 전환이 시작할 때 실행할 명령을 지정합니다.
[script code]를 함수인자가 없는 단순 function 호출 구문으로 구성한 경우 해당 funtion의 첫번째 파라미터로 현재 VIEWITEM의 id를 넘겨줍니다.
이 속성은 NAVIGATIONCONTAINER.modofyItem(3)로 변경할 수 있습니다.
Values
"[script code]"
[attr] VIEWITEM src
<VIEWITEM src="main.xml" />
VIEWITEM에 로드할 xml 경로
이 속성은 NAVIGATIONCONTAINER.modofyItem(3)로 변경할 수 있습니다.
Values
"[xml path]"
[attr] VIEWITEM transitionInEffect
<VIEWITEM transitionInEffect="move:forward" />
VIEWITEM을 선택할 때 사용할 화면 전환 효과
화면 전환 효과 목록은 TransitionEffect 표룰 참조하십시오.
이 속성은 NAVIGATIONCONTAINER.modofyItem(3)로 변경할 수 있습니다.
Values
"[effect] : [option1] | [option2] | ...", default: "move:forward"
[attr] VIEWITEM transitionOutEffect
<VIEWITEM transitionOutEffect="move:back" />
VIEWITEM에서 빠져나올 때 사용할 화면 전환 효과
화면 전환 효과 목록은 TransitionEffect 표룰 참조하십시오.
이 속성은 NAVIGATIONCONTAINER.modofyItem(3)로 변경할 수 있습니다.
Values
"[effect] : [option1] | [option2] | ...", default: "move:back"
▹ PAINT (dev)
<?xml version="1.0" encoding="utf-8"?>

<MOML>
   <UILAYOUT portrait="300,300" landscape="300,300">
       <PAINT id="paint" layout="0,0,300,300" defaultImg="#ffffff"/>
   </UILAYOUT>
</MOML>
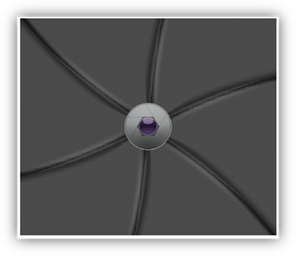
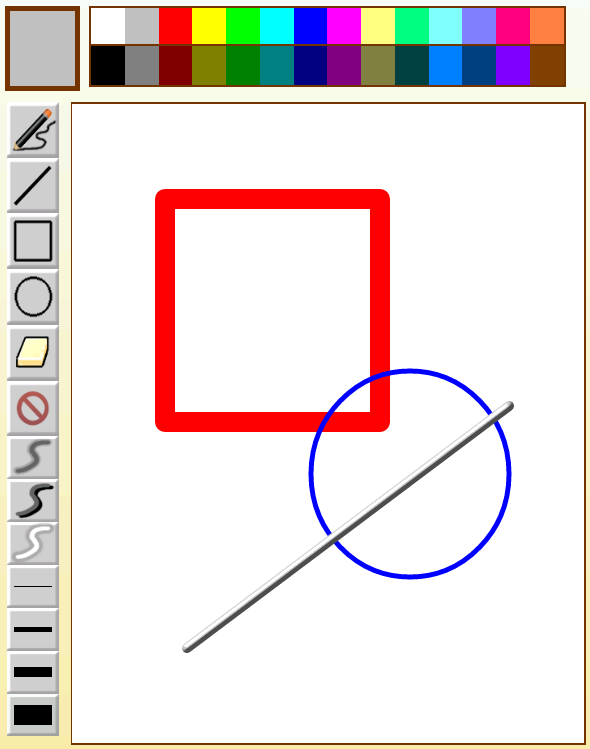
PAINT는 그림판 UI 및 기능을 제공하는 UI element입니다.
PAINT를 응용하여 그림판을 표현 한 모습니다.
Inherited from WINDOW
[attr] color
그리는 색상을 지정합니다.
Values
"[#RGB]" | "[#ARGB]" | "[#RRGGBB]" | "[#AARRGGBB]" | "[color name]"
[attr] effect
그리는 효과를 지정합니다.
Values
"emboss" | "blurNor" | "blurOut"
[attr] painData
base64 데이터 그림
Values
"[base64 string]"
[attr] thickness
그리는 두께를 지정합니다.
Values
"[number]"
[func] void blurNor()
<BUTTON defaultImg="blur.png" onClick="paint.blurNor()" />
바깥 쪽 흐리게 그리도록 설정
[func] void blurOut()
<BUTTON defaultImg="blurOut.png" onClick="paint.blurOut()" />
안 쪽 흐리게 그리도록 설정
[func] void circle()
<BUTTON defaultImg="circle.png" onClick="paint.circle()" />
원 그리기 상태로 변경
[func] void clear()
<BUTTON defaultImg="clear.png" onClick="paint.clear()" />
모두 지우기
[func] void emboss()
<BUTTON defaultImg="emboss.png" onClick="paint.emboss()" />
도드라지게 그리기 상태로 변경
[func] void erase()
<BUTTON defaultImg="erase.png" onClick="paint.erase()" />
선택된 곳 지우기 상태로 변경
[func] void line()
<BUTTON defaultImg="line.png" onClick="paint.line()" />
선 그리기 상태로 변경
[func] void pen()
<BUTTON defaultImg="pen.png" onClick="paint.pen()" />
자유 곡선 그리기 상태로 변경
[func] void rectangle()
<BUTTON defaultImg="rectangle.png" onClick="rectangle.pen()" />
네모 그리기 상태로 변경
[func] void save()
<BUTTON defaultImg="save.png" onClick="paint.save()" />
현재 화면 저장하기
Android 경우 storage:yyMMddHHmmss.png 로 저장됨
▹ POPUP
<?xml version="1.0" encoding="utf-8"?>

<MOML version="1.1.8">
   <UILAYOUT portrait="300,300" landscape="300,300">
       <WINDOW defaultImg="#99696969" layout="0,0,300,300">
           <POPUP layout="50,50,200,200" defaultImg="#000000" showEffect="fade:1000" hideEffect="fade:1000">
               <BUTTON layout="200-48px,0,48px,48px" defaultImg="embed:/img/uiElements/popup/button_grey_close.png" onClick="document.close()"/>
               <WINDOW layout="0,48px,200,200-48px" align="linear:vertical|fill">
                   <BUTTON layout="0,0" text="menu 1" defaultImg="#CCE5FF"/>
                   <BUTTON layout="0,0" text="menu 2" defaultImg="#99CCFF"/>
                   <BUTTON layout="0,0" text="menu 3" defaultImg="#66B2FF"/>
                   <BUTTON layout="0,0" text="menu 4" defaultImg="#3399FF"/>
                   <BUTTON layout="0,0" text="menu 5" defaultImg="#0080FF"/>
                   <BUTTON layout="0,0" text="menu 5" defaultImg="#0066CC"/>
               </WINDOW>
           </POPUP>
       </WINDOW>
   </UILAYOUT>
</MOML>
POPUP 은 사용자에게 일시적으로 정보를 보여줄 때 사용하는 UI element 로 POPUP 을 생성하거나 소멸 시에 effect 를 효과를 적용할 수 있습니다.
Effect Type 표
| effect | description |
|---|---|
| fade | 서서히 나타나거나 사라짐 |
| slide | 지정된 방향에서 나타나거나 지정된 방향으로 사라짐 |
Duration 은 millisecond 단위로 지정합니다.
Direction 은 slide effect 만 지원합니다. (left, right, up, down)
Inherited from WINDOW
[attr] bool onBackKey
<?xml version="1.0" encoding="utf-8"?>

<MOML version="1.1.8" >
   <UILAYOUT portrait="300,500" landscape="300,500" >
       <POPUP layout="0,0,300,500" defaultImg="#ffffff" onBackKey="function.confirmClose" >
           <WINDOW layout="0,0,300,30" defaultImg="#800080f0" align="linear:center|right">
               <BUTTON text="close" onClick="function.confirmClose" defaultImg="#0080ff"/>
           </WINDOW>
       </POPUP>
   </UILAYOUT>

   <FUNCTION id="confirmClose" >
       <CMD cmd="device.systemPopup('', 'Close popup?', 'Yes:container.close', 'No', '')" />
       <RETURN cmd="true" />
   </FUNCTION>
</MOML>
뒤로가기 키를 눌렀을 때 동작할 script를 설정합니다.
true를 리턴하면 해당 POPUP이 키를 처리하는 것으로 간주하고 다른 개체에게 키 처리를 넘기지 않습니다.
false를 리턴하면 해당 POPUP은 더이상 키를 처리하지 않는 것으로 간주하고 다른 개체가 키를 처리합니다.
container.close를 호출하지 않고, true를 리턴하면 POPUP이 닫히지 않도록 할 수 있습니다.
false를 리턴한 경우 상위의 NAVIGATIONCONTAINER나 다른 POPUP에 의해 POPUP이 닫힐 수도 있습니다.
Values
"[script code]", default: "container.close;true;"
[attr] showEffect
<POPUP layout="50,50,200,200" defaultImg="#000000" showEffect="slide:1000,up" />
POPUP 생성 시에 effect 효과 적용
Values
"[Type:Duration(millisecond),Direction]"
[attr] hideEffect
<POPUP layout="50,50,200,200" defaultImg="#000000" hideEffect="slide:1000,down" />
POPUP 소멸 시에 effect 효과 적용
Values
"[Type:Duration(millisecond),Direction]"
▹ PROGRESSBAR
<?xml version="1.0" encoding="utf-8"?>

<MOML>
   <UILAYOUT portrait="300,300" landscape="300,300">
       <PROGRESSBAR layout="0,0,300,300" progress="50" max="100">
   </UILAYOUT>
</MOML>
PROGRESSBAR는 사용자에게 한 과정의 진행 상황을 보여주는 UI element입니다.
Inherited from WINDOW
[attr] max
<PROGRESSBAR layout="0,0,300,300" progress="50" max="100">
최대 값
Values
"[max number]", default : 100
[attr] progress
<PROGRESSBAR layout="0,0,300,300" progress="50" max="100">
현재 값
Values
"[number]", default : 0
[attr] style
<PROGRESSBAR layout="0,0,300,300" progress="50" max="100" style="iOS">
PROGRESSBAR 스타일
| style | 화면 |
|---|---|
| iOS |  |
| Android |  |
Values
"android" | "iOS"
▹ RADIO
<?xml version="1.0" encoding="utf-8"?>

<MOML>
   <UILAYOUT portrait="300,300" landscape="300,300">
       <WINDOW layout="0,0,300,300" align="linear:vertical|center">
           <RADIO layout="100,100" groupId="0" text="Apple" />
           <RADIO layout="100,100" grouId="0" text="Banana"/>
       </WINDOW>
   </UILAYOUT>
</MOML>
RADIO는 사용자가 RADIO 그룹 중 하나만 선택할 수 있는 기능을 제공하는 UI element입니다.
| platform | 화면 |
|---|---|
| Android | 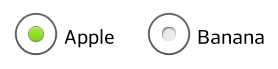 |
| iOS | 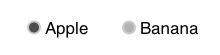 |
Inherited from BUTTON
[attr] checkedImg
<RADIO layout="100,100" groupId="0" text="Apple" checkedImg="checked.png"/>
check된 이미지를 변경할 때 이미지의 url을 지정합니다.
Values
"[image url]"
[attr] groupId
<RADIO layout="100,100" groupId="0" text="Apple" />
소속 그룹
Values
"[group identifier]"
[attr] imgSize
<RADIO layout="100,100" groupId="0" text="Apple" defaultImg="img/normal.png" imgSize="30,50" />
Radio image의 크기 지정
"auto"는 fontSize에 맞춰서 Radio image 크기가 지정됩니다.
"fill"는 Radio의 높이 만큼 Radio image 크기가 지정됩니다.
Values
"auto" | "fill" | "[number,number]", default : "auto"
[attr] selected
<RADIO layout="100,100" groupId="0" text="Apple" selected="true"/>
선택 유무
Values
"true" | "false"
[attr] style
<RADIO layout="100,100" groupId="0" text="Apple" style="button"/>
버튼형태로 사용할지 설정합니다.
Text앞에 RADIO이미지가 출력되지 않으며 BUTTON과 동일한 형태로 출력됩니다.
Values
"button" | ""
▹ SLIDER
<?xml version="1.0" encoding="utf-8"?>

<MOML>
   <UILAYOUT portrait="300,300" landscape="300,300">
       <SLIDER layout="0,0,300,50" progress="50" max="100">
   </UILAYOUT>
</MOML>
SLIDER는 진행 상황을 BAR형태로 사용자가 컨트롤할 수 있게 보여주는 UI element입니다.
Inherited from WINDOW
[attr] max
<SLIDER layout="0,0,300,50" progress="50" max="100">
최대 값
Values
"[number]"
[attr] onChange
<SLIDER layout="0,0,300,50" progress="50" max="100" onChange="function.onChange">
SLIDER의 진행상황이 사용자에 의해 변경되었을 때 호출됩니다.
Values
"[script string]"
[attr] progress
<SLIDER layout="0,0,300,50" progress="50" max="100">
현재 값
Values
"[number]"
[attr] style
<SLIDER layout="0,0,300,50" progress="50" max="100" style="iOS">
SLIDER 스타일
| style | 화면 |
|---|---|
| Android |  |
| iOS |  |
Values
"android" | "iOS", default: "android"
▹ SPINNER
spinner.xml
<?xml version="1.0" encoding="utf-8"?>

<MOML>
   <UILAYOUT portrait="300,300" landscape="300,300">
       <WINDOW layout="0,0,300,300" align="linear:vertical|hCenter ">
           <SPINNER layout="300,50" title="Spinner" index="0" dataSource="spinnerData.xml" dataList="/DATA/ITEMLIST/ITEM" valuePath="@id" textPath="URL/text()" onChange="function.updateSpinner" />
       </WINDOW>
   </UILAYOUT>
</MOML>
spinnerData.xml
<?xml version="1.0" encoding="UTF-8" ?>

<DATA>
<ITEMLIST>
   <ITEM id="1010">
       <NAME><![CDATA[Android]]></NAME>
       <URL><![CDATA[http://android.com]]></URL>
   </ITEM>
   <ITEM id="1020">
       <NAME><![CDATA[Apple]]> </NAME>
       <URL>http://apple.com</URL>
   </ITEM>
   <ITEM id="1030">
       <NAME><![CDATA[Mospi]]> </NAME>
       <URL>http://mospi.org</URL>
   </ITEM>
</ITEMLIST>
</DATA>
SPINNER는 사용자에게 리스트 박스를 보여주고 리스트에 표시된 항목 중 한가지 값을 선택할 수 있는 방법을 제공하는 UI element입니다.
| platform | 화면 |
|---|---|
| Android | 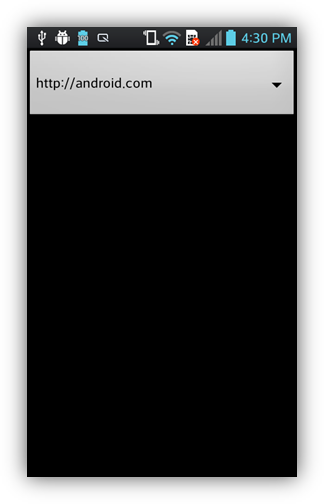 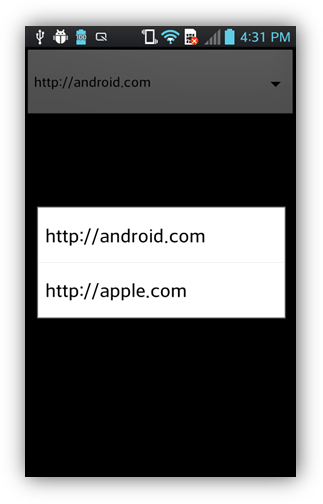 |
| iOS | 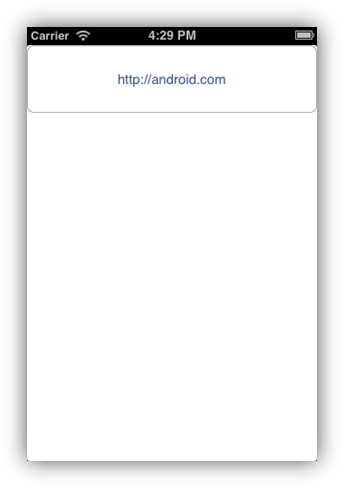  |
Inherited from WINDOW
[attr] dataList
<SPINNER dataSource="listData.xml" dataList="/DATA/ITEM" >
...
</SPINNER>
아이템으로 사용할 기준 xml path
Values
"[element xml path]"
[attr] dataSource
<SPINNER layout="0,0,300,100" dataSource="spinnerData.xml" />
SPINNER에서 사용할 datasource 주소 또는 xml 데이터
Values
"[datasource address]" | "[xml code]"
[attr] index
선택한 항목의 index
value와 text는 현재 선택된 index에 해당하는 값을 리턴합니다.
Values
"[number]", default: "0"
[attr] onChange
SPINNER의 값이 변경되었을 때 호출됩니다.
[attr] style
스타일
Values
"comboBox" | "line", default : "line"
[attr] text
현재 선택 된 문자열
text를 변경하면 index도 변경됩니다.
Values
"[selected value]"
[attr] textPath
SPINNER 항목에 표시할 문자열들의 dataList에 대한 상대 xml path
textPath를 지정하지 않으면 valuePath를 textPath로 사용합니다.
Values
"[value xml path]"
[attr] title
SPINNER를 눌렀을 때 뜨는 팝업창의 제목
Values
"[text]"
[attr] value
현재 선택 된 값
value를 변경하면 index도 변경됩니다.
Values
"[text]"
[attr] valuePath
SPINNER 항목 값들의 dataList에 대한 상대 xml path
valuePath를 지정하지 않으면 textPath를 valuePath로 사용합니다.
Values
"[value xml path]"
▹ STYLEBUTTON (dev)
<?xml version="1.0" encoding="utf-8"?>

<MOML>
   <UILAYOUT portrait="300,300" landscape="300,300">
       <STYLEBUTTON layout="50,50,100,50" style="round" text="round style">
   </UILAYOUT>
</MOML>
모양이나 그리는 방법을 세부적으로 설정할 수 있는 버튼입니다.
STYLEBUTTON은 5개의 overlay 레이어가 배경과 텍스트 레이어 사이에 존재하며 지정한 shape으로 테두리를 설정하고 borderStyle을 적용합니다.
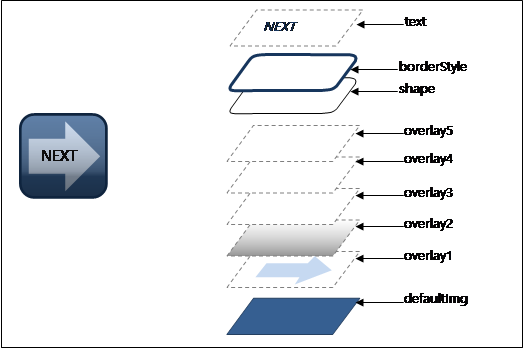
shape속성과 overlay속성에서는 아래와 같은 shapeFunction을 사용할 수 있습니다.
| shapeFunction | sample | description |
|---|---|---|
| rect |  |
직사각형 |
| square |  |
정사각형 |
| oval |  |
타원 |
| circle |  |
원 |
| triangle leftTriangle rightTriangle upTriangle downTriangle |
 leftTriangle |
삼각형 triangle == upTriangle |
| arrow leftArrow rightArrow upArrow downArrow |
leftArrow |
화살표 arrow == rightArrow |
| house leftHouse rightHouse upHouse downHouse |
 lefthouse |
집모양 오각형 house == upHouse |
| roundRect(r) roundRect(w,h) roundRect(lt,rt,rb,lb) roundRect(ltw,lth,rtw,rth, rbw,rbh,lbw,lbh) |
 roundRect(10,10,0,0) |
둥근 모서리 사각형 코너 크기를 지정하기 위한 1, 2, 4, 8개의 인자를 받습니다. 최소 비율 좌표계(가로 세로 중 작은 쪽을 기준으로 한 비율 좌표계)를 사용합니다. r : corner radius w, h: round corner width, height lt,rt,rb,lb: corner radius left top, right top, right bottom, left bottom (clock wise order) ltw,lth,rtw,rth,rbw,rbh,lbw,lbh: round corner left top width, left top height, right top width, right top height, right bottom width, right bottom height, left bottom width, left bottom height (clock wise order) |
| polygon(...) |  polygon(50,50,100, 50,50,100) |
다각형 다각형의 점 위치 x,y를 순서대로 짝수개의 인자를 받습니다. 100분율 좌표계를 사용합니다. 시작점과 끝점의 위치 값은 항상 동일합니다. 끝점은 생략할 수 있습니다. |
Inherited from BUTTON
[attr] borderStyle
<STYLEBUTTON borderStyle="solid:4|#80a08080" layout="50,50,100,20" >
버튼의 테두리 두께와 색상을 설정합니다.
Values
"emboss" | "solid:[thickness] | [[#RGB]|[#ARGB]|[#RRGGBB]|[#AARRGGBB][color name]]"
shortened form: "solid" == "solid:1:#80000000"
[attr] glossEffect
<STYLEBUTTON glossEffect="true" defaultImg="#c0c0c0" layout="50,50,100,20" >
광택 효과를 추가합니다.
Values
"true" | "false", default: "false"
[attr] overlay1 ~ overlay5
<STYLEBUTTON overlay1="color:#80a08080|shape=triangle" layout="50,50,100,20" >
<STYLEBUTTON overlay1="gradation:lr|#a0ffffff|#00000000" layout="50,80,100,20" >
<STYLEBUTTON overlay1="image:/img/btnBg.png|shape=triangle " layout="50,110,100,20" >
overlay layer에 색상이나 이미지, 그라데이션 효과등을 설정합니다.
image url 로 그림 파일을 사용하는 대신 imageFunction으로 패턴을 사용할 수 있습니다.
| imageFunction | 설명 |
|---|---|
| stripe | 대각선 빗살 무늬 |
Values
"color:[ [#RGB]|[#ARGB]|[#RRGGBB]|[#AARRGGBB][color name]] | [shape=[shapeFunction]]"
| "gradation:[direction] | [[#RGB]|[#ARGB]|[#RRGGBB]|[#AARRGGBB][color name] | ...] | [shape=[shapeFunction]]"
| "image:[image url]|[imageFunction] | [shape=[shapeFunction]]"
shortened form: "gradation" == "gradation:tb|#80ffffff|#00000000"
[attr] padding1 ~ padding5
<STYLEBUTTON padding1="20,10,15,10" overlay1="color:shape=oval|#c0c0c0" layout="50,50,100,100" >
overlay layer의 안쪽 여백을 설정합니다.
padding1~5은 overlay1~5에 설정한 shape의 위치를 조정하는데 유용합니다.
Values
"[left],[top],[right],[bottom]"
[attr] shape
<STYLEBUTTON shape="circle" defaultImg="#c0c0c0" layout="50,50,20,20" >
<STYLEBUTTON shape="roundRect(5)" defaultImg="#c0c0c0" layout="50,80,100,20" >
<STYLEBUTTON shape="polygon(0,50,50,0,100,50,50,100)" defaultImg="#c0c0c0" layout="50,110,100,20" >
버튼의 모양을 설정합니다.
Values
"[shapeFunction]"
[attr] style
<STYLEBUTTON style="glossIcon" defaultImg="#c0c0c0" layout="50,50,100,20" >
<STYLEBUTTON style="round" defaultImg="#c0c0c0" layout="50,50,110,20" >
버튼을 미리 정해진 모양으로 설정합니다.
style값에 따라 아래 속성이 자동으로 들어갑니다.
사용자가 직접 지정한 속성이 자동으로 들어간 속성의 이름과 동일한 경우 사용자가 지정한 값을 사용합니다.
| style value | attribute & value |
|---|---|
| glossIcon | glossEffect="true" shape="roundRect(20)" borderStyle="emboss" overlay5="image:stripe" overlay4="gradation:#00000000 |
| round | shape="roundRect(20)" borderStyle="emboss" overlay5="gradation:#a0ffffff |
Values
"glossIcon" | "round"
▹ VIDEO
<?xml version="1.0" encoding="utf-8"?>

<MOML>
   <UILAYOUT portrait="300,300" landscape="300,300">
       <VIDEO layout="0,0,300,300" src="http://mospi.org/sample/agateapi/res/video/moml.mp4"
        captionSrc="http://mospi.org/sample/agateapi/res/video/moml.smi"/>
   </UILAYOUT>
</MOML>
VIDEO는 파일 또는 네트워크 스트림 영상을 재생하는 UI element입니다.
smi, srt 자막을 지원합니다.
VIDEO 실행 화면입니다.

Inherited from WINDOW
Related
iOS:
MediaPlayer.framework
[attr] autoPlay
<VIDEO layout="0,0,300,300" src="http://mospi.org/test/video/sample.avi"
  captionSrc="http://mospi.org/test/video/sample.smi" caption="false" autoPlay="true"/>
자동 시작 유무
Values
"true" | "false", default: "false"
[attr] caption
<VIDEO layout="0,0,300,300" src="http://mospi.org/test/video/sample.avi"
  captionSrc="http://mospi.org/test/video/sample.smi" caption="false"/>
자막 표시 유무
Values
"true" | "false"
[attr] captionSrc
<VIDEO layout="0,0,300,300" src="http://mospi.org/test/video/sample.avi"
  captionSrc="http://mospi.org/test/video/sample.smi"/>
자막 경로
Values
"[caption address]"
[attr] controls
<VIDEO layout="0,0,300,300" src="http://mospi.org/test/video/sample.avi"
  captionSrc="http://mospi.org/test/video/sample.smi" controls="none"/>
기본으로 제공하는 컨트롤 UI를 설정합니다.
컨트롤 UI를 직접 구현했거나 사용자가 플레이를 제어할 수 없도록 하기 위해서는 "none"을 사용하십시오.
"default"일 때 제공하는 컨트롤은 OS 에 따라 다릅니다.
Android에서는 중앙 재생 버튼이 제공되며, iOS 에서는 중앙 재생 버튼, 좌측 하단 일시 중지 버튼, 우측 하단 전체 화면 버튼이 제공됩니다.
Values
"default" | "none", default: "default"
[attr] playPosition
재생 위치 설정
Values
"[milliseconds]"
[attr] playLength
재생 시간
Values
"[milliseconds]"
[attr] repeat
반복 설정
Values
"true" | "false", default: "false"
[attr] src
<VIDEO layout="0,0,300,300" src="http://mospi.org/test/video/sample.avi"/>
재생할 영상 경로
Values
"[playback source address]"
[func] bool isPlay()
<CMD condition="video.isPlay() == false" cmd="video.play()" />
영상 재생 유무
Related VIDEO.play(0)
[func] void pause()
<CMD condition="video.isPlay() == true" cmd="video.pause()" />
영상 일시 정지
Related VIDEO.play(0)
[func] void play()
<BUTTON onClick="video.play()" />
영상 재생
Related VIDEO.isPlay(0)
[func] void stop()
<BUTTON onClick="video.stop()" />
영상 정지
Related VIDEO.play(0)
[func] void rewind()
<BUTTON onClick="video.rewind()" />
영상 되감기
Related VIDEO.play(0)
▹ WEBVIEW
<?xml version="1.0" encoding="utf-8"?>

<MOML>
   <UILAYOUT portrait="300,300" landscape="300,300">
       <WEBVIEW layout="0,0,300,300" src="http://www.apple.com"/>
   </UILAYOUT>
</MOML>
WEBVIEW는 웹 페이지를 표시할 수 있는 UI element입니다.
주로 일부 영역을 웹 페이지로 사용하고 싶을 때 사용됩니다.
Inherited from WINDOW
Related
Android:
<uses-permission android:name="android.permission.INTERNET" />
[attr] controls
<WEBVIEW layout="300,300" src="http://www.apple.com" controls="none"/>
이전 페이지, 다음 페이지로 이동하는 기본 control UI를 이용할 것인지 결정합니다.
Values
"default" | "none", default : "default"
[attr] loadingIndicator
<WEBVIEW layout="300,300" src="http://www.apple.com" loadingIndicator="none"/>
페이지 로딩 상태를 표시할 방법을 설정합니다.
Values
"none" | "progressBar", default: "progressBar"
[attr] bool onBackKey
<?xml version="1.0" encoding="utf-8"?>

<MOML version="1.1.7" >
  <UILAYOUT portrait="300,300" landscape="300,300" >
    <WEBVIEW layout="0,0,300,300" src="http://mospi.org" onBackKey="function.webViewBackKey"/>
  </UILAYOUT>

  <FUNCTION id="webViewBackKey" >
    <RETURN condition="!caller.canBack" cmd="false" />
    <CMD cmd="device.systemPopup('', 'WebView back?', 'Yes:caller.back', 'No', '');" />
    <RETURN cmd="true" />
  </FUNCTION>
</MOML>
뒤로가기 키를 눌렀을 때 동작할 script를 설정합니다.
true를 리턴하면 해당 WEBVIEW가 키를 처리하는 것으로 간주하고 다른 개체에게 키 처리를 넘기지 않습니다.
false를 리턴하면 해당 WEBVIEW는 더이상 키를 처리하지 않는 것으로 간주하고 다른 개체가 키를 처리합니다.
caller.back을 호출하지 않고, true를 리턴하면 뒤로 가기 키의 동작을 막을 수 있습니다.
Values
"[script code]", default: "caller.back;"
[attr] src
<WEBVIEW layout="300,300" src="http://www.apple.com"/>
WEB 페이지에 표시할 주소 또는 html 소스 코드
Values
"[url]" | "[html code]" | "javascript:[java script]"
[attr] supportZoom
<WEBVIEW layout="300,300" src="http://www.apple.com" supportZoom="false"/>
zoom기능을 설정합니다.
Values
"true" | "false"
[func] void back()
<WEBVIEW id="web" layout="300,200" src="http://www.apple.com"/>
<BUTTON layout="300,100" text="back" onClick="web.back()" />
이전 페이지로 이동
Related WEBVIEW.forward(0), WEBVIEW.canBack(0), WEBVIEW.canForward(0), WEBVIEW.refresh(0)
[func] bool canBack()
<WEBVIEW id="web" layout="300,200" src="http://www.apple.com"/>
<BUTTON layout="300,100" text="back" onClick="web.canBack()" />
뒤 페이지로 이동가능 유무
Related WEBVIEW.back(0), WEBVIEW.forward(0), WEBVIEW.canForward(0), WEBVIEW.refresh(0)
[func] bool canForward()
<WEBVIEW id="web" layout="300,200" src="http://www.apple.com"/>
<BUTTON layout="300,100" text="canForward" onClick="web.canForward()" />
앞 페이지로 이동가능 유무
Related WEBVIEW.back(0), WEBVIEW.forward(0), WEBVIEW.canBack(0), WEBVIEW.refresh(0)
[func] void clear()
탐색 기록을 지우고 페이지를 로딩한 화면을 초기화 합니다.
탐색 기록을 지우면 back(), forward() 를 실행할 수 없습니다.
주로 WEBVIEW를 재사용하는 곳에서 초기화하는데 사용하거나 사용자가 뒤로 갈 수 없도록 하는데 사용합니다.
[func] void forward()
<WEBVIEW id="web" layout="300,200" src="http://www.apple.com"/>
<BUTTON layout="300,100" text="forward" onClick="web.forward()" />
앞 페이지로 이동
Related WEBVIEW.back(0), WEBVIEW.canBack(0), WEBVIEW.canForward(0), WEBVIEW.refresh(0)
[func] void refresh()
<WEBVIEW id="web" layout="300,200" src="http://www.apple.com"/>
<BUTTON layout="300,100" text="refresh" onClick="web.refresh()" />
앞 페이지로 이동
Related WEBVIEW.back(0), WEBVIEW.canBack(0), WEBVIEW.canForward(0), WEBVIEW.refresh(0)
[func] string url()
현재 페이지의 url을 리턴합니다.
LINKMAP
WEBVIEW에서 로딩하는 url link를 페이지를 로딩하는 대신 다른 동작으로 변경합니다.
LINKMAP은 특정 링크가 일반 웹브라우저와는 다르게 동작하도록 지정할 수 있습니다. 다음과 같은 상황에서 주로 사용됩니다.
- WEBVIEW 내에 홈버튼이나 뒤로 가기 버튼을 NAVIGATIONCONTAIONER와 연동
- 웹페이지 팝업을 띄우는 대신 MOML UI를 사용한 화면을 띄움.
- 특정 페이지로 이동하기 전에 함수를 실행한 후 결과에 따라 이동하고 싶을 때.
- 일반적인 url scheme (http://~, https://~ 와 같은) 이 아닌 custom url scheme 을 처리하고 싶을 때.
LINKMAP은 여러개의 자식 LINK element 로 구성할 수 있으며 WEBVIEW 역시 여러개의 자식 LINKMAP element를 가질 수 있습니다.
[attr] LINKMAP baseUrl
<WEBVIEW layout="0,0,300,300">
    <LINKMAP baseUrl="https://accounts.google.com">
        <LINK url="/ServiceLogin?" cmd="function.loginHook"/>
        <LINK url="/SignUp?" cmd="function.newAccountHook"/>
    </LINKMAP>

    <LINKMAP baseUrl="https://mlogin.yahoo.com/w/login">
        <LINK url="/user?" cmd="function.loginHook"/>
        <LINK url="/mreg?" cmd="function.newAccountHook"/>
    </LINKMAP>
</WEBVIEW>
WEBVIEW/LINKMAP/LINK.url 에 사용할 기본 url을 지정합니다.
baseUrl을 지정하면 같은 사이트에서 여러개의 LINK 를 후킹할 때 url 의 앞부분의 동일한 부분을 반복하는 불편함을 줄일 수 있습니다.
LINKMAP 항목은 여러개를 사용할 수 있으므로 baseUrl 별로 묶어서 사용할 수 있습니다.
Values
"[url]"
[attr] LINKMAP url
<MOML>
    <FUNCTION id="linkHook(url)">
        <CMD cmd="device.toastPopup('login requested : ' + url)"/>
        <CMD cmd="web.src=url"/>
    </FUNCTION>

    <UILAYOUT portrait="300,300" landscape="300,300">
        <WEBVIEW id="web" layout="0,0,300,300" src="http://www.google.com">
            <LINKMAP baseUrl="https://accounts.google.com">
                <LINK url="/ServiceLogin?" cmd="function.linkHook"/>
            </LINKMAP>
        </WEBVIEW>
    </UILAYOUT>
</MOML>
동작을 가로챌 link의 url을 설정합니다.
후킹할 url의 절대 경로는 LINKMAP.baseUrl 과 LINKMAP/LINK.url 의 문자열 합으로 구성됩니다.
만약 후킹할 url이 *로 끝나면 로딩 페이지의 앞부분이 후킹할 url과 일치하는 모든 페이지를 대상으로 후킹합니다.
실제로 후킹된 url을 받기 위해서는 cmd를 단순 function 호출 방식으로 구성해야합니다. 자세한 내용은 LINK.cmd 를 참고하십시오.
Values
"[url]" | "[url]*"
[attr] LINKMAP cmd
<MOML>
   <FUNCTION id="linkHook(url)">
       <CMD cmd="device.toastPopup('login requested : ' + url)"/>
       <CMD cmd="web.src=url"/>
   </FUNCTION>

   <UILAYOUT portrait="300,300" landscape="300,300">
       <WEBVIEW id="web" layout="0,0,300,300" src="http://www.google.com">
           <LINKMAP baseUrl="https://accounts.google.com">
               <LINK url="/ServiceLogin?" cmd="function.linkHook"/>
           </LINKMAP>
        </WEBVIEW>
    </UILAYOUT>
</MOML>
가로챈 link의 명령을 설정합니다.
[script code]를 함수인자가 없는 단순 function 호출 구문으로 구성한 경우 해당 funtion의 첫번째 파라미터로 후킹된 url을 넘겨줍니다.
*로 끝나는 url을 사용하여 여러개를 후킹한 경우 파라미터로 넘겨준 url을 사용해 실제 url을 확인할 수 있습니다.
cmd로 후킹한 대상 link는 로딩되지 않습니다. 따라서 실제로는 존재하지 않는 link를 사용해도 무방합니다. 만약 대상 link를 로딩해야 하는 경우라면 "WEBVIEW.src=url"과 같은 스크립트 구문을 사용하여 로딩할 수 있습니다.
WEBVIEW.src에 url을 지정한 경우에는 후킹이 동작하지 않습니다. 사용자 클릭이나 WEBVIEW 내부 스크립트에 의해 호출되는 경우에만 동작합니다.
Values
"[script code]"
[attr] LINKMAP onFinish
<MOML>
    <FUNCTION id="finishLogin(url)">
        <CMD cmd="device.toastPopup('login requested : ' + url)"/>
    </FUNCTION>

    <UILAYOUT portrait="300,300" landscape="300,300">
        <WEBVIEW id="web" layout="0,0,300,300" src="http://www.google.com">
            <LINKMAP baseUrl="https://accounts.google.com">
                <LINK url="/ServiceLogin?" onFinish="function.finishLogin"/>
            </LINKMAP>
        </WEBVIEW>
    </UILAYOUT>
</MOML>
지정한 url의 페이지의 로딩이 끝날 때마다 매번 실행할 명령을 지정합니다.
onFinish는 cmd와 함께 쓸 수 없습니다. cmd로 후킹한 대상 link는 로딩되지 않으므로 onFinish가 호출되지 않습니다.
[script code]를 함수인자가 없는 단순 function 호출 구문으로 구성한 경우 해당 funtion의 첫번째 파라미터로 후킹된 url을 넘겨줍니다. *로 끝나는 url을 사용하여 여러개를 후킹한 경우 파라미터로 넘겨준 url을 사용해 실제 url을 확인할 수 있습니다.
onFinish는 cmd와는 다르게 WEBVIEW.src에 url을 지정한 경우에도 호출됩니다.
Values
"[script code]"
[attr] LINKMAP onStart
<MOML>
    <FUNCTION id="startLogin(url)">
        <CMD cmd="device.toastPopup('login requested : ' + url)"/>
    </FUNCTION>

    <UILAYOUT portrait="300,300" landscape="300,300">
        <WEBVIEW id="web" layout="0,0,300,300" src="http://www.google.com">
            <LINKMAP baseUrl="https://accounts.google.com">
                <LINK url="/ServiceLogin?" onStart="function.startLogin"/>
            </LINKMAP>
        </WEBVIEW>
    </UILAYOUT>
</MOML>
지정한 url의 페이지의 로딩이 시작될 때마다 매번 실행할 명령을 지정합니다.
onStart는 cmd와 함께 쓸 수 없습니다. cmd로 후킹한 대상 link는 로딩되지 않으므로 onStart가 호출되지 않습니다.
[script code]를 함수인자가 없는 단순 function 호출 구문으로 구성한 경우 해당 funtion의 첫번째 파라미터로 후킹된 url을 넘겨줍니다. *로 끝나는 url을 사용하여 여러개를 후킹한 경우 파라미터로 넘겨준 url을 사용해 실제 url을 확인할 수 있습니다.
onStart는 cmd와는 다르게 WEBVIEW.src에 url을 지정한 경우에도 호출됩니다.
Values
"[script code]"
▹ WINDOW
<?xml version="1.0" encoding="utf-8"?>

<MOML>
   <UILAYOUT portrait="300,300" landscape="300,300">
       <WINDOW layout="0,0,300,300" />
   </UILAYOUT>
</MOML>
WINDOW는 모든 UI element의 기반이 되는 UI element입니다.
[attr] align
<WINDOW align="linear" />
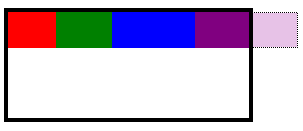
<WINDOW align="flow:wideSide|hJustify|center" />
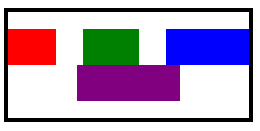
<WINDOW align="linear:center" />
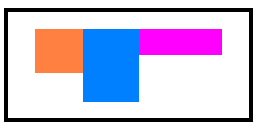
<WINDOW align="linear:center|subCenter" />
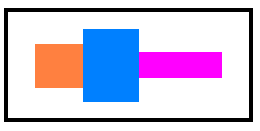
<WINDOW align="linear:hCenter|bottom|subBottom" />
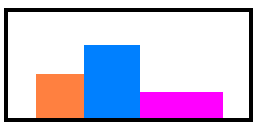
자식 UI element의 배치와 정렬 방법을 설정합니다.
align은 layout type, direction option, row/column align option, sub align option 의 4 단계로 값을 설정합니다.
- layout type
배치 방법에 따라 하위 option의 사용 방법과 자식 UI element의 layout attribute 값에 영향을 미칩니다.
| layout type | 설명 |
|---|---|
| relative | left, top을 원점(0,0)으로 하여 자식 UI element의 위치를 지정합니다. 자식 UI element의 layout 속성은 4개의 ","로 분리 된 값들로 구성됩니다. (layout="x,y,width,height") [direction option], [row/column align option], [sub align option]은 사용하지 않습니다. 오직 align="relative"로만 사용됩니다. |
| linear | 자식 UI element 들을 1행 이나 1열으로 정렬합니다. 자식 UI element의 layout 속성은 2개의"," 로 분리된 값들로 구성됩니다. (layout="width,height") 기본 option 들은 "horizontal |
| flow | 자식 UI element들을 다중 행 또는 다중 열로 정렬합니다. 자식 UI element의 layout 속성은 2개의"," 로 분리된 값들로 구성됩니다. (layout="width,height") 기본 option 들은 "horizontal |
- direction option
layout type이 linear나 flow인 경우 방향을 설정합니다. 기본값은 horizontal입니다.
| direction type | 설명 |
|---|---|
| horizontal | 가로로 왼쪽에서 오른쪽으로 차례대로 자식 UI element들을 배치합니다. |
| vertical | 세로로 위에서 아래로 차례대로 자식 UI element들을 배치합니다. |
| wideSide | 넓이와 높이 중 큰 값 방향으로 자식 UI element들을 배치합니다. |
| narrowSide | 넓이와 높이 중 작은 값 방향으로 자식 UI element들을 배치합니다. |
- row/column align option
layout type이 linear나 flow인 경우 행이나 열들의 배치 방법을 설정합니다. 기본값은 left|top입니다.
| row/column align option | 설명 |
|---|---|
| left / top / right / bottom | 자식 UI element들이 배치된 행이나 열을 좌/상/우/하 한쪽으로 붙여서 나열합니다. |
| vCenter / hCenter / center | 자식 UI element들이 배치된 행이나 열을 가운데로 정렬합니다. center option은 vCenter |
| vFill / hFill / fill | 여백을 채우도록 자식 UI element들의 크기를 키웁니다. "fill" option은 "vFill |
| vJustify / hJustify / justify | 배치된 행이나 열의 처음과 마지막 UI element를 양 끝 경계에 맞춰 정렬합니다. 만약 한개의 element 만 있는 경우, "left |
- sub align option
layout type이 linear나 flow인 경우 배치된 행열 내에서 크기가 다른 UI element들의 배치 방법을 설정합니다. 기본값은 subLeft|subTop입니다.
| sub align option | 설명 |
|---|---|
| subLeft / subRight | 세로 방향의 direction option을 사용한 경우 배치된 열 내에서 가로 방향의 정렬을 설정합니다. |
| subTop / subBottom | 가로 방향의 direction option을 사용한 경우 배치된 행 내에서 세로 방향의 정렬을 설정합니다. |
| subCenter | 배치된 행이나 열내에서 중앙에 배치시킵니다. |
[attr] defaultImg
<WINDOW defaultImg="#ff0000" />
<WINDOW defaultImg="image/redLine.png" />
배경 색상 및 이미지
Values
"[#RGB]" | "[#ARGB]" | "[#RRGGBB]" | "[#AARRGGBB]" | "[color name]" | "[image url]"
[attr] documentUrl
<CMD cmd="device.toastPopup(win.documentUrl)" />
...
<WINDOW id="win" />
WINDOW 가 정의된 document 파일의 경로
이 속성은 읽기 전용으로 변경할 수 없습니다.
[attr] enabled
<WINDOW enabled="false" />
활성화 유무
Values
"true" | "false"
[attr] height
WINDOW 의 height
Values
"[number]"
[attr] img
defaultImg의 약칭
Values
"[number]"
[attr] layout
<?xml version="1.0" encoding="utf-8"?>

<MOML>
   <UILAYOUT portrait="300,300" landscape="300,300">
       <WINDOW layout="0,0,300,300" defaultImg="#ffffff">
           <LABEL id="win1" text="win1" layout="50,50,100,50" defaultImg="#ff8080"/>
           <LABEL id="win2" text="win2" layout="150,50,50,50" defaultImg="#80ff80"/>
           <LABEL id="win3" text="win3" layout="win1.left, prev.bottom, win1.width+win2.width, prev.height+1cm" defaultImg="#8080ff"/>
       </WINDOW>
   </UILAYOUT>
</MOML>
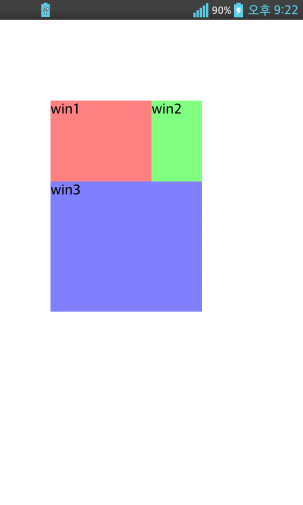
align에 따라 위치나 크기와 같은 배치 특성을 지정합니다.
"[layout value], [layout value], ..."는 "0,0,30,40" 과 같은 moml unit을 사용하는 것이 일반적이나 px, cm, mm, in, pt, sr과 같은 단위와 다른 id의 위치를 참조하는 식이나 일반적인 계산식도 사용이 가능합니다.
Values
Align 이 linear 혹은 flow인 경우 : "[width], [height] "
Align 이 relative인 경우 : "[left], [top],[width], [height] "
default: align이 linear나 flow인 경우 "auto,auto", relative인 경우 "prev.right,prev.top,auto,auto"
[attr] left
부모 WINDOW 의 지역 좌표 계에서의 left 좌표
Values
"[number]"
[attr] margin
주위의 형제 WINDOW나 부모 WINDOW 경계 간의 여백을 설정합니다.
4개의 값을 지정하면 왼쪽, 위쪽, 오른쪽, 아래쪽 값으로 인식합니다.
2개의 값을 지정하면 가로, 세로 값으로 인식하여 왼쪽과 오른쪽, 위쪽과 아래쪽에 동일한 값을 사용합니다.
1개의 값을 지정하면 모두 동일한 값으로 인식합니다.
일반적으로 margin은 flow나 linear align 에서 각 WINDOW 사이의 여백을 조절할 때 사용합니다. align="relative" 인 경우 margin은 아무런 의미가 없습니다.
Values
"[left],[top],[right],[bottom]" | "[horizontal], [vertical]" | "[all]"
[attr] onClick
Click했을 때 이벤트 처리
Values
"[script code]"
[attr] onCreate
WINDOW가 생성될 때 처리할 script를 설정합니다.
Values
"[script code]"
[attr] onFlickLeft/Right/Up/Down
flick했을 때 이벤트 처리
Values
"[script code]"
[attr] onHide
WINDOW가 SHOW에서 HIDE로 바뀔 때 처리할 script를 설정합니다.
Values
"[script code]"
[attr] onLongClick
Long Click 했을 때 이벤트 처리
Values
"[script code]"
[attr] onScroll
<?xml version="1.0" encoding="utf-8"?>

<MOML>
   <UILAYOUT portrait="300,300" landscape="300,300">
       <WINDOW layout="0,0,300,300" defaultImg="#ffffff" scroll="vertical" onScroll="function.onScroll">
           <LABEL text="scroll me" layout="50,50,100,50" defaultImg="#ff8080"/>
           <LABEL text="scroll me" layout="50,300,100,50" defaultImg="#ff8080"/>
       </WINDOW>
   </UILAYOUT>

   <FUNCTION id="onScroll(x,y)">
       <CMD cmd="device.log('x:' + x + ', y:' + y)"/>
   </FUNCTION>
</MOML>
WINDOW가 스크롤 될 때 실행할 script를 설정합니다.
[script code]를 함수인자가 없는 단순 function 호출 구문으로 구성한 경우 해당 funtion의 첫번째, 두번째 파라미터로 현재 위치 x,y 를 넘겨줍니다.
Values
"[script code]" | "[function(2)]"
[attr] onShow
WINDOW가 HIDE에서 SHOW로 바뀔때 처리할 script를 설정합니다.
Values
"[script code]"
[attr] padding
WINDOW내의 자식 WINDOW와의 간격 설정
4개의 값을 지정하면 왼쪽, 위쪽, 오른쪽, 아래쪽 값으로 인식합니다.
2개의 값을 지정하면 가로, 세로 값으로 인식하여 왼쪽과 오른쪽, 위쪽과 아래쪽에 동일한 값을 사용합니다.
1개의 값을 지정하면 모두 동일한 값으로 인식합니다.
padding은 margin과 달리 UI element가 각각 구현하는 것이므로 서로 다르게 동작할 수 있습니다.
WINDOW, CONTAINER, POPUP element에서는 자식 WINDOW와의 간격을 의미하지만, 다른 UI element에서 padding은 일반적으로 내부 여백을 뜻합니다. 예를 들어, BUTTON이나 LABEL 에서는 배경과 문자열 간의 여백을 의미합니다.
Values
"[left],[top],[right],[bottom]" | "[horizontal], [vertical]" | "[all]"
[attr] pressedImg
<WINDOW defaultImg="#ff0000" pressedImg="#30ff0000" />
<WINDOW defaultImg="image/redLine.png" pressedImg="image/redLine.png" />
눌린 상태에서의 배경 색상 및 이미지
Values
"[#RGB]" | "[#ARGB]" | "[#RRGGBB]" | "[#AARRGGBB]" | "[color name]" | "[image url]"
[attr] scroll
<WINDOW scroll="vertical|horizontal" />
scrollBar 설정
Values
"vertical" | "horizontal" | "both" | "none" | "vertical|horizontal"
[attr] scrollBarVisible
<WINDOW scrollBarVisible="true" />
scrollBar 표시 유무
scroll을 설정하지 않은 상태에서 scrollBarVisible은 아무런 효과를 나타내지 못합니다.
Values
"true" | "false", default: "true"
[attr] scrollX
가로 scroll 위치
Values
"[number]"
Related WINDOW.scroll, WINDOW.onScroll, WINDOW.scrollTo, WINDOW.scrollY
[attr] scrollY
세로 scroll 위치
Values
"[number]"
Related WINDOW.scroll, WINDOW.onScroll, WINDOW.scrollTo, WINDOW.scrollX
[attr] top
부모 WINDOW 의 지역 좌표 계에서의 top 좌표
Values
"[number]"
[attr] width
WINDOW 의 width
Values
"[number]"
[attr] visible
화면 표시 유무
Values
"visible" | "invisible", default: "visible"
[func] void addEventListener(event, function)
<CMD cmd="appLauncher.addEventListener('onComplete', 'function.onComplete')" />
이벤트 감지 함수를 등록합니다.
이벤트 발생 시 등록 된 함수가 자동 호출됩니다.
| Parameter | Type | 설명 |
|---|---|---|
| event | "[identifier]" | 이벤트 이름 |
| function | "[function.id]" ⎮ "[script]" | 이벤트 처리 함수 또는 스크립트 |
Related WINDOW.removeEventListener(2)
[func] string fireEvent(event, args...)
<?xml version="1.0" encoding="utf-8"?>

<MOML>
   <UILAYOUT portrait="320,480">
       <BUTTON text="custom event" onClick="caller.fireEvent('onCustomEvent, 'test')" onCustomEvent ="function. onCustomEvent "/>
   </UILAYOUT>

   <FUNCTION id=" onCustomEvent (arg1)">
       <CMD cmd="device.toastPopup(arg1)" />
   </FUNCTION>
</MOML>
event를 발생시킵니다.
| Parameter | Type | 설명 |
|---|---|---|
| event | "[identifier]" | 이벤트 이름 |
| args... | "[string]" , "[string]", ... | 이벤트 파라미터 |
Related WINDOW.removeEventListener(2)
[func] string fullId()
<WINDOW id="win" layout="0,0,100,100" defaultImg="#00ff00"/>
<BUTTON layout="0,150,100,100" onClick="device.toastPopup(win.fullId())" />
UI element의 full id를 리턴
[func] void removeEventListener(event, function)
<CMD cmd="appLauncher.removeEventListener('onComplete', 'function.onComplete')" />
이벤트 감지 함수를 해제합니다.
이벤트 발생 시 더 이상 해당 함수가 자동 호출되지 않습니다.
| Parameter | Type | 설명 |
|---|---|---|
| event | "[identifier]" | 이벤트 이름 |
| function | "[function.id]" ⎮ "[script]" | 이벤트 처리 함수 또는 스크립트 |
Related WINDOW.addEventListener(2)
[func] void runScript(script)
container.xml
<?xml version="1.0" encoding="utf-8"?>

<MOML>
   <UILAYOUT portrait="320,480">
       <BUTTON text="popup" onClick="container.open(‘popup.xml’, ‘new’)" />
   </UILAYOUT>

   <FUNCTION id="onPopupClose">
       <CMD cmd="device.toastPopup(closed')"  delay="1000"/>
   </FUNCTION>
</MOML>
popup.xml
<?xml version="1.0" encoding="utf-8"?>

<MOML>
   <UILAYOUT portrait="320,480">
       <POPUP layout="0,0,320,480" defaulting="#ffffff">
           <BUTTON text="normal close" onClick=" function.normalClose" />
           <BUTTON text="runScript close" onClick=" function.runScriptClose" />
       </POPUP>
   </UILAYOUT>

   <FUNCTION id="normalClose">
       <!-- delay function will not be called after caller document is closed -->
       <CMD cmd="function.document.container.onPopupClose"/>
       <CMD cmd="document.close"/>
   </FUNCTION>

   <FUNCTION id="runScriptClose">
       <!-- switch caller to document.container-->
       <CMD cmd=" document.container.runScript(‘function.caller.onPopupClose’)"/>
       <CMD cmd="document.close"/>
   </FUNCTION>
</MOML>
현재 UI element를 caller로 지정하여 스크립트를 실행한 결과를 리턴합니다.
UI element의 runScript를 실행하는 것은 onClick와 같은 이벤트 처리 함수가 실행되는 방법과 유사합니다.
이는 스크립트를 실행하는 도중에 caller가 변경되기 때문에 caller를 사용하여 기존에 작성한 이벤트 핸들링 함수를 다른 상황에서 재사용할 때 유용합니다.
또한 caller를 변경함으로써 최초 이벤트를 발생시킨 caller가 소멸된 이후에도 스크립트를 실행하도록 할 수 있습니다.
| Parameter | Type | 설명 |
|---|---|---|
| script | "[script]" | 실행할 명령 |
Related application.runScript(1)
[func] void scrollTo(x, y)
화면을 지정 좌표로 이동
WINDOW.scroll 속성을 지정한 경우에만 동작합니다.
horizontal이나 vertical 중 한쪽만 스크롤이 지정된 경우, 지정하지 않은 축에 대한 값은 무시합니다.
| Parameter | Type | 설명 |
|---|---|---|
| x | "[number]" | 스크롤 위치 x |
| y | "[number]" | 스크롤 위치 y |
Related WINDOW.scroll, WINDOW.onScroll, WINDOW.scrollX, WINDOW.scrollY
Objects
▹ animation
<?xml version="1.0" encoding="utf-8"?>

<MOML>
  <FUNCTION id="afterAni1">
    <CMD cmd="device.toastPopup('animation is done')" />
  </FUNCTION>

  <UILAYOUT portrait="320,480">
    <WINDOW id="window_a" layout="0,0,320,480" defaultImg="#ffffffff" >
      <LABEL id="label_1" layout="10,10,50,30" text="label_1" defaultImg="#000000"
              fontSize="14" fontColor="#ffffff" visible="visible" />
      <LABEL id="label_2" layout="10,130,50,30" text="label_2" defaultImg="#000000"
                 fontSize="14" fontColor="#ffffff" />
      <LABEL id="label_3" layout="250,170,50,30" text="label_3" defaultImg="#000000"
                 fontSize="14" fontColor="#ffffff" visible="invisible" />

      <BUTTON layout="0,300,75,30" text="show"
                  onClick="animation.show('root.label_1', 'fade', '', 5000, 'function.afterAni1')" />


      <BUTTON layout="80,300,75,30" text="hide"
              onClick="animation.hide('root.label_1', 'fade', '', 5000, 'function.afterAni1')" />
      <BUTTON layout="0,350,75,30" text="flyOut"
        onClick="animation.flyOut('root.label_2', 300, 0, 50, 30, 'easeOut1', 3000, 'function.afterAni1')" />

      <BUTTON layout="80,350,75,30" text="flyIn"
        onClick="animation.flyIn('root.label_3', -300, 0, 50, 30, 'easeOut1', 5000, 'function.afterAni1')" />
      <BUTTON layout="160,350,75,30" text="rotate"
        onClick="animation.rotate('root.label_1', 360, 0, 0, '', 5000, 'function.afterAni1')" />
    </WINDOW>
  </UILAYOUT>
</MOML>
UI element에 애니메이션 효과를 줍니다.
move, moveIn, moveOut을 제외한 모든 애니메이션은 UI element의 크기나 위치 속성값을 변경하지 않습니다.
즉, 애니메이션 중에는 크기나 위치가 바뀌는 것처럼 보이더라도 전과 후의 크기나 위치는 동일합니다. 애니메이션이 끝난 시점의 위치나 크기로 다시 애니메이션을 시작하려면 위치와 크기를 다시 설정한 후 수행해야 합니다.
애니메이션 효과는 효과가 진행되는 속도를 조절하기 위해 timeCurve를 사용합니다.
| timeCurve | 함수식 | 설명 |
|---|---|---|
| backIn |  |
시작부분에서 애니메이션을 살짝 반대방향으로 진행시킨 후 정상 진행합니다. |
| backInOut |  |
시작과 끝부분에서 넘침 효과를 나타냅니다. |
| backOut | 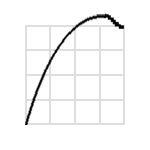 |
끝부분에서 애니메이션을 좀 더 진행한 후 되돌아옵니다. |
| backOutIn | 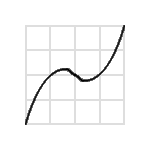 |
중간에 살짝 반대 방향으로 진행 후 정상 진행합니다. |
| bounceIn | 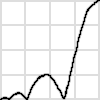 |
시작하는 시점에서 튕김 효과를 냅니다. |
| bounceInOut | 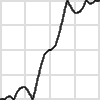 |
시작하는 시점과 끝나는 시점에서 튕김 효과를 냅니다. |
| bounceOut | 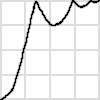 |
끝나는 시점에서 튕김 효과를 냅니다. |
| bounceOutIn | 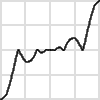 |
진행 중간에서 튕김 효과를 냅니다. |
| easeIn[1~N] |  |
부드럽게 시작합니다. 숫자가 클수록 느린 시작과 빠른 끝의 정도가 심해집니다. easeIn[2~N]의 숫자는 y=xN으로 표현되는 timeCurve 방정식의 제곱수를 의미합니다. easeIn1 은 sin 커브를 사용합니다. |
| easeInOut[1~N] |  |
부드럽게 시작하고 부드럽게 끝냅니다. 숫자가 클수록 시작과 끝은 느리고 중간은 빨라집니다. |
| easeOut[1~N] |  |
부드럽게 끝납니다. 숫자가 클수록 빠른 시작과 느린 끝의 정도가 심해집니다. |
| easeOutIn1[1~N] | 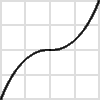 |
시작과 끝을 빠르게 하고 중간에 부드럽게 멈춘후 진행합니다. 숫자가 클수록 중간에 머무는 시간이 길어집니다. |
| elasticIn | 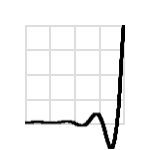 |
시작하는 시점에서 탄성 효과를 냅니다. |
| elasticInOut | 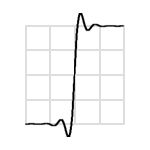 |
시작하는 시점과 끝나는 시점에서 탄성 효과를 냅니다. |
| elasticOut | 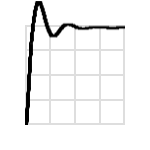 |
끝나는 시점에서 탄성 효과를 냅니다. |
| elasticOutIn | 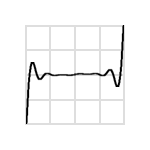 |
진행 중간에서 탄성 효과를 냅니다. |
| hold1~N | 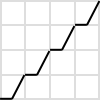 hold4 |
중간에 멈춤니다. 숫자는 멈추는 회수입니다. hold0의 함수식은 y=x 입니다. |
| linear | 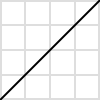 |
기본값입니다. 일정한 속도로 효과를 진행합니다. |
| repeat[1~N] | 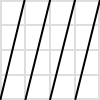 repeat4 |
반복합니다. 숫자는 반복 회수입니다. |
| reverse |  |
반대로 진행합니다. |
| roundTrip[1~N] |  roundTrip4 |
왕복합니다. 위치나 크기 변화에 있어서 주어진 시간의 절반 동안 모든 효과를 진행하고, 나머지 절반 시간 동안에는 효과를 반대로 진행하여 처음 상태로 돌아갑니다. 숫자는 왕복 회수입니다. |
| step1~N |  step4 |
애니메이션을 끊어서 진행합니다. 숫자는 중간에 보여지는 단계수입니다. step0의 함수식은 y=1 입니다. step1의 함수식은 y=0 입니다. |
timeCurve 이름은 "|" 를 사용하여 여러 개를 사용할 수 있습니다.
여러 개를 사용하면 순서대로 앞의 방정식 결과값을 다음 방정식의 입력값으로 전달합니다. (순서에 따라 결과가 크게 달라질 수 있습니다.)
| 복합사용 | 함수식 |
|---|---|
| roundTrip2⎮easeOut2 | 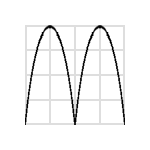 |
| easeOut2⎮roundTrip2 | 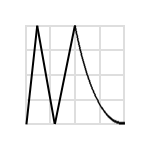 |
Inherited from baseObject
[func] void flyIn(uiId, x, y, scale, timeCurve, millisec, endFunction)
UI element에 날아 들어와 나타나기 애니메이션을 실행합니다.
| Parameter | Type | 설명 |
|---|---|---|
| uiId | "[identifier]" | UI element의 id |
| x | "[number]" | 시작 위치 x (uiId의 left, top을 기준으로 한 상대좌표임) |
| y | "[number]" | 시작 위치 y (uiId의 left, top을 기준으로 한 상대좌표임) |
| scale | "number" | 시작할 때의 크기 100% 기준 비율 |
| timeCurve | "[time curve] ⎮ ..." | |
| millisec | "[milliseconds]" | 애니메이션 수행 시간 |
| endFunction | "[script]" | 애니메이션이 끝난 후 실행할 명령 |
[func] void flyIn(uiId, x, y, width, height, timeCurve, millisec, endFunction)
UI element에 날아 들어와 나타나기 애니메이션을 실행합니다.
| Parameter | Type | 설명 |
|---|---|---|
| uiId | "[identifier]" | UI element의 id |
| x | "[number]" | 시작 위치 x (uiId의 left, top을 기준으로 한 상대좌표임) |
| y | "[number]" | 시작 위치 y (uiId의 left, top을 기준으로 한 상대좌표임) |
| width | "number" | 시작할 때의 너비 |
| height | "number" | 시작할 때의 높이 |
| timeCurve | "[time curve] ⎮ ..." | |
| millisec | "[milliseconds]" | 애니메이션 수행 시간 |
| endFunction | "[script]" | 애니메이션이 끝난 후 실행할 명령 |
[func] void flyOut(uiId, x, y, scale, timeCurve, millisec, endFunction)
UI element에 날아가 없어지기 애니메이션을 실행합니다.
| Parameter | Type | 설명 |
|---|---|---|
| uiId | "[identifier]" | UI element의 id |
| x | "[number]" | 끝 위치 x (uiId의 left, top을 기준으로 한 상대좌표임) |
| y | "[number]" | 끝 위치 y (uiId의 left, top을 기준으로 한 상대좌표임) |
| scale | "number" | 끝날 때의 크기 100% 기준 비율 |
| timeCurve | "[time curve] ⎮ ..." | |
| millisec | "[milliseconds]" | 애니메이션 수행 시간 |
| endFunction | "[script]" | 애니메이션이 끝난 후 실행할 명령 |
[func] void flyOut(uiId, x, y, width, height, timeCurve, millisec, endFunction)
UI element에 날아가 없어지기 애니메이션을 실행합니다.
| Parameter | Type | 설명 |
|---|---|---|
| uiId | "[identifier]" | UI element의 id |
| x | "[number]" | 끝 위치 x (uiId의 left, top을 기준으로 한 상대좌표임) |
| y | "[number]" | 끝 위치 y (uiId의 left, top을 기준으로 한 상대좌표임) |
| width | "number" | 끝날 때의 너비 |
| height | "number" | 끝날 때의 높이 |
| timeCurve | "[time curve] ⎮ ..." | |
| millisec | "[milliseconds]" | 애니메이션 수행 시간 |
| endFunction | "[script]" | 애니메이션이 끝난 후 실행할 명령 |
[func] void hide(uiId, effect, timeCurve, millisec, endFunction)
UI element에 사라지는 애니메이션을 실행합니다.
| Parameter | Type | 설명 |
|---|---|---|
| uiId | "[identifier]" | UI element의 id |
| effect | "fade" or "" | 사라질 때 효과 |
| timeCurve | "[time curve] ⎮ ..." | |
| millisec | "[milliseconds]" | 애니메이션 수행 시간 |
| endFunction | "[script]" | 애니메이션이 끝난 후 실행할 명령 |
[func] void move(uiId, x, y, timeCurve, millisec, endFunction)
UI element에 날아가 없어지기 애니메이션을 실행합니다.
move와 관련된 애니메이션은 relative layout인 경우만 동작합니다.
move는 크기를 변경하지 않는 moveOut과 동일합니다.
| Parameter | Type | 설명 |
|---|---|---|
| uiId | "[identifier]" | UI element의 id |
| x | "[number]" | 끝 위치 x (uiId의 left, top을 기준으로 한 상대좌표임) |
| y | "[number]" | 끝 위치 y (uiId의 left, top을 기준으로 한 상대좌표임) |
| timeCurve | "[time curve] ⎮ ..." | |
| millisec | "[milliseconds]" | 애니메이션 수행 시간 |
| endFunction | "[script]" | 애니메이션이 끝난 후 실행할 명령 |
[func] void moveIn(uiId, x, y, width, height, timeCurve, millisec, endFunction)
UI element를 이동하면서 크기를 변경하는 애니메이션을 실행합니다.
move와 관련된 애니메이션은 relative layout인 경우만 동작합니다.
moveIn은 입력된 좌표로 먼저 이동한 후 flyIn애니메이션을 실행합니다.
moveIn은 flyIn과 마찬가지로 애니매이션이 끝나는 시점에 현재 상태를 맞춥니다. LABEL.text와 같은 경우 애니매이션이 시작할 때는 순간적으로 글자가 커지거나 줄어들 수 있습니다.
moveIn은 flyIn과 동일한 변형 방법을 사용하지만, flyIn은 시작 좌표를 입력받는 반면 moveIn은 끝 좌표를 입력받습니다.
| Parameter | Type | 설명 |
|---|---|---|
| uiId | "[identifier]" | UI element의 id |
| x | "[number]" | 끝 위치 x (uiId의 left, top을 기준으로 한 상대좌표임) |
| y | "[number]" | 끝 위치 y (uiId의 left, top을 기준으로 한 상대좌표임) |
| width | "number" | 끝날 때의 너비 |
| height | "number" | 끝날 때의 높이 |
| timeCurve | "[time curve] ⎮ ..." | |
| millisec | "[milliseconds]" | 애니메이션 수행 시간 |
| endFunction | "[script]" | 애니메이션이 끝난 후 실행할 명령 |
[func] void moveOut(uiId, x, y, width, height, timeCurve, millisec, endFunction)
UI element를 이동하면서 크기를 변경하는 애니메이션을 실행합니다.
move와 관련된 애니메이션은 relative layout인 경우만 동작합니다.
moveOut은 flyOut 애니매이션을 실행한 후 실제 이동은 애니메이션이 모두 끝난 후, endFunction 실행 직전에 일어납니다.
moveOut은 flyOut과 마찬가지로 애니매이션이 시작하는 시점에 현재 상태를 맞춥니다. LABEL.text와 같은 경우 애니매이션이 끝날 때는 순간적으로 글자가 커지거나 줄어들 수 있습니다.
moveOut은 flyOut과 동일한 변형 방법을 사용하지만, flyOut과 달리 애니메이션 이후에도 사라지지 않으며 해당 좌표로 이동합니다.
| Parameter | Type | 설명 |
|---|---|---|
| uiId | "[identifier]" | UI element의 id |
| x | "[number]" | 끝 위치 x (uiId의 left, top을 기준으로 한 상대좌표임) |
| y | "[number]" | 끝 위치 y (uiId의 left, top을 기준으로 한 상대좌표임) |
| width | "number" | 끝날 때의 너비 |
| height | "number" | 끝날 때의 높이 |
| timeCurve | "[time curve] ⎮ ..." | |
| millisec | "[milliseconds]" | 애니메이션 수행 시간 |
| endFunction | "[script]" | 애니메이션이 끝난 후 실행할 명령 |
[func] void polyIn(uiId, type, xOrMove, yOrLength, timeCurve, millisec, endFunction)
UI element에 다각형으로 날아 들어와 나타나기 애니메이션을 실행합니다.
| Parameter | Type | 설명 |
|---|---|---|
| uiId | "[identifier]" | UI element의 id |
| type | "leftTop" ⎮ "rightTop" ⎮ "leftBottom" ⎮ "rightBottom" ⎮ "left" ⎮ "top" ⎮ "right" ⎮ "bottom" | 변형할 부분 |
| xOrMove | "[number]" | type에 따라 상대 x 좌표나 이동 거리를 지정합니다. |
| yOrLength | "[number]" | type에 따라 상대 y 좌표나 길이를 지정합니다. |
| timeCurve | "[time curve] ⎮ ..." | |
| millisec | "[milliseconds]" | 애니메이션 수행 시간 |
| endFunction | "[script]" | 애니메이션이 끝난 후 실행할 명령 |
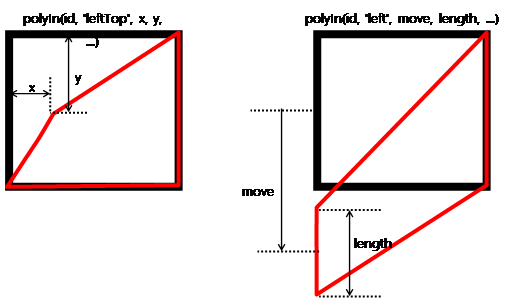
[func] void polyIn(uiId, ltX, ltYy, rtX, rtY, lbX, lbY, rbX, rbY, timeCurve, millisec, endFunction)
UI element에 다각형으로 날아 들어와 나타나기 애니메이션을 실행합니다.
변형 중간에 정상적이지 않은 변형이 존재하면 OS에 따라 오동작할 수 있습니다. 특히 처음이나 끝 부분이 크기가 0인 변형이 들어가지 않도록 주의하십시오.
예를들어 좌표가 (0,0,100,100) 인 개체를 polyIn(id, 0,0, -100,0, 0,0, -100,0, ...)으로 변형하면 변형 중간에는 정상적으로 너비가 줄어들지만, 처음 부분에서는 너비가 0이 되므로 오동작하게 됩니다. polyIn(id, 0,0, -99,0, 0,0, -99,0, ...) 와 같이 사용하여야 합니다.
| Parameter | Type | 설명 |
|---|---|---|
| uiId | "[identifier]" | UI element의 id |
| ltX, ltY | "[number]" | 왼쪽 위 꼭지점의 상대 위치 x, y |
| rtX, rtY | "[number]" | 오른쪽 위 꼭지점의 상대 위치 x, y |
| lbX, lbY | "[number]" | 왼쪽 아래 꼭지점의 상대 위치 x, y |
| rbX, rbY | "[number]" | 오른쪽 아래 꼭지점의 상대 위치 x, y |
| timeCurve | "[time curve] ⎮ ..." | |
| millisec | "[milliseconds]" | 애니메이션 수행 시간 |
| endFunction | "[script]" | 애니메이션이 끝난 후 실행할 명령 |
[func] void polyOut(uiId, type, xOrMove, yOrLength, timeCurve, millisec, endFunction)
UI element에다각형으로 날아가 사라지기 애니메이션을 실행합니다.
변형 중간에 정상적이지 않은 변형이 존재하면 OS에 따라 오동작할 수 있습니다. 특히 처음이나 끝 부분이 크기가 0인 변형이 들어가지 않도록 주의하십시오.
예를들어 좌표가 (0,0,100,100) 인 개체를 polyOut(id, 0,0, -100,0, 0,0, -100,0, ...) 으로 변형하면 변형 중간에는 정상적으로 너비가 줄어들지만, 끝부분에서는 너비가 0이 되므로 오동작하게 됩니다. polyOut(id, 0,0, -99,0, 0,0, -99,0, ...) 와 같이 사용하여야 합니다.
| Parameter | Type | 설명 |
|---|---|---|
| uiId | "[identifier]" | UI element의 id |
| type | "leftTop" ⎮ "rightTop" ⎮ "leftBottom" ⎮ "rightBottom" ⎮ "left" ⎮ "top" ⎮ "right" ⎮ "bottom" | 변형할 부분 |
| xOrMove | "[number]" | type에 따라 상대 x 좌표나 이동 거리를 지정합니다. |
| yOrLength | "[number]" | type에 따라 상대 y 좌표나 길이를 지정합니다. |
| timeCurve | "[time curve] ⎮ ..." | |
| millisec | "[milliseconds]" | 애니메이션 수행 시간 |
| endFunction | "[script]" | 애니메이션이 끝난 후 실행할 명령 |

[func] void polyOut(uiId, ltX, ltYy, rtX, rtY, lbX, lbY, rbX, rbY, timeCurve, millisec, endFunction)
UI element에 다각형으로 날아가 사라지기 애니메이션을 실행합니다.
변형 중간에 정상적이지 않은 변형이 존재하면 OS에 따라 오동작할 수 있습니다. 특히 처음이나 끝 부분이 크기가 0인 변형이 들어가지 않도록 주의하십시오.
예를들어 좌표가 (0,0,100,100) 인 개체를 polyIn(id, 0,0, -100,0, 0,0, -100,0, ...)으로 변형하면 변형 중간에는 정상적으로 너비가 줄어들지만, 처음 부분에서는 너비가 0이 되므로 오동작하게 됩니다. polyIn(id, 0,0, -99,0, 0,0, -99,0, ...) 와 같이 사용하여야 합니다.
| Parameter | Type | 설명 |
|---|---|---|
| uiId | "[identifier]" | UI element의 id |
| ltX, ltY | "[number]" | 왼쪽 위 꼭지점의 상대 위치 x, y |
| rtX, rtY | "[number]" | 오른쪽 위 꼭지점의 상대 위치 x, y |
| lbX, lbY | "[number]" | 왼쪽 아래 꼭지점의 상대 위치 x, y |
| rbX, rbY | "[number]" | 오른쪽 아래 꼭지점의 상대 위치 x, y |
| timeCurve | "[time curve] ⎮ ..." | |
| millisec | "[milliseconds]" | 애니메이션 수행 시간 |
| endFunction | "[script]" | 애니메이션이 끝난 후 실행할 명령 |
[func] void rotate(uiId, degree, pivotX, pivotY, timeCurve, millisec, endFunction)
UI element를 회전합니다.
회전 중심축은 UI element 영역의 안쪽뿐만 아니라 바깥쪽에도 설정할 수 있습니다.
| Parameter | Type | 설명 |
|---|---|---|
| uiId | "[identifier]" | UI element의 id |
| degree | "[number]" | 360도 기준 회전각도 |
| pivotX | "[number]" | 회전 중심축 x (uiId의 left, top을 기준으로 한 상대좌표임) |
| pivotY | "[number]" | 회전 중심축 y (uiId의 left, top을 기준으로 한 상대좌표임) |
| timeCurve | "[time curve] ⎮ ..." | |
| millisec | "[milliseconds]" | 애니메이션 수행 시간 |
| endFunction | "[script]" | 애니메이션이 끝난 후 실행할 명령 |
[func] void show(uiId, effect, timeCurve, millisec, endFunction)
UI element에 보이기 애니메이션을 지정합니다.
| Parameter | Type | 설명 |
|---|---|---|
| uiId | "[identifier]" | UI element의 id |
| effect | "fade" | "" |
| timeCurve | "[time curve] ⎮ ..." | |
| millisec | "[milliseconds]" | 애니메이션 수행 시간 |
| endFunction | "[script]" | 애니메이션이 끝난 후 실행할 명령 |
[func] void stop(uiId)
UI element의 애니메이션을 중단합니다.
| Parameter | Type | 설명 |
|---|---|---|
| uiId | "[identifier]" | UI element의 id |
▹ appLauncher
<?xml version="1.0" encoding="utf-8"?>

<MOML>
   <FUNCTION id="initEvent">
       <CMD cmd="appLauncher.addEventListener('onComplete', 'onCompleteAppLauncher')"/>
   </FUNCTION>

   <FUNCTION id="onCompleteAppLauncher(type, path)">
       <CMD cmd="device.toastPopup(type + ':' + path)"/>
   </FUNCTION>

   <UILAYOUT portrait="300,300" landscape="300,300">
       <WINDOW layout="0,0,300,300" defaultImg="#ffff4500" align="linear:vertical|center">
           <LABEL layout="200,50" text="appLauncher object example" textAlign="center"/>
           <BUTTON layout="200,50" text="audioRecorder" onClick="appLauncher.exec('audioRecorder')"/>
           <BUTTON layout="200,50" text="imageCapture" onClick="appLauncher.setSaveForImageCapture(true),appLauncher.setSaveDirForImageCapture('storage:Photo/'),appLauncher.exec('imageCapture')"/>
           <BUTTON layout="200,50" text="videoCapture" onClick="appLauncher.exec('videoCapture')"/>
           <BUTTON layout="200,50" text="albums" onClick="appLauncher.exec('albums')"/>
           <BUTTON layout="200,50" text="open google!" onClick="appLauncher.openUri('http://google.com', '')"/>
       </WINDOW>
   </UILAYOUT>

   <CMD cmd="function.initEvent()"/>
</MOML>
appLauncher는 다른 application이나 기능을 실행하는 object입니다.
다음 그림은 BUTTON을 눌렀을 때 내장 웹브라우저를 실행하여 http://google.com 웹 페이지를 로딩하는 화면입니다.
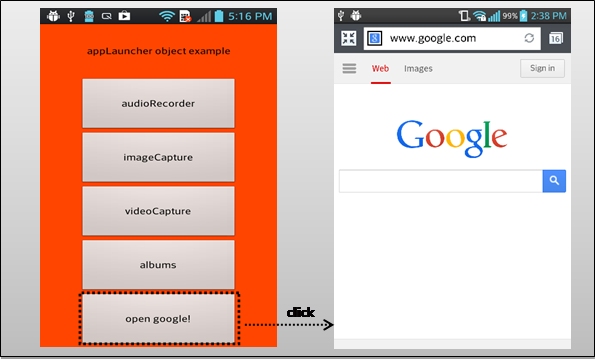
Inherited from baseObject
Related
iOS:
AssetsLibrary.framework
[func] bool canOpenUri(uri)
...

   <key>LSApplicationQueriesSchemes</key>
   <array>
       <string>fb</string>
       <string>twitter</string>
   </array>

...
uri scheme을 수행할 수 있는지 확인합니다.
대부분 uri scheme을 실행할 수 있는 어플리케이션의 설치 유무를 보고 판단하기 때문에 canOpenUri은 true를 리턴 했더라도, openUri는 실패할 수 있습니다.
iOS9 이상부터는 다른 어플리케이션의 uri scheme를 확인하기 위해서는 info.plist에 미리 scheme를 추가해줘야 합니다.
| Parameter | Type | 설명 |
|---|---|---|
| uri | "[uri scheme]" |
Related appLauncher.openUri(2) <!------------------------------------------------------------------------------------>
[func] void exec(type)
<BUTTON text="open google!" onClick="appLauncher.exec('albums')" />
type에 따른 기능을 실행합니다.
| Parameter | Type | 설명 |
|---|---|---|
| type | "[string]" | 아래 표 참고 |
| type | 설명 | Android | iOS |
|---|---|---|---|
| albums | 갤러리를 실행합니다. 사용자가 실행된 앨범에서 사진을 선택 후 원래 화면으로 복귀하면 onComplete 이벤트가 발생합니다. |
O | O |
| imageCapture | 사진을 촬영합니다. | O | O |
| videoCapture | 동영상을 녹화합니다. | O | O |
| applicationDetailSettings | 설정 - 현재 앱 세부 설정으로 이동합니다. | O | O |
| audioRecorder | 녹음기를 실행합니다. | O | X |
| settings | 설정 앱을 실행합니다. | O | X |
| bluetoothSettings | 설정 - 블루투스로 이동합니다. | O | X |
| deviceInfoSettings | 설정 – 디바이스 정보로 이동합니다. | O | X |
| displaySettings | 설정 – 디스플레이로 이동합니다. | O | X |
| localeSettings | 설정 – 지역, 언어로 이동합니다. | O | X |
| locationSourceSettings | 설정 – 위치 정보로 이동합니다. | O | X |
| printSettings | 설정 – 인쇄로 이동합니다. | O | X |
| soundSettings | 설정 – 소리로 이동합니다. | O | X |
| wifiSettings | 설정 – WiFi로 이동합니다. | O | X |
| wirelessSettings | 설정 – 무선으로 이동합니다. | O | X |
Related baseObject.addEventListener(2), baseObject.removeEventListener(2)
[func] void openUri(uri, option)
<BUTTON text="Tel. +1-650-253-0000" onClick="appLauncher.openUri('tel:+1-650-253-0000', '')" />
uri sheme에 따라 어플리케이션을 실행합니다.
| Parameter | Type | 설명 |
|---|---|---|
| uri | "[uri scheme]" | 아래 표 참고 |
| option | "goIntallPage" | "askErrorPopup" |
| uri scheme 예제 | 설명 |
|---|---|
| http://www.mospi.org https://www.mospi.org |
지정된 uri로 웹브라우저를 실행합니다. |
| mailto:mospi@mospi.org | 이메일 작성기를 실행합니다. |
| tel:+1-650-253-0000 | 전화를 겁니다. (전화 기능이 없는 경우 동작하지 않을 수 있습니다.) |
| sms:+1-650-253-0000 | 문자 메시지를 보냅니다. (전화 기능이 없는 경우 동작하지 않을 수 있습니다.) |
| geo:latitude,longitude | 지도에 위치를 표시합니다. |
| twitter: | 트위터. twitter가 설치되어 있어야 합니다. |
| Option | 설명 |
|---|---|
| goInstallPage | uri를 처리할 app 이 없으면 설치 페이지로 이동. |
| askErrorPopup | uri를 처리할 app 이 없으면 popup으로 설치페이지로 이동할 것인지를 사용자에게 묻습니다. |
[func] void setSaveDirForImageCapture(path)
이미지 저장 경로를 storage:Photo 폴더로 설정합니다.
xml
<CMD cmd="appLauncher.setSaveDirForImageCapture('storage:Photo/')" />
imageCaptrue 이미지 저장 경로 설정합니다.
| Parameter | Type | 설명 |
|---|---|---|
| path | "[save path]" default : storage:/AppLauncher/ImageCapture/ |
imageCapture 실행 후 이미지 저장 경로 |
Related appLauncher.exec(2), appLauncher.setSaveForImageCapture(1)
[func] void setSaveForImageCapture(save)
<CMD cmd="appLauncher.setSaveForImageCapture(true)" />
imageCapture 이미지 저장 유무를 설정합니다.
| Parameter | Type | 설명 |
|---|---|---|
| save | "true" ⎮ "false" default : false |
저장 유무 |
Related appLauncher.exec(2), appLauncher.setSaveDirForImageCapture(1)
[event] void onComplete(type, path)
appLauncher.exec()를 수행한 결과를 전달합니다.
baseObject.addEventListener에 이벤트를 처리할 function이 지정되어 있어야 합니다.
| Parameter | Type | 설명 |
|---|---|---|
| type | "[type]" | 아래 표 참고 |
| path | "[path]" | 선택하거나 저장된 파일의 경로. |
| type | 설명 |
|---|---|
| audioRecorder | 녹음기를 실행합니다. (Android 만 지원) |
| videoCapture | 동영상을 녹화합니다. |
| imageCapture | 사진을 촬영합니다. |
| albums | 갤러리를 실행합니다. |
Related baseObject.addEventListener(2), baseObject.removeEventListener(2)
▹ application
application 은 어플리케이션 설정 및 정보 관리 등과 관련 된 동작들을 수행하는 object 입니다.
Inherited from baseObject
[attr] string logFilter
표시할 로그 필터의 목록을 설정합니다.
logFilter는 로그의 앞부분에 [ ] 안에 표시가 됩니다.
logFilter로 all 을 사용하면 모든 로그를 볼 수 있습니다.
logFilter는 | 문자를 사용하여 여러개를 설정할 수 있습니다.
logFilter의 마지막에 * 문자를 붙여서 특정 단어로 시작하는 log를 여러개 설정할 수 있습니다. ex) "net*"
Values
"all" | "[logFilter] | [...]"
Related application.log(2), APPLICATIONINFO/DEBUG.log
[attr] string orientation
화면방향을 설정합니다.
portrait나 landscape는 장치나 사용자 설정에 따라 양쪽 방향을 지원하지 못하고 기본 방향만 지원하는 defaultPortrait나 defaultLandscape와 동일하게 동작할 수 있습니다.
Values
"default" | "all" | "defaultPortrait" | "defaultLandscape" | "portrait" | "landscape", default: "default"
| type | 설명 |
|---|---|
| default | native 설정을 따라갑니다. Android : AndroidManifest.xml 파일의 iOS : info.plist 파일의 Supported interface orientations 값 |
| all | 모든 방향으로 회전 가능하도록 설정합니다. |
| defaultPortrait | 기본 세로 방향으로 설정합니다. |
| defaultLandscape | 기본 가로 방향으로 설정합니다. |
| portrait | 세로 방향으로만 회전 가능하도록 설정합니다. |
| landscape | 가로 방향으로만 회전 가능하도록 설정합니다. |
Related APPLICATIONINFO/ORIENTATION.type
[func] int height()
어플리케이션 뷰의 높이를 리턴합니다.
어플리케이션이 로드되는 영역인 MOMLView의 크기를 리턴합니다.
Related application.width(), device.screen.width(), device.screen.height()
[func] bool isObject(id)
id에 해당하는 Script object나 UI object가 존재 하는지 확인합니다.
application.isObject(1)함수는 스크립트에서 id를 찾는 방법과 동일한 방식으로 id를 검색합니다.
즉, UI object를 root로 시작하지 않는 상대적인 위치 id로 검색이 가능하며, Script object와 UI object 이름이 동일할 때는 UI object가 우선합니다.
UI Object의 존재 유무만 검사하기 위해서는 CONTAINER.isExist(1)를 사용하십시오.
| Parameter | Type | 설명 |
|---|---|---|
| id | "[identifier]" | Script object나 UI Object의 id |
Related CONTAINER.isExist(1)
[func] void load(url)
새 어플리케이션을 로드합니다.
새로운 어플리케이션 정보 파일을 로드하면 현재 로드된 어플리케이션은 종료됩니다.
| Parameter | Type | 설명 |
|---|---|---|
| url | "[url]" | Application info XML 파일의 url |
Related CONTAINER.isExist(1)
[func] void loadTheme(src)
테마를 변경하고 프로그램을 다시 시작합니다.
테마를 새로 로드하게 되면 APPLICATIONINFO/START.url에 지정된 UI XML을 다시 로드합니다.
| Parameter | Type | 설명 |
|---|---|---|
| src | "[url]" | theme XML 파일 application info XML에 대한 상대 위치입니다. |
Related themeSrc, APPLICATIONINFO/THEME.src
[func] void log(logFilter, msg)
로그 메시지를 분류하여 출력합니다.
application.logFilter나 APPLICATIONINFO/DEBUG.log의 logFilter목록에 설정이 되어 있어야 로그가 표시됩니다.
모든 로그를 보기 위해서는 application.logFilter나 APPLICATIONINFO/DEBUG.log를 all로 설정하십시오.
| Parameter | Type | 설명 |
|---|---|---|
| logFilter | "[string]" | 로그 분류 "all" ⎮ "[log id] ⎮ [...]" |
| msg | "[string]" | 표시할 로그 메시지 |
Related application.logFilter, APPLICATIONINFO/DEBUG.log, device.log(2)
[func] string name()
어플리케이션 이름을 리턴합니다.
APPLICATIONINFO/NAME.name에 지정된 이름을 리턴합니다. 만약 이름을 지정하지 않았다면 package명의 마지막 부분을 사용합니다.
Related APPLICATIONINFO/NAME.name
[func] string packageName()
어플리케이션 패키지 이름을 리턴합니다.
Android는 AndroidManifest.xml의 package 값을, iOS는 bundle id를 리턴합니다.
[func] string runScript(script)
스크립트를 실행한 결과를 리턴합니다.
application.runScript는 현재 caller와 parent를 그대로 유지하면서 스크립트를 실행합니다. 현재 caller나 parent를 변경하기 위해서는 application.runScript(2)나 WINDOW.runScript(1)를 사용하십시오.
| Parameter | Type | 설명 |
|---|---|---|
| script | "[script]" | 실행할 명령 |
Related application.runScript(2), WINDOW.runScript(1)
[func] string runScript(uiId, script)
caller와 parent를 변경하여 스크립트를 실행한 결과를 리턴합니다.
application.runScript(2)는 지정된 uiId로 현재 caller와 parent를 변경합니다.
CONTAINER에서MOML/CMD.cmd를 실행할 때와 마찬가지로 caller와 parent가 동일합니다. 이러한 특성은 CONTAINER의 함수를 실행할 때 유용합니다. WINDOW.runScript(1)에서는 해당 caller.parent가 parent로 지정되므로 어느 특정 컨테이너의 함수를 실행하기 위해서는 myContainer.runScript('function.caller.myFunc')처럼 중간에 caller를 넣어서 실행해야하지만, application.runScript('myContainer', 'function.myFunc')처럼 해당 컨테이너의 함수를 바로 쓸 수 있습니다.
| Parameter | Type | 설명 |
|---|---|---|
| uiId | "[identifier]" | UI element의 id |
| script | "[script]" | 실행할 명령 |
Related application.runScript(1), WINDOW.runScript(1)
[func] string terminate()
어플리케이션을 종료합니다.
android는 마지막 activity인 경우 프로세스를 종료시키며 그렇지 않은 경우 현재 activity만 종료합니다.
iOS는 프로세스를 종료합니다.
[func] string themeSrc()
현재 지정된 테마를 리턴합니다.
Related loadTheme, APPLICATIONINFO/THEME.src
[func] string version()
어플리케이션의 버전을 리턴합니다.
마켓이나 스토어 등록시 구분하는 version을 리턴합니다.
Android는 AndroidManifest.xml 의 android:versionCode를 리턴합니다.
iOS는 Bundle version을 리턴합니다.
Related versionName
[func] string url()
현재 로드된 Application Info XML 파일의 url을 리턴합니다.
Related versionName
[func] string versionName()
어플리케이션의 버전명을 리턴합니다.
사용자에게 보여주기 위한 버전명을 리턴합니다.
android는 AndroidManifest.xml 의 android:versionName을 리턴합니다.
iOS는 Bundle version string, short를 리턴합니다.
Related version
[func] string width()
어플리케이션 뷰의 너비를 리턴합니다.
어플리케이션이 로드되는 영역인 MOMLView의 크기를 리턴합니다.
Related application.height(), device.screen.width(), device.screen.height()
▹ baseObject
baseObject는 모든 object의 기반이 되는 object입니다.
모든 Object는 이벤트 감지 함수 등록 및 해제 기능을 제공합니다.
[func] void addEventListener(event, function)
onComplete 이벤트에 function.onComplete 함수를 등록하는 예제입니다. 이벤트 발생 시 등록한 함수가 호출됩니다.
xml
<CMD cmd="appLauncher.addEventListener('onComplete', 'function.onComplete')" />
이벤트 감지 함수를 등록합니다.
Related baseObject.removeEventListener(2)
[func] void addEventListener(event, function)
onComplete 이벤트에 function.onComplete 함수를 등록하는 예제입니다. 이벤트 발생 시 등록한 함수가 호출됩니다.
xml
<CMD cmd="appLauncher.addEventListener('onComplete', 'function.onComplete')" />
이벤트 감지 함수를 등록합니다. 이벤트 발생 시 등록 된 함수가 자동 호출됩니다.
| Parameter | Type | 설명 |
|---|---|---|
| event | "[identifier]" | 이벤트 이름 |
| function | "[function.id]" ⎮ "[script]" | 이벤트 처리 함수 또는 스크립트 |
Related baseObject.removeEventListener(2)
[func] void removeEventListener(event, function)
onComplete 이벤트에 등록되어 있는 function.onComplete 함수를 해제하는 예제입니다. 이벤트 발생 시 더 이상 해당 함수가 자동 호출되지 않습니다.
xml
<CMD cmd="appLauncher.removeEventListener('onComplete', 'function.onComplete')" />
이벤트 감지 함수를 해제합니다.
| Parameter | Type | 설명 |
|---|---|---|
| event | "[identifier]" | 이벤트 이름 |
| function | "[function.id]" ⎮ "[script]" | 이벤트 처리 함수 또는 스크립트 |
Related baseObject.addEventListener(2)
▹ date
날짜와 시각에 관한 작업을 처리할 수 있는 object입니다.
date object는 내부 시각(time) 하나를 저장하고 있고, locale과 format이 설정되어 있습니다. locale은 format을 사용하는 모든 함수들이 항상 사용하며, 함수 인자로부터 연산에 필요한 format이나 time을 받은 경우에는 저장된 format이나 저장된 time을 사용하지 않습니다.
date에서 사용하는 format은 시스템의 구현을 따르므로 OS의 버전에 따라 구현 수준이 달라 동작의 차이가 있을 수 있습니다. 시스템에서 제공하는 format은 UNICODE 표준(http://www.unicode.org)을 따르고 있으며 일반적으로 많이 사용하는 형식들은 아래와 같습니다.
| format characters | description |
|---|---|
| YYYY | 년 |
| M | 월 : 1 ~ 12 |
| MM | 월 : 01 ~ 12 |
| MMM | 월(영문화권만 동작함) : Jan ~ Dec |
| MMMM | 월 : January ~ December |
| d | 일 : 1 ~ 31 |
| dd | 일: 01 ~ 31 |
| h | 시: 1 ~ 12 |
| hh | 시: 01 ~ 12 |
| H | 시: 0 ~ 23 |
| HH | 시: 00 ~ 23 |
| k | 시: 1 ~ 24 |
| kk | 시: 01 ~ 24 |
| K | 시: 0 ~ 11 |
| KK | 시: 00 ~ 11 |
| m | 분: 0 ~ 59 |
| mm | 분: 00 ~ 59 |
| s | 초: 0 ~ 59 |
| ss | 초: 00 ~ 59 |
| S | 밀리초: 0 ~ 999 |
| SS | 밀리초: 00 ~ 999 |
| SSS | 밀리초: 000 ~ 999 |
Inherited from baseObject
[attr] string ampm
지정된 시간의 오전 오후 값을 설정하거나 리턴합니다.
Values
"am" | "pm", default : "[current am or pm]"
Related date.getAmpm(1), date.format(1)
[attr] string date
지정된 시간을 date.format에서 지정한 형식에 따라 설정하거나 리턴합니다.
지정된 시간이 없을 경우 현재 시간을 리턴합니다.
Values
"[string]", default : "[current time]"
Related date.format(1)
[attr] int day
지정된 시간의 일을 설정하거나 리턴합니다.
Values
"[number]", default : "[current day]"
Related date.getDay(1)
[attr] string format
시간을 표현할 때 사용할 형식을 설정하거나 리턴합니다.
Values
"[date format]", default : " yyyy/MM/dd HH:mm:ss"
Related date.getDay(1)
[attr] int hour12
저장된 시간의 시를 12시간 단위로 설정하거나 리턴합니다.
Values
"[0-11]", default : "[current hour]"
Related date.getHour24(1)
[attr] int hour24
저장된 시간의 시를 24시간 단위로 설정하거나 리턴합니다.
Values
"[0-23]", default : "[current hour]"
Related date.getHour12(1)
[attr] string locale
날짜와 시각을 format에 따라 출력할 때 사용할 언어를 설정하거나 현재 설정 값을 리턴합니다.
Values
"[string]", default : "en"
Related date.getHour12(1)
[attr] int millisec
저장된 시간의 밀리초를 설정하거나 리턴합니다.
Values
"[0-999]", default : "[current millisecond]"
Related date.getMillisec(1)
[attr] int min
저장된 시간의 분을 설정하거나 리턴합니다.
Values
"[0-59]", default : "[current minute]"
Related date.getMin(1)
[attr] int month
저장된 시간의 월을 설정하거나 리턴합니다.
Values
"[1-12]", default : "[current month]"
Related date.getMonth(1)
[attr] int sec
저장된 시각의 초를 설정하거나 리턴합니다.
Values
"[0-59]", default : "[current second]"
Related date.getSec(1)
[attr] int year
저장된 시각의 년도를 설정하거나 리턴합니다.
Values
"[number]", default : "[current year]"
Related date.getYear(1)
[func] string add(field, value)
저장된 시각에 field에 해당하는 부분의 값을 더한 시각을 저장된 형식으로 리턴합니다.
함수 실행 후 저장된 시각은 변하지 않습니다.
| Parameter | Type | 설명 |
|---|---|---|
| type | "year" ⎮ "month" ⎮ "day" ⎮ "hour" ⎮ "min" ⎮ "sec" | |
| value | "[number]" |
Related date.add(3) , date.addDate(1) , date.addDate(2)
[func] string add(date, field, value)
함수 인자로 받은 date의 field에 해당하는 부분의 값을 더한 시각을 저장된 형식으로 리턴합니다.
| Parameter | Type | 설명 |
|---|---|---|
| date | "[string]" | |
| type | "year" ⎮ "month" ⎮ "day" ⎮ "hour" ⎮ "min" ⎮ "sec" | |
| value | "[number]" |
Related date.add(2) , date.addDate(1) , date.addDate(2)
[func] string addDate(date)
함수 인자로 받은 date와 저장된 시각을 더하여 저장된 형식으로 리턴합니다.
| Parameter | Type | 설명 |
|---|---|---|
| date | "[string]" |
Related date.addDate(2), date.add (2) , date.addDate(3)
[func] string addDate(date1, date2)
함수 인자로 받은 date1과 date2를 더하여 저장된 형식으로 리턴합니다.
| Parameter | Type | 설명 |
|---|---|---|
| date1 | "[string]" | |
| date2 | "[string]" |
Related date.addDate(1), date.add (2) , date.add (3)
[func] string diffDate(date)
함수 인자로 받은 date와 저장된 시각의 차이를 저장된 형식으로 리턴합니다.
날짜의 경우 0년 0월 0일은 실제로 존재하지 않으므로 0001/01/01(yyyy/MM/dd)을 사용합니다.
ex) date.add('2012/12/12', '0001/01/01') == '2012/12/12'
시각인 경우 0시에 대한 표현은 형식을 따릅니다. 0 : H, K, 12 : h, 24 : k
| Parameter | Type | 설명 |
|---|---|---|
| date | "[string]" |
Related date.diffDate(2), date.diffDay(1), date.diffDay(2)
[func] string diffDate(date1, date2)
함수 인자로 받은 date1과 date2의 차이를 저장된 형식으로 리턴합니다.
날짜의 경우 0년 0월 0일은 실제로 존재하지 않으므로 0001/01/01(yyyy/MM/dd)을 사용합니다.
ex) date.add('2012/12/12', '0001/01/01') == '2012/12/12'
시각인 경우 0시에 대한 표현은 형식을 따릅니다. 0 : H, K, 12 : h, 24 : k
| Parameter | Type | 설명 |
|---|---|---|
| date1 | "[string]" | |
| date2 | "[string]" |
Related date.diffDate(1), date.diffDay(1), date.diffDay(2)
[func] int diffDay(date)
함수 인자로 받은 date와 내부 시각과의 날짜 차이를 리턴합니다.
리턴하는 날짜 차는 달력에 표현되는 날짜의 차이입니다. 시각의 차를 날짜로 환산한 값이 아님을 주의하십시오. 즉 "2000/01/01 23:00:00" 과 "2000/01/02 01:00:00" 의 시간차는 2시간이지만 날짜는 1일이 차이납니다.
| Parameter | Type | 설명 |
|---|---|---|
| date | "[string]" |
Related date.diffDay(2), date.diffDate(1), date.diffDate(2)
[func] int diffDay(date1, date2)
함수 인자로 받은 date1과 date2의 날짜 차이를 리턴합니다.
리턴하는 날짜 차는 달력에 표현되는 날짜의 차이입니다. 시각의 차를 날짜로 환산한 값이 아님을 주의하십시오. 즉 "2000/01/01 23:00:00" 과 "2000/01/02 01:00:00" 의 시간차는 2시간이지만 날짜는 1일이 차이납니다.
| Parameter | Type | 설명 |
|---|---|---|
| date1 | "[string]" | |
| date2 | "[string]" |
Related date.diffDay(2), date.diffDate(1), date.diffDate(2)
[func] string getAmpm(date)
함수 인자로 받은 date의 오전 오후 값을 리턴합니다.
| Parameter | Type | 설명 |
|---|---|---|
| date | "[string]" |
Related date.ampm
[func] string getDay(date)
함수 인자로 받은 date의 날짜를 리턴합니다.
| Parameter | Type | 설명 |
|---|---|---|
| date | "[string]" |
Related date.day
[func] string getFormatDate(format)
저장된 날짜를 새로운 형식으로 변환하여 리턴합니다.
| Parameter | Type | 설명 |
|---|---|---|
| date | "[string]" |
Related date.getFormatDate(2)
[func] string getFormatDate(date, format)
함수 인자로 받은 date를 새로운 형식으로 변환하여 리턴합니다.
| Parameter | Type | 설명 |
|---|---|---|
| date | "[string]" | |
| format | "[date format]" |
Related date.getFormatDate(1)
[func] int getHour12(date)
함수 인자로 받은 date를 새로운 형식으로 변환하여 리턴합니다.
| Parameter | Type | 설명 |
|---|---|---|
| date | "[string]" |
Related date.getHour24(1), date.hour12, date.hour24
[func] int getHour24(date)
함수 인자로 받은 date의 시를 24시간 단위로 리턴합니다.
| Parameter | Type | 설명 |
|---|---|---|
| date | "[string]" |
Related date.getHour12(1) , date.hour12, date.hour24
[func] int getMillisec(date)
함수 인자로 받은 date의 1/100초를 리턴합니다.
| Parameter | Type | 설명 |
|---|---|---|
| date | "[string]" |
Related date.millisec
[func] int getMin(date)
함수 인자로 받은 date의 분을 리턴합니다.
| Parameter | Type | 설명 |
|---|---|---|
| date | "[string]" |
Related date.min
[func] int getSec(date)
함수 인자로 받은 date의 초를 리턴합니다.
| Parameter | Type | 설명 |
|---|---|---|
| date | "[string]" |
Related date.sec
[func] string getWeekDay(date)
함수 인자로 받은 date의 요일을 리턴합니다.
| Parameter | Type | 설명 |
|---|---|---|
| date | "[string]" |
Related date.weekDay(0)
[func] int getYear(date)
함수 인자로 받은 date의 년도를 리턴합니다.
| Parameter | Type | 설명 |
|---|---|---|
| date | "[string]" |
Related date.year
[func] string now()
현재 시각을 저장된 형식으로 리턴합니다.
[func] string reset()
저장된 시각을 현재 시각으로 설정하고 리턴합니다.
[func] string weekDay()
저장된 시각의 요일을 리턴합니다.
저장된 시각을 여러 형태로 리턴하거나 설정하는 다른 함수들(date.year, month, day, hour24, hour12, min, sec, ...)들과 달리 요일은 현재 값을 읽어 올 수는 있지만 변경할 수는 없습니다. 요일을 변경하기 위해서는 date.day나 다른 값들을 변경해야 합니다.
Related date.getWeekDay(1)
▹ db
<?xml version="1.0" encoding="utf-8"?>

<MOML>
   <FUNCTION id="init">
       <CMD cmd="db.exec('CREATE TABLE IF NOT EXISTS DEMO( _id INTEGER PRIMARY KEY AUTOINCREMENT, data TEXT NOT NULL)')" />
   </FUNCTION>

   <UILAYOUT portrait="300,300" landscape="300,300">
       <WINDOW layout="0,0,300,300" defaultImg="#ffff4500" align="linear:vertical|center">
           <BUTTON layout="200,50" text="select!" onClick="db.exec('SELECT * FROM DEMO')"/>
       </WINDOW>
   </UILAYOUT>

   <CMD cmd="function.init()"/>
</MOML>
db는 database에 table 생성, 수정, 삭제와 같은 작업을 수행할 수 있는 object입니다.
Inherited from baseObject
Related
Android:
<uses-permission android:name="android.permission.WRITE_EXTERNAL_STORAGE"/>
iOS:
libsqlite3.dylib
[func] bool exec(sql)
<CMD cmd="db.exec('SELECT * FROM DEMO')"/>
sql 문을 수행합니다.
쿼리 작업 수행 후 작업 결과는 db.result object에 저장합니다.
| Parameter | Type | 설명 |
|---|---|---|
| sql | "[sql statement]" |
Related db.result object
▹ db.result
<?xml version="1.0" encoding="utf-8"?>

<MOML>
   <UILAYOUT portrait="300,300" landscape="300,300">
       <WINDOW layout="0,0,300,300" defaultImg="#ffff4500" align="linear:vertical|center">
           <BUTTON layout="200,50" text="select!" onClick="db.exec('SELECT * FROM DEMO')"/>
           <BUTTON layout="200,50" text="{db.result.rowCount()}"/>
       </WINDOW>
   </UILAYOUT>
</MOML>
db.result는 db object를 통해 수행 된 쿼리 결과가 저장되는 object입니다.
Result의 columnIndex, columnName, rowIndex는 아래 도식과 같이 참조됩니다.
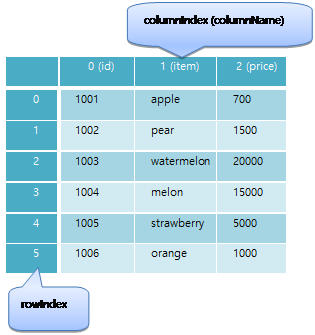
Inherited from baseObject
[func] int columnCount()
<LABEL text="{db.result.columnCount()}"/>
쿼리 수행 후 결과의 열 수
[func] string data(rowIndex, columIndex)
<LABEL text="{db.result.data(0,0)}"/>
쿼리 수행 후 결과 조회
| Parameter | Type | 설명 |
|---|---|---|
| rowIndex | "[0-based index number]" | |
| columnIndex | "[0-based index number]" |
[func] string getData(rowIndex, columName)
<LABEL text="{db.result.getData(0, 'name')}"/>
쿼리 수행 후 결과 조회
| Parameter | Type | 설명 |
|---|---|---|
| rowIndex | "[0-based index number]" | |
| columName | "[column name]" |
[func] string getXmlData()
<LIST dataSource="{db.result.getXmlData()}" dataList="/DATA/ROW"/>
쿼리 수행 후 결과를 XML 형태로 리턴
XML 형태는 Example 의 우측 결과 화면을 참고하시기 바랍니다.
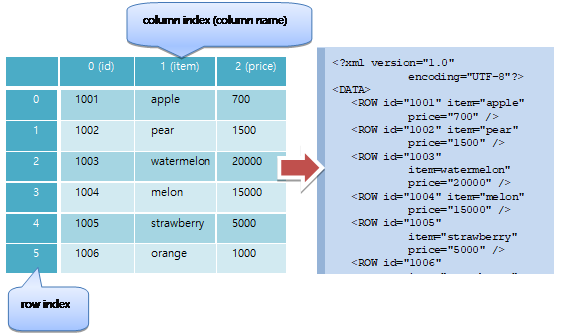
[func] int rowCount()
<LABEL text="{db.result.rowCount()}"/>
쿼리 수행 후 결과의 행 수
▹ device
device의 직접적인 기능 및 정보를 제공하는 object입니다.
Inherited from baseObject
Related
iOS:
CoreLocation.framework
[func] string getPermissionStatus(permission)
권한 상태를 리턴합니다.
Android는 permission 값으로 "android.permission.CAMERA" 와 같이 AndroidManifest.xml에 선언한 문자열로 확인할 수 있습니다.
iOS에서는 일반 앱은 sms를 보내거나 device.id를 얻어 올 수 없으므로 항상 restricted를 리턴합니다.
| return value | description |
|---|---|
| granted | 이 앱에 대해 사용자가 허용함. |
| denied | 이 앱에 대해 사용자가 거부함. |
| unasked | 아직 사용자가 권한을 확인하지 않았음. |
| disabled | 폰 전체 사용 권한이 비활성화 됨. |
| restricted | 시스템 정책에 의해 권한에 접근이 제한됨. |
| unknown | 알려지지 않은 권한이거나 권한 이름이 잘못됨. |
| notExist | 권한과 관련있는 장치나 서비스가 현재 폰에 존재하지 않음. |
| notConfigured | 권한 설정에 필요한 프로젝트 설정이나 빌드 설정이 되어 있지 않음. |
| error | 권한 확인 도중 에러 발생. |
| Parameter | Type | 설명 |
|---|---|---|
| permission | "[string]" | 아래 표 참조. |
| permission | description |
|---|---|
| camera | 카메라 사용 |
| device.id | 폰의 device Id |
| location | 위치 정보 |
| sms | SMS 보내기 |
Related device.requestPermission(1)
[func] string id()
<BUTTON onClick="device.id()" />
device의 고유 아이디를 가져옵니다.
Android에서는 telephony manager에서 제공하는 device id 를 사용합니다. CDMA방식인 경우 MEID나 ESN을 리턴하며, GSM방식인 경우 IMEI를 리턴합니다.
Android에서 telephony manager를 사용할 수 없는 경우는 android.provider.Settings.Secure.ANDROID_ID 를 리턴합니다.
iOS에서는 32byte UUID와 8byte pending ID로 이루어진 40 byte 16진수 id를 리턴합니다. 8byte pending ID는 UUID의 첫 8byte와 동일합니다.
iOS에서 리턴되는 ID는 어플리케이션 별로 관리되므로 서로 다른 어플리케이션인 경우 다른 값을 리턴합니다. 하지만, 한 어플리케이션 내에서는 삭제후 설치하거나 업데이트하더라도 동일한 값을 리턴합니다.
Related
Android:
<uses-permission android:name="android.permission.READ_PHONE_STATE"/>
[func] void log(message)
<BUTTON onClick="device.log('test system log print!!!!')" />
해당 message에 대한 system log를 출력합니다.
Android, iOS의 해당하는 log 출력 창에 "MOML"이 prefix되어서 message가 출력됩니다.
| Parameter | Type | 설명 |
|---|---|---|
| message | "[string]" |
[func] void log(tag, message)
<BUTTON onClick="device.log('TEST', 'test system log print!!!!')" />
해당 tag와 message에 대한 system log를 출력합니다.
Android, iOS의 해당하는 log 출력 창에 지정해준 tag가 prefix되어서 message가 출력됩니다.
| Parameter | Type | 설명 |
|---|---|---|
| tag | "[string]" | |
| message | "[string]" |
[func] void mail(email)
<BUTTON onClick="device.mail ('test@mospi.org')" />
e-mail을 보내는 화면으로 이동합니다. 받는 사람란에 email 이 표시됩니다.
| Parameter | Type | 설명 |
|---|---|---|
| "[string]" |
[func] string manufacturer()
<BUTTON onClick="caller.text=device.manufacturer" />
device 제조사에 대한 정보를 가져옵니다.
[func] string model()
<BUTTON onClick="caller.text=device.model" />
device model명을 가져옵니다.
[func] string phoneNumber()
<BUTTON onClick="caller.text=device.phoneNumber" />
device의 전화 번호를 가져옵니다.
+821012345678 형식입니다.
iOS에서는 항상 빈 문자열("")을 리턴합니다.
[func] string requestPermission(permission)
사용자에게 권한 승인을 요청하고 변경된 상태를 리턴합니다.
requestPermission은 현재 권한 상태가 "unasked"인 경우에만 사용자에게 권한을 허용하도록 묻습니다. 다른 상태에서는 사용자 확인 없이 현재 값을 그대로 리턴합니다.
disabled, denied 상태에서 권한을 허용하기 위해서는 사용자에게 직접 폰의 설정 등에서 권한을 변경하도록 안내해야합니다.
사용자가 폰의 설정을 통해 직접 권한을 변경한 경우는 OS나 권한 종류에 따라 현재 앱이 종료될 수 있습니다.
리턴값은 getPermissionStatus의 리턴값을 참고하십시오.
| Parameter | Type | 설명 |
|---|---|---|
| permission | "[string]" | getPermissionStatus의 permission 값 참고 |
Related device.getPermissionStatus(1)
[func] string product()
<BUTTON onClick="caller.text=device.product" />
device product명을 가져옵니다.
[func] void sms(number)
<BUTTON onClick="device.sms('01022335566')" />
sms message를 보내는 화면으로 이동합니다.
| Parameter | Type | 설명 |
|---|---|---|
| number | "[string]" | sms를 받을 전화번호를 지정합니다. |
[func] void sms(number, message, option)
<BUTTON onClick="device.sms('01022335566', 'test sms send!!!', 'background')" />
sms message를 보내는 화면으로 이동합니다.
';'을 구분자로 여러 번호를 입력하면(ex:'01022335566;01077889900') 여러 전화번호로 동일한 메시지를 보낼 수 있습니다.
| Parameter | Type | 설명 |
|---|---|---|
| number | "[string]" | sms를 받을 전화번호를 지정합니다. |
| message | "[string]" | sms를 보내는 message를 지정합니다. |
| option | "background" | background로 sms보내기를 원하는 경우 지정합니다. |
Android의 경우 option으로 "background"를 지정해줄 경우 해당 permission이 필요합니다.
<uses-permission android:name="android.permission.SEND_SMS "/>
[func] void systemPopup(description)
<BUTTON onClick="device.systemPopup('system popup message!!!')" />
device에서 기본적으로 보여지는 popup의 형태로 message를 보여줍니다.
| Parameter | Type | 설명 |
|---|---|---|
| description | "[string]" |
[func] void systemPopup(title, message, button1, button2, button3)
<BUTTON onClick="device.systemPopup('system popup', 'system popup message!!!', '확인:function.ok', '나중에:function.after', '취소:function.cancel')" />
device에서 기본적으로 보여지는 popup의 형태로 message를 보여줍니다.
| Parameter | Type | 설명 |
|---|---|---|
| title | "[string]" | popup title. |
| message | "[string]" | popup message. |
| button1 | "[string:script]" | button1에 표시될 text와 클릭 되었을 때 실행할 script를 지정합니다. |
| button2 | "[string:script]" | button2에 표시될 text와 클릭 되었을 때 실행할 script를 지정합니다. 지정하지 않는 경우 button2는 표시되지 않습니다. |
| button3 | "[string:script]" | button3에 표시될 text와 클릭 되었을 때 실행할 script를 지정합니다. 지정하지 않는 경우 button3는 표시되지 않습니다. |
[func] void tel(number)
<BUTTON onClick="device.tel('01022335566')" />
지정한 번호로 전화를 겁니다.
device.tel Android에서 사용자에게 확인을 받지 않고 바로 전화를 겁니다. 이와 같은 동작은 추가적인 권한이 필요합니다.
사용자에게 확인을 받고 전화를 걸기 위해선 appLauncher.openUri(‘tel:01022335566’, ‘’)과 같이 사용해야 합니다. 이 경우 추가적인 권한은 필요없습니다.
| Parameter | Type | 설명 |
|---|---|---|
| number | "[string]" |
Related appLauncher.openUri(2)
Android:
<uses-permission android:name="android.permission.CALL_PHONE"/>
[func] void toastPopup(message)
<BUTTON onClick="device.toastPopup('test toast popup message!!!)" />
화면 하단 창을 만들어 메시지를 표시한 후 사라집니다.
Android는 시스템의 toast popup 창을 사용합니다.
| Parameter | Type | 설명 |
|---|---|---|
| message | "[string]" |
[func] void web(url)
<BUTTON onClick="device.web('http://mospi.org')" />
기본 web browser를 통해 지정해준 url를 보여줍니다.
| Parameter | Type | 설명 |
|---|---|---|
| url | "[string]" |
▹ device.cpu
cpu와 메모리 정보를 제공하는 object입니다.
Inherited from baseObject
[func] int freeMemory()
시스템에서 사용할 수 있는 메모리를 kb 단위로 리턴합니다.
실제로 사용 가능한 메모리는 OS종류나 시스템의 정책에 따라 다를 수 있습니다.
[func] float performance()
CPU의 성능 지표값을 MIPS (Million Instruction Per Second)로 리턴합니다.
Android는 BogoMIPS값을 리턴합니다.
iOS는 알려진 장치에 대해서는 일정한 값을 리턴하고, 알 수 없는 장치에 대해서는 예측값을 리턴합니다.
[func] int totalMemory()
시스템의 전체 메모리를 kb 단위로 리턴합니다.
[func] int useMemory()
시스템이나 응용프로그램이 사용한 메모리를 kb 단위로 리턴합니다.
▹ device.gps
위치 정보를 제공하는 object입니다.
Inherited from baseObject
Related
Android:
<uses-permission android:name="android.permission.ACCESS_FINE_LOCATION"/>
<uses-permission android:name="android.permission.ACCESS_COARSE_LOCATION"/>
iOS:
CoreLocation.framework
[func] bool enabled()
장치의 위치 서비스가 활성화되어 있는 지를 리턴합니다.
장치의 위치 서비스가 활성화되어 있더라도 Android에서 일부만 허용했거나 iOS에서 해당 앱에 대해 사용자에게 아직 묻지 않았을 수 있습니다. 보다 정확한 정보를 위해서는 device.gps.status()를 확인해야 합니다.
Related device.gps.status()
[func] void start()
위치 서비스를 사용하여 현재 위치 구합니다.
위치를 구하면 onChange 이벤트를 발생합니다.
device.gps.stop()을 호출하기 전까지는 계속 위치 서비스를 사용하면서 위치 변경되면 지속적으로 onChange 이벤트를 발생합니다.
Related device.gps.stop(), device.gps.onChange(10) event
[func] string status()
위치 서비스의 세부 상태를 리턴합니다.
| device.gps.status | description | Android | iOS | device.gps.enabled |
|---|---|---|---|---|
| enabled | 위치 서비스의 모든 기능을 사용할 수 있습니다. | O | O | true |
| disabled | 사용자가 위치 서비스를 껐습니다. | O | O | false |
| gpsOnly | GPS만 사용하도록 설정되어 있습니다. | O | X | true |
| networkOnly | 네트워크만 사용하도록 설정되어 있습니다. | O | X | true |
| notDetermined | 이 앱에 대해 사용자에게 아직 묻지 않았습니다. | X | O | true |
| restricted | 앱 자체에 위치 정보를 사용할 권한이 없습니다. | O | O | false |
| userDenied | 이 앱에 대해 사용자가 거부했습니다. | X | O | false |
[func] void stop()
위치 서비스 사용을 중지합니다.
Related device.gps.start()
[event] void onChange(latitude, longitude, address, country, adminArea, subAdminArea, locality, subLocality, thoroughFare, subThoroughFare)
device.gps.start를 실행하여 위치서비스로부터 받은 위치를 전달합니다. device.gps.addEventListener로 "onChange"이벤트를 처리할 function이 지정되어 있어야 합니다.
| Parameter | Type | 설명 |
|---|---|---|
| latitude | "[-90~90]" | 위도 |
| longitude | "[-180~180] | 경도 |
| address | "[string]" | 전체 주소 |
| country | "[string]" | 국가 |
| adminArea | "[string]" | 주, 도, 대 행정구역 |
| subAdminArea | "[string]" | 소 행정구역 |
| locality | "[string]" | 도시, 시 |
| subLocality | "[string]" | 구 |
| thoroughfare | "[string]" | 동, 도로명, 거리명 |
| subThroughfare | "[string]" | 번지 |
Related device.gps.start(), baseObject.addEventListener(2), baseObject.removeEventListener(2)
▹ device.network
network 정보를 제공하는 object입니다.
Inherited from baseObject
Related
iOS:
'SystemConfiguration.framework'
<!------------------------------------------------------------------------------------>
[func] string BSSID()
무선랜의 기본 서비스 영역 식별자 (Basic Service Set IDentifier)를 리턴합니다. 보통 AP의 Mac주소를 리턴합니다.
Related
Android:
<uses-permission android:name="android.permission.ACCESS_WIFI_STATE"/>
[func] string SSID()
무선랜의 서비스 영역 식별자 (Service Set IDentifier)를 리턴합니다. 일반적으로 무선 AP의 이름으로 사용하는 문자열을 리턴합니다.
Related
Android:
<uses-permission android:name="android.permission.ACCESS_WIFI_STATE"/>
[func] string ipV4Address()
32bit IP address를 리턴합니다.
Related
Android:
<uses-permission android:name="android.permission.ACCESS_NETWORK_STATE"/>
<uses-permission android:name="android.permission.ACCESS_WIFI_STATE"/>
[func] string ipV6Address()
128bit IP address를 리턴합니다.
Related
Android:
<uses-permission android:name="android.permission.ACCESS_NETWORK_STATE"/>
<uses-permission android:name="android.permission.ACCESS_WIFI_STATE"/>
[func] bool isRoaming()
로밍 상태를 리턴합니다.
Related
Android:
<uses-permission android:name="android.permission.ACCESS_NETWORK_STATE"/>
[func] float linkSpeed()
네트워크 접속 속도를 Mbps 단위로 리턴합니다.
Related
Android:
<uses-permission android:name="android.permission.ACCESS_NETWORK_STATE"/>
<uses-permission android:name="android.permission.ACCESS_WIFI_STATE"/>
[func] string macAddress()
네트워크 장치의 mac address를 리턴합니다.
Related
Android:
<uses-permission android:name="android.permission.ACCESS_NETWORK_STATE"/>
<uses-permission android:name="android.permission.ACCESS_WIFI_STATE"/>
[func] string type()
네트워크의 접속 형식을 리턴합니다.
"unknown" | "cell3g" | "cell4g" | "wifi"
Related
Android:
<uses-permission android:name="android.permission.ACCESS_NETWORK_STATE"/>
<uses-permission android:name="android.permission.ACCESS_WIFI_STATE"/>
▹ device.os
OS정보를 제공하는 object입니다.
Inherited from baseObject
[func] string country()
시스템에 설정된 국가의 국가 코드를 리턴합니다.
국가 코드는 "US", "KR" 처럼 영문 대문자 두글자로 이루어져 있으며 ISO 3166-1 형식을 따릅니다.
[func] string language()
시스템에 설정된 언어의 언어 코드를 리턴합니다.
언어 코드는 "en", "ko" 처럼 영문 소문자 두글자로 이루어져 있으며 ISO 639-1 형식을 따릅니다.
[func] string platform()
OS의 버전을 리턴합니다. 대부분 3자리 소수점으로 구분된 숫자 형태로 이루어져 있습니다.
▹ device.screen
화면 정보를 제공하는 object입니다.
Inherited from baseObject
[func] string capture()
현재 화면을 이미지로 저장하고 파일 이름을 리턴합니다.
[func] int height()
스크린의 높이를 리턴합니다.
장치의 방향에 따라 화면이 회전된 경우 리턴되는 값도 변경됩니다.
Related device.screen.width(), application.height(), application.width()
[func] int width()
스크린의 너비를 리턴합니다.
장치의 방향에 따라 화면이 회전된 경우 리턴되는 값도 변경됩니다.
Related device.screen.height(), application.height(), application.width()
[func] float xdpi()
스크린의 가로 DPI (인치당 도트 수)를 리턴합니다.
[func] float ydpi()
스크린의 세로 DPI (인치당 도트 수)를 리턴합니다.
▹ file
file 은 파일 생성, 쓰기, 읽기, 삭제와 같은 파일 제어 기능들을 수행하는 object입니다.
Inherited from baseObject
[func] string addSlash(url)
url 문자열의 끝에 '/'를 추가합니다.
이미 끝에 "/"가 있으면 새로 추가하지 않습니다.
만약 끝에 "/"가 여러개면 하나만 남기고 나머지는 지웁니다.
| Parameter | Type | 설명 |
|---|---|---|
| url | "[url]" |
Related removeSlash(1)
[func] bool copy(src, dest)
<CMD cmd="file.copy('read.txt', 'storage:temp.txt')" />
파일을 복사합니다.
대상 파일 경로는 storage: 프로토콜만 사용할 수 있습니다.
대상 파일이 존재하면 덮어 씁니다.
파일이 존재하지 않거나, 파일을 쓸 수 없거나, 네트워크 전송도중 실패하면 false를 리턴합니다.
| Parameter | Type | 설명 |
|---|---|---|
| src | "[path]" | 원본 파일의 경로 |
| dest | "[path]" | 대상 파일의 경로 |
[func] void copy(src, dest, endFunction)
<CMD cmd="file. copy('read.txt', 'storage:temp.txt', 'function.onFileCopy')" />

. . .

<FUNCTION id="onFileCopy(success)">
   <CMD condition="success" cmd="label1.text = 'success'" elseCmd="label1.text = 'fail'"/>
</FUNCTION>
<CMD cmd="file.copy('read.txt', 'storage:temp.txt', 'label1.text=success?\'success\':\'fail\'')" />
파일을 비동기적으로 복사한 후 스크립트를 실행합니다.
대상 파일 경로는 storage: 프로토콜만 사용할 수 있습니다.
대상 파일이 존재하면 덮어 씁니다.
파일이 존재하지 않거나, 파일을 쓸 수 없거나, 네트워크 전송도중 실패하면 false를 리턴합니다.
endFunction의 [script code]를 함수인자가 없는 단순 function 호출 구문으로 구성한 경우 해당 funtion의 파라미터로 파일 복사 성공 여부로 file.success를 넘겨줍니다.
file.success는 endFunction을 호출하는 동안만 유효합니다.
| Parameter | Type | 설명 |
|---|---|---|
| src | "[path]" | 원본 파일의 경로 |
| dest | "[path]" | 대상 파일의 경로 |
| endFunction | "[script code]" | 작업이 끝난 후 실행할 명령 |
[func] bool create(path)
<CMD cmd="file.create('storage:/test/file.txt')" />
지정 경로에 파일을 생성합니다.
| Parameter | Type | 설명 |
|---|---|---|
| path | "[path]" | 생성 할 파일 경로 정보 |
[func] string data()
file.read(2)의 파일 data
file.read(2)의 endFunction이 실행되는 동안에만 유효합니다.
[func] string dir(path, ext, option)
<LIST layout="10,10,300,300" defaultImg="#40808080" dataSource="{file.dir('/data/gallery1', 'jpg|png', '')}" dataList="/FILES/FILE">
   <LISTLAYOUT>
       <LABEL layout="0,0,300,30" text="{xpath.evaluate('@path')} "/>
   </LISTLAYOUT>
</LIST>
결과 ```xml <?xml version='1.0' encoding='UTF-8' standalone='yes' ?>
폴더의파일 목록을 XML 형식으로 리턴합니다.
리턴하는 XML의 형식은 "
ext 는 "|" 를 사용하여 여러개의 확장자를 검색할 수 있으며 확장자 맨 앞의 "." 은 무시합니다.
ex) ".jpg|.png" 와 "jpg|png" 는 동일한 의미입니다.
option 으로 "recursive"를 사용하면 하위 폴더까지 검색합니다.
| Parameter | Type | 설명 |
|---|---|---|
| path | "[path]" | 파일 목록을 검색할 폴더 |
| ext | "[ext1] ⎮ [ext2] ⎮ ..." | 검색할 파일의 확장자. "⎮" 를 사용하여 여러개를 줄 수 있습니다. |
| option | "recursive" ⎮ "" | 검색 옵션 |
[func] string extName(url)
Url 의 확장자를 리턴합니다.
리턴한 확장자는 "."으로 시작하지 않습니다.
| Parameter | Type | 설명 |
|---|---|---|
| url | "[string]" | url 경로 |
[func] string fileExtName(url)
Url 의 폴더 부분을 제외한 파일.확장자 명을 리턴합니다.
리턴한 이름은 "/"를 포함하지 않습니다.
url의 폴더부분을 제외한 나머지 파일명들은 그대로 리턴합니다. 즉, url이 "."으로 끝나면 리턴한 이름도 "."으로 끝납니다.
| Parameter | Type | 설명 |
|---|---|---|
| url | "[string]" | url 경로 |
[func] string fileName(url)
Url 의 폴더 부분을 제외한 파일명을 리턴합니다.
리턴한 이름은 "/"를 포함하지 않습니다.
리턴한 이름은 "."으로 끝나지 않습니다.
| Parameter | Type | 설명 |
|---|---|---|
| url | "[string]" | url 경로 |
[func] string folderName(url)
Url 의 폴더 이름을 리턴합니다.
리턴한 folderName은 "/"로 끝나지 않습니다.
만약 url이 "/"로 끝나면 "/"만 제거하고 리턴합니다.
| Parameter | Type | 설명 |
|---|---|---|
| url | "[string]" | url 경로 |
[func] string folderFileName(url)
Url 의 확장자를 제외한 폴더와 파일 이름을 리턴합니다.
리턴한 이름은 "."로 끝나지 않습니다.
만약 url이 "/"로 끝나면 그대로 리턴합니다.
| Parameter | Type | 설명 |
|---|---|---|
| url | "[string]" | url 경로 |
[func] string makePath(folder, fileName)
makePath(folder, fileName, "")와 동일합니다.
[func] makePath(folder, fileName, ext)
Url full path 명을 만듭니다.
folder명 끝부분 "/"는 무시합니다.
fileName의 앞부분 "/" 와 끝부분 "."은 무시합니다.
ext의 앞부분 "."은 무시합니다.
ext가 없으면 리턴한 이름은 "."으로 끝나지 않습니다.
| Parameter | Type | 설명 |
|---|---|---|
| folder | "[string]" | folder url 경로 |
| fileName | "[string]" | 파일 이름 |
| ext | "[string]" | 확장자 이름 |
[func] string pathToUrl(path) (dev)
file path를 webview에서 인식할 수 있는 url 형태로 변환합니다.
path의 절대 경로가 storage: 로 시작하는 경우 file:// 로 변환합니다.
path의 절대 경로가 embed: 로 시작하는 경우 OS에 따라 접근 가능한 프로토콜로 변환합니다. (Android의 경우 AndroidManifest.xml 내 provider 설정이 필요합니다.)
path의 절대 경로가 이미 http:// 나 https:// 와 같은 url인 경우는 그대로 리턴합니다.
| Parameter | Type | 설명 |
|---|---|---|
| path | "[string]" | file 경로 |
Related
Android:
AndroidManifest.xml manifest/application/provider element
<provider android:name="org.mospi.moml.webkit.pub.ui.AssetFileContentProvider" android:authorities="[package id].embed" />
[func] string removeSlash(url)
url 문자열의 끝에 '/'를 지웁니다.
"/"로 끝나지 않으면 url을 그대로 리턴합니다.
만약 여러개의 "/"로 끝나면 모두 지웁니다.
| Parameter | Type | 설명 |
|---|---|---|
| url | "[url]" |
Related addSlash(1)
[func] bool write(path, contents)
<CMD cmd="file.write('storage:/test/file.txt', 'abcdef')" />
지정 경로의 파일에 문자열을 씁니다.
| Parameter | Type | 설명 |
|---|---|---|
| path | "[path]" | 파일 경로 정보 |
| contents | "[string]" | 파일에 쓸 문자열 |
[func] string read(path)
<LABEL text="{file.read('storage:/test/file.txt')}" />
지정 경로의 파일을 읽습니다.
file.read(1)은 동기적으로 동작하므로 파일을 모두 읽을 때까지 리턴하지 않습니다.
파일을 읽어오는 시간이 오래걸리는 경우 UI가 응답하지 않을 수 있습니다. 특히 http:// 와 같은 프로토콜을 사용하는 경우 주의하십시오.
비동기적으로 동작하기를 원하는 경우는 file.read(2)를 사용하십시오.
| Parameter | Type | 설명 |
|---|---|---|
| path | "[path]" | 파일 경로 정보 |
[func] string read(path)
<CMD cmd="file.read('storage:/test/file.txt', 'function.onFileRead')" />

. . .

<FUNCTION id="onFileRead(data)">
   <CMD cmd="label1.text = data" />
</FUNCTION>
<CMD cmd="file.read('storage:/test/file.txt', 'label1.text = file.data')" />
지정 경로의 파일을 비동기적으로 읽은 후 스크립트를 실행합니다.
file.read(2)는 비동기적으로 동작하므로 즉시 리턴합니다. 동기적으로 동작하기를 원하는 경우는 file.read(1)을 사용하십시오.
endFunction의 [script code]를 함수인자가 없는 단순 function 호출 구문으로 구성한 경우 해당 funtion의 파라미터로 file.data를 넘겨줍니다.
file.data는 endFunction을 호출하는 동안만 유효합니다.
| Parameter | Type | 설명 |
|---|---|---|
| path | "[path]" | 파일 경로 정보 |
| endFunction | "[script code]" | 작업이 끝난 후 실행할 명령 |
[func] string remove(path)
<CMD cmd="file.remove('storage:/test/file.txt')" />
지정 경로의 파일이나 폴더를 지웁니다.
| Parameter | Type | 설명 |
|---|---|---|
| path | "[path]" | 파일 경로 정보 |
[func] int size(path)
<CMD cmd="file.size('storage:/test/file.txt')" />
지정 경로의 파일의 크기를 리턴합니다.
파일이 존재하지 않거나 폴더이거나 에러가 발생한 경우에는 -1을 리턴합니다.
| Parameter | Type | 설명 |
|---|---|---|
| path | "[path]" | 파일 경로 정보 |
[func] bool success()
<CMD cmd="file.size('storage:/test/file.txt')" />
file.copy(3)의 복사 성공 여부
file.copy(3)의 endFunction이 실행되는 동안에만 유효합니다.
▹ http
<MOML version="1.1.8">

   <UILAYOUT portrait="300,300" landscape="300,300">
       <WINDOW layout="0,0,300,300" defaultImg="#f8f8f8" align="linear:vertical|center">
           <LABEL layout="200,30" text="http file upload example" fontSize="15"/>
           <BUTTON layout="200,30" text="imageCapture" onClick="function.imageCapture"/>
           <WINDOW id="preview" layout="200,100" defaultImg="#ffffff"/>
           <LABEL id="imagePath" layout="200,30"/>
           <BUTTON layout="200,30" text="fileUpload" onClick="function.fileUpload"/>
       </WINDOW>
   </UILAYOUT>

   <!-- open image capture -->
   <FUNCTION id="imageCapture">
       <CMD cmd="appLauncher.addEventListener('onComplete', 'onSelectImage');"/>
       <CMD cmd="appLauncher.setSaveForImageCapture(true)"/>
       <CMD cmd="appLauncher.setSaveDirForImageCapture('storage:Photo/')"/>
       <CMD cmd="appLauncher.exec('imageCapture')"/>
   </FUNCTION>

   <!-- set picture -->
   <FUNCTION id="onSelectImage(type, path)">
       <CMD cmd="appLauncher.removeEventListener('onComplete', 'onSelectImage');"/>
       <CMD cmd="preview.img = path"/>
       <CMD cmd="imagePath.text = path"/>
   </FUNCTION>

   <!-- upload saved picture-->
   <FUNCTION id="fileUpload">
       <CMD cmd="requestId = http.createRequestId()"/>
       <CMD cmd="http.clearPostFileInfo(requestId)"/>
       <CMD cmd="http.addPostFileInfo(requestId, 'file', imagePath.text)"/>
       <CMD cmd="http.post(requestId, 'http://www.MyCompany.com/post.php?dir=testHttpFileUpload', 'key1=value1|key2=value2', 'function.onCompleteFileUpload')" />
   </FUNCTION>

   <!-- display upload result -->
   <FUNCTION id="onCompleteFileUpload(data, requestId, success, errorCode, errorMsg)">
       <CMD cmd="device.systemPopup('requestId:' + requestId + '\r\nsuccess:' + success + '\r\nerrorCode:' + errorCode + '\r\nerrorMsg:' + errorMsg + '\r\ndata:' + data)"/>
   </FUNCTION>
</MOML>
http는 웹 서버와의 통신 작업을 수행하는 object입니다.
Inherited from baseObject
Related
iOS :
MobileCoreServices.framework
[attr] timeout
<CMD cmd="http.timeout=10000"/>
통신 timeout
Values
[millisecond]
[func] int addHeaderField(requestId, field, value)
<CMD cmd="requestId = http.createRequestId()" />
<CMD cmd="http.addHeaderField(requestId, 'User-Agent', 'SmartView/1.2')" />
GET이나 POST 방식으로 요청할 때 HTTP 헤더 필드 값을 설정하고 requestId를 리턴합니다.
requestId를 -1 로 요청하면 새로운 requestId를 생성하여 리턴합니다.
| Parameter | Type | 설명 |
|---|---|---|
| requestId | "[request id]" | http.createRequestId로 생성된 요청 id |
| field | "[string]" | 필드 이름 |
| value | "[string]" | 필드 값 |
Related http.createRequestId()
[func] int addPostFileInfo(requestId, fileKey, filePath)
<CMD cmd="http.addPostFileInfo(userVariable.uploadRequestId, 'uploadedfile', 'storage:/test.txt')" />
POST 방식으로 업로드할 파일 정보를 추가합니다.
requestId를 -1 로 요청하면 새로운 requestId를 생성하여 리턴합니다.
같은 requestId로 파일 정보를 여러번 추가하면 여러개의 파일을 한번에 전송할 수 있습니다.
| Parameter | Type | 설명 |
|---|---|---|
| requestId | "[request id]" | http.createRequestId로 생성된 요청 id |
| fileKey | "[string]" | 파일 키 |
| filePath | "[file path]" | 파일 경로 |
Related http.createRequestId()
[func] void clearPostFileInfo(requestId)
<CMD cmd="userVariable.uploadRequestId = http.createRequestId()" />
<CMD cmd="http.addPostFileInfo(userVariable.uploadRequestId, 'uploadedfile', 'storage:/test.txt')" />
<CMD cmd="http.clearPostFileInfo(userVariable.uploadRequestId)" />
업로드 파일 정보를 모두 삭제합니다.
| Parameter | Type | 설명 |
|---|---|---|
| requestId | "[request id]" | http.createRequestId로 생성된 요청 id |
Related http.createRequestId()
[func] int createRequestId()
<CMD cmd="requestId = http.createRequestId()" />
새로운 request id (http 통신 unique id)를 생성합니다.
[func] string data()
get이나 post의 응답 data를 리턴합니다.
get이나 post의 endFunction이 실행되는 동안에만 유효합니다.
Values
"[string]"
[func] int errorCode()
get이나 post의 에러코드나 http 상태 코드를 리턴합니다.
get이나 post의 endFunction이 실행되는 동안에만 유효합니다.
웹 서버 접속에 성공하지 못하면 -1값을 갖습니다.
웹 서버 접속에 성공한 경우 http 상태코드를 갖습니다.
Values
"-1" | "[100 - 599]"
[func] string errorMsg()
get이나 post의 에러메시지나 http 상태 메시지를 리턴합니다.
get이나 post의 endFunction이 실행되는 동안에만 유효합니다.
메시지는 OS종류나 OS버전에 따라 다르게 표시됩니다.
Values
"[string]"
[func] int get(url, parameters)
http.get(-1, url, parameters, '')와 동일합니다.
[func] int get(requestId, url, parameters)
http.get(requestId, url, parameters, '')와 동일합니다.
Values
"[string]"
[func] int get(requestId, url, parameters, endFunction)
<CMD cmd="http.get(-1, 'http://mospi.org/test/get.jsp', 'key1=value1|key2=value2', 'function.onHttpGet')" />
. . .
<FUNCTION id="onHttpGet(data, requestId, success, errorCode, errorMsg)">
   <CMD cmd="device.systemPopup('requestId:' + requestId + '\r\nsuccess:' + success + '\r\nerrorCode:' + errorCode + '\r\nerrorMsg:' + errorMsg + '\r\ndata:' + data)"/>
</FUNCTION>
<CMD cmd="http.get(-1, 'http://mospi.org/test/get.jsp?key1=value1&key2=value2', '', 'device.systemPopup(\'data:\' + http.data)')" />
파라미터가 여러 개인 경우 '|' 로 구분합니다. 만약 key나 value에 '|' 문자를 써야하는 경우라면 '|' 로 써야 합니다.
<CMD cmd="parameters = 'name=neutral|value=:-\|'" />
파라미터의 key나 value 값으로 다른 문자열 변수를 사용하는 경우 string.encode의 urlQuery형식으로 문자열을 변환하여 사용하십시오.
<CMD cmd="parameters = 'name=neutral|value=' + string.encode(value, 'urlQuery')" />
http server 로 GET 요청을 수행하고 request id 리턴합니다.
requestId를 -1 로 요청하면 새로운 requestId를 생성하여 리턴합니다.
endFunction의 [script code]를 함수인자가 없는 단순 function 호출 구문으로 구성한 경우 해당 funtion의 파라미터로 http.data, http.requestId, http.success, http.errorCode, http.errorMsg 를 넘겨줍니다. (onComplete와 파라미터 순서가 다름에 주의하십시오.)
http.data, http.requestId, http.success, http.errorCode, http.errorMsg는 endFunction을 호출하는 동안만 유효합니다.
| Parameter | Type | 설명 |
|---|---|---|
| requestId | "[request id]" | 요청 id |
| url | "[url]" | server url |
| parameters | "[key1=value1⎮key2=value2⎮...]" | 파라미터 |
| endFunction | "[script]" | 전송이 끝난 후 실행할 명령 |
Related http.createRequestId()
[func] int post(url, parameters)
http.post(-1, url, parameters, '')와 동일합니다.
[func] int post(requestId, url, parameters)
http.post(requestId, url, parameters, '')와 동일합니다.
[func] int post(requestId, url, parameters, endFunction)
<CMD cmd="http.post(-1, 'http://mospi.org/test/get.jsp', 'key=value', 'function.onHttpPost)" />
. . .
<FUNCTION id="onHttpPost (data, requestId, success, errorCode, errorMsg)">
   <CMD cmd="device.systemPopup('requestId:' + requestId + '\r\nsuccess:' + success + '\r\nerrorCode:' + errorCode + '\r\nerrorMsg:' + errorMsg + '\r\ndata:' + data)"/>
</FUNCTION>
<CMD cmd="http.post (-1, 'http://mospi.org/test/get.jsp?key=value', '', 'device.systemPopup(\'data:\' + http.data)')" />
파라미터가 여러 개인 경우 '|' 로 구분합니다. 만약 key나 value에 '|' 문자를 써야하는 경우라면 '|' 로 써야 합니다.
<CMD cmd="parameters = 'name=neutral|value=:-\|'" />
파라미터의 key나 value 값으로 다른 문자열 변수를 사용하는 경우 string.encode의 urlQuery형식으로 문자열을 변환하여 사용하십시오.
<CMD cmd="parameters = 'name=neutral|value=' + string.encode(value, 'urlQuery')" />
http server 로 POST 요청을 수행하고 requestId를 리턴합니다.
http.post는 업로드 파일 정보가 있을 경우 같이 보냅니다.
requestId를 -1 로 요청하면 새로운 requestId를 생성하여 리턴합니다.
| Parameter | Type | 설명 |
|---|---|---|
| requestId | "[request id]" | 요청 id |
| url | "[url]" | server url |
| parameters | "[key1=value1⎮key2=value2⎮...]" | 파라미터 |
| endFunction | "[script]" | 전송이 끝난 후 실행할 명령 |
Related http.createRequestId()
[func] void removePostFileInfo(requestId, fileKey)
<CMD cmd="http.removePostFileInfo(userVariable.uploadRequestId, 'uploadFile')" />
fileKey에 해당하는 업로드 파일 정보를 삭제합니다.
| Parameter | Type | 설명 |
|---|---|---|
| requestId | "[request id]" | 요청 id |
| fileKey | "[file key]" | 파일 키 |
Related http.createRequestId()
[func] int requestId()
get이나 post의 requestId를 리턴합니다.
get이나 post의 endFunction이 실행되는 동안에만 유효합니다.
Values
"[number]"
[func] int setContent (requestId, content)
post 전송시 보낼 내용을 설정하고 requestId를 리턴합니다.
requestId를 -1 로 요청하면 새로운 requestId를 생성하여 리턴합니다.
content가 설정되어 있는 경우는 parameters는 무시합니다.
| Parameter | Type | 설명 |
|---|---|---|
| requestId | "[request id]" | 요청 id |
| content | "[string]" | 내용 |
Related http.createRequestId(), http.post(3,4)
[func] int setContentType(requestId, type)
<CMD cmd="http.setContentType(userVariable.uploadRequestId, 'text/xml')" />
전송 데이터 타입을 설정하고 requestId를 리턴합니다.
requestId를 -1 로 요청하면 새로운 requestId를 생성하여 리턴합니다.
파일 업로드 정보가 없는 HTTP GET이나 POST 전송시 헤더 필드의 "Content-Type" 을 설정합니다.
http.addHeaderField(3) 함수를 사용해 "Content-Type" 을 직접 설정한 경우 setContentType으로 설정한 값은 무시됩니다.
| Parameter | Type | 설명 |
|---|---|---|
| requestId | "[request id]" | 요청 id |
| type | "[string]" | 데이터 타입 |
Related http.createRequestId(), http.addHeaderField(3)
[event] bool success()
get이나 post의 응답 결과
get이나 post의 endFunction이 실행되는 동안에만 유효합니다.
Values
"true" | "false"
[event] void onComplete(requestId, isSucces, errorCode, content, errorMessage)
http.get, http.post를 수행하여 웹서버로부터 수신한 결과를 전달합니다. baseObject.addEventListener에 "onComplete"이벤트를 처리할 function이 지정되어 있어야 합니다.
| Parameter | Type | 설명 |
|---|---|---|
| requestId | "[request id]" | 요청 id |
| isSuccess | "true" ⎮ "false" | 요청 성공 여부 |
| errorCode | "[response Code]" | HTTP 통신 상태 코드 ex)404, 400 |
| content | "[string]" | 응답 본문 내용 |
| errorMessage | "[error Message]" | 통신에 실패했을 때 웹서버에서 전달해주는 오류 내용 |
Related baseObject.addEventListener(2), baseObject.removeEventListener(2)
▹ image (dev)
이미지 파일과 관련된 작업을 수행합니다.
Inherited from baseObject
[func] string adjust(url, maxWidth, maxHeight)
<CMD cmd="uploadFile = image.adjust(photoFile, 1000, 1000)"/>
사진을 0°로 회전시키고, 가로 세로 비율을 유지하면서 파일의 크기를 줄입니다.
| Parameter | Type | 설명 |
|---|---|---|
| url | "[url]" | 사진 파일 위치 |
| maxWidth | "[number]" | 가로 최대 크기 |
| maxHeight | "[number]" | 세로 최대 크기 |
[func] string capture(uiId, left, top, width, height)
<CMD cmd="file = image.capture('webview', 0, 0, root.width, root.height)"/>
UI Element의 일부분을 캡처하여 이미지를 파일로 저장하고, 파일 url을 리턴합니다.
| Parameter | Type | 설명 |
|---|---|---|
| id | "[identifier]" | UI element의 id |
| left | "[number]" | 캡처할 영역의 왼쪽 위치 (UI element를 기준으로 한 상대 좌표임.) |
| top | "[number]" | 캡처할 영역의 위쪽 위치 (UI element를 기준으로 한 상대 좌표임.) |
| width | "[number]" | 캡처할 영역의 너비 |
| height | "[number]" | 캡처할 영역의 높이 |
▹ json
json는 json 형식의 데이터를 xml 형태로 변환하는 작업을 수행하는 object입니다.
Inherited from baseObject
[func] string toXml(jsonData)
<LIST dataSource="{json.toXml(userVariable.jsonData)}" dataList="/DATA/ROW" />
원본 json data
{
   "fruit": [
       {"id":1001, "item":"apple", "price":700},
       {"id":1002, "item":"pear", "price":1500}
   ]
}
변환된 xml data
<?xml version="1.0" encoding="UTF-8"?>

<DATA>
   <fruit>
       <id>1001</id>
       <price>700</price>
       <item>apple</item>
   </fruit>
   <fruit>
       <id>1002</id>
       <price>1500</price>
       <item>pear</item>
   </fruit>
</DATA>
json 형식 데이터를 xml 형태로 변환하여 리턴
| Parameter | Type | 설명 |
|---|---|---|
| jsonData | "[json data statement]" |
▹ math
<LABEL layout="0,0,300,100" text="{math.add(userVariable.op1, userVariable.op2)}" />
math는 수학적 연산을 수행하는 object입니다.
Inherited from baseObject
[func] float add(op1, op2)
<LABEL layout="0,0,300,100" text="{math.add(userVariable.op1, userVariable.op2)}" />
더하기
| Parameter | Type | 설명 |
|---|---|---|
| op1 | "[number]" | |
| op2 | "[number]" |
[func] float abs(num)
절대값
| Parameter | Type | 설명 |
|---|---|---|
| num | "[number]" |
[func] float acos(number)
코사인 함수를 사용했을 때 지정한 값이 나오는 라디안을 리턴합니다.
| Parameter | Type | 설명 |
|---|---|---|
| num | "[number]" |
[func] float acosd(number)
코사인 함수를 사용했을 때 지정한 값이 나오는 각도를 리턴합니다.
| Parameter | Type | 설명 |
|---|---|---|
| num | "[number]" |
[func] float asin(number)
사인 함수를 사용했을 때 지정한 값이 나오는 라디안을 리턴합니다.
| Parameter | Type | 설명 |
|---|---|---|
| num | "[number]" |
[func] float asind(number)
사인 함수를 사용했을 때 지정한 값이 나오는 각도를 리턴합니다.
| Parameter | Type | 설명 |
|---|---|---|
| num | "[number]" |
[func] float atan(number)
탄젠트 함수를 사용했을 때 지정한 값이 나오는 라디안을 리턴합니다.
| Parameter | Type | 설명 |
|---|---|---|
| num | "[number]" |
[func] float atand(number)
탄젠트 함수를 사용했을 때 지정한 값이 나오는 각도를 리턴합니다.
| Parameter | Type | 설명 |
|---|---|---|
| num | "[number]" |
[func] float atan2(y, x)
주어진 점의 라디안을 리턴합니다.
| Parameter | Type | 설명 |
|---|---|---|
| y | "[number]" | |
| x | "[number]" |
[func] float atan2d(y, x)
주어진 점의 각도를 리턴합니다.
| Parameter | Type | 설명 |
|---|---|---|
| y | "[number]" | |
| x | "[number]" |
[func] float ceil(number)
주어진 수보다 큰 가장 작은 정수를 리턴합니다.
| Parameter | Type | 설명 |
|---|---|---|
| num | "[number]" |
[func] float cos(number)
라디안 코사인
| Parameter | Type | 설명 |
|---|---|---|
| num | "[number]" |
[func] float cosd(number)
각도 코사인
| Parameter | Type | 설명 |
|---|---|---|
| num | "[number]" |
[func] float div(op1, op2)
<LABEL layout="0,0,300,100" text="{math.div(userVariable.op1, userVariable.op2)}" />
나누기
| Parameter | Type | 설명 |
|---|---|---|
| op1 | "[number]" | |
| op2 | "[number]" |
[func] float floor(number)
주어진 수보다 작은 가장 큰 정수를 리턴합니다.
| Parameter | Type | 설명 |
|---|---|---|
| num | "[number]" |
[func] float log(number)
자연 로그
| Parameter | Type | 설명 |
|---|---|---|
| num | "[number]" |
[func] float log10(number)
상용 로그
| Parameter | Type | 설명 |
|---|---|---|
| num | "[number]" |
[func] float max(op1, op2)
최대값
| Parameter | Type | 설명 |
|---|---|---|
| op1 | "[number]" | |
| op2 | "[number]" |
[func] float min(op1, op2)
최소값
| Parameter | Type | 설명 |
|---|---|---|
| op1 | "[number]" | |
| op2 | "[number]" |
[func] float mul(op1, op2)
<LABEL layout="0,0,300,100" text="{math.mul(userVariable.op1, userVariable.op2)}" />
곱하기
| Parameter | Type | 설명 |
|---|---|---|
| op1 | "[number]" | |
| op2 | "[number]" |
[func] float num(number)
<LABEL layout="0,0,300,100" text="{userVariable.numValue = math.num(strValue)}" />
숫자로 변환
| Parameter | Type | 설명 |
|---|---|---|
| num | "[number]" |
[func] float pi()
파이(π)값 (3.141592653589793)
| Parameter | Type | 설명 |
|---|---|---|
| op1 | "[number]" | |
| op2 | "[number]" |
[func] float pow(op1, op2)
거듭 제곱
| Parameter | Type | 설명 |
|---|---|---|
| op1 | "[number]" | |
| op2 | "[number]" |
[func] int rand(num)
주어진 수를 넘지 않는 임의의 자연수를 리턴합니다.
| Parameter | Type | 설명 |
|---|---|---|
| num | "[number]" |
[func] float sin(number)
라디안 사인값
| Parameter | Type | 설명 |
|---|---|---|
| num | "[number]" |
[func] float sind(number)
각도 사인값
| Parameter | Type | 설명 |
|---|---|---|
| num | "[number]" |
[func] float sqrt(num)
제곱근
| Parameter | Type | 설명 |
|---|---|---|
| num | "[number]" |
[func] float sub(op1, op2)
빼기
| Parameter | Type | 설명 |
|---|---|---|
| op1 | "[number]" | |
| op2 | "[number]" |
[func] float tan(number)
라디안 탄젠트값
| Parameter | Type | 설명 |
|---|---|---|
| num | "[number]" |
[func] float tand(number)
각도 탄젠트값
| Parameter | Type | 설명 |
|---|---|---|
| num | "[number]" |
[func] float toDegree(num)
라디안을 각도로 변환합니다.
| Parameter | Type | 설명 |
|---|---|---|
| num | "[number]" |
[func] float toRadian(num)
각도를 라디안으로 변환합니다.
| Parameter | Type | 설명 |
|---|---|---|
| num | "[number]" |
▹ res
<CMD cmd="res.load('/res/' + res.lang + '/strings.xml')"/>
다국어 처리를 위한 리소스 문자열을 다룰 수 있는 object입니다.
Inherited from baseObject
[attr] string lang
<CMD cmd="res.lang = 'en'"/>
<CMD cmd="res.load('/res/' + res.lang + '/strings.xml')"/>
<BUTTON img="/res/{res.lang}/roundButton.png" text="Confirm"/>
현재 리소스 언어
기본값은 device.os.language가 리턴하는 값입니다.
res.lang과 STRING.lang의 값은 단순히 서로를 매칭하기 위한 것이므로 일반적으로 많이 사용하는 "kr", "en"등과 같은 언어 코드 외에 사용자가 정의한 임의의 값도 사용할 수 있습니다.
Values
[strings], default: system language
Related device.os.language, STRING.lang
[func] void load(url)
strings.xml
<?xml version="1.0" encoding="utf-8"?>

<MOML>
   <STRINGS lang="en">
       <STRING key="English" value="English"/>
       <STRING key="Setting" value="Setting"/>
       <STRING key="Language:" value="Language:"/>
   </STRINGS>

   <STRINGS lang="zh-CN">
       <STRING key="English" value="繁體中文"/>
       <STRING key="Setting" value="设置"/>
       <STRING key="Language:" value="语言:"/>
   </STRINGS>
</MOML>
<CMD cmd="res.load('strings.xml')"/>
어플리케이션 문자열 테이블에 STRINGS XML 파일을 로딩합니다.
로드한 문자열은 어플리케이션이 종료되거나 새로운 ApplicationInfo가 로드될 때까지 유지됩니다.
파일을 여러번 로딩한 경우 문자열 테이블은 병합됩니다.
document 문자열 테이블에 동일한 키가 존재하는 경우 어플리케이션 문자열 테이블 대신 document 문자열 테이블의 값이 사용됩니다.
| Parameter | Type | 설명 |
|---|---|---|
| url | "[url]" ⎮ "[xml text]" | STRINGS XML 파일의 url이나 파일 내용 |
[func] string paramStr(key, strs...)
<LABEL text="{res.paramStr('%1 over %2', 4, 7)}" />
<LABEL text="{res.paramStr('%1 over %2 = %1/%2', 4, 7)}" />
현재 설정된 언어의 문자열 테이블에서 key에 해당하는 문자열 내의 %n을 차례대로 치환하여 리턴합니다.
%n으로 같은 번호를 여러번 사용하면 하나의 strs로 여러개를 함께 치환할 수 있습니다.
| Parameter | Type | 설명 |
|---|---|---|
| key | "[string]" | %n을 포함한 문자열에 해당하는 키 |
| strs | "[string]", "[string]", ... | %n을 포함한 문자열에 해당하는 키 |
[func] string str(key)
<LABEL text="{res.str('Thank you.')}"/>
<LABEL text=".@Thank you."/>
현재 설정된 언어의 문자열 테이블에서 key에 해당하는 문자열 값을 찾아 리턴합니다.
UI element의 value 전체를 "{res.str('KEY_STRING')}"와 같이 처리하는 경우 ".@KEY_STRING" 으로 대신할 수 있습니다.
key를 검색하는 순서는 document 문자열 테이블, parent document 문자열 테이블, application 문자열 테이블 순입니다.
현재 언어의 문자열 테이블에서 key에 해당하는 문자열 값을 찾지 못한 경우는 키 자체를 리턴합니다.
| Parameter | Type | 설명 |
|---|---|---|
| key | "[string]" | 언어의 문자열 테이블에 등록된 키 |
▹ saveVariable
다음 어플리케이션 실행 시에도 마지막에 사용한 userId를 그대로 사용하기 위해 saveVariable.userId 로 저장합니다.
<?xml version="1.0" encoding="utf-8"?>

<MOML version="1.1.4">
  <UILAYOUT portrait="320,300" landscape="320,300">
      <WINDOW layout="320,480" align="relative">
        <EDIT id="userId" layout="145,2,25,28" text="{saveVariable.userId}" />
        <BUTTON layout="145,2,60,28" text="OK" onClick="saveVariable.userId=userId.text" />
      </WINDOW>
  </UILAYOUT>
</MOML>
saveVariable은 application 내 의 전역변수들을 관리하는 object 입니다. saveVariable은 파일로 저장되기 때문에 어플리케이션이 삭제 될 때 까지 사용할 수 있는 변수입니다.
saveVariable의 기본값은 empty string("")입니다.
Inherited from userVariable
▹ sound
다음 어플리케이션 실행 시에도 마지막에 사용한 userId를 그대로 사용하기 위해 saveVariable.userId 로 저장합니다.
<?xml version="1.0" encoding="UTF-8"?>

<MOML>
   <FUNCTION id="endFunc">
       <CMD cmd="device.systemPopup('Sound', 'Play end', 'OK','', '')" />
   </FUNCTION>

   <UILAYOUT portrait="300,270">
       <WINDOW layout="0,0,320,270" align="linear:vertical" scroll="vertical" onShow="sound.stopAll()">
           <BUTTON text="create" layout="100,50" defaultImg="#ffff00" onClick="userVariable.Sound = sound.createSound('http://mospi.org/test/sample/music.mp3', 'autoPlay:true | loop:false | shareResource:true', 'function.endFunc')"/>
           <BUTTON text="PLAY" layout="100,50" defaultImg="#ffff00" onClick="sound.play(userVariable.Sound)"/>
           <BUTTON text="Stop" layout="100,50" defaultImg="#ffff00" onClick="sound.stop(userVariable.Sound)"/>
           <BUTTON text="Pause" layout="100,50" defaultImg="#ffff00" onClick="sound.pause(userVariable.Sound)"/>
           <BUTTON text="Loop" layout="100,50" defaultImg="#ffff00" onClick="sound.loop(userVariable.Sound)"/>
       </WINDOW>
   </UILAYOUT>
</MOML>
sound는 음악 파일을 재생하는 object입니다. 재생할 수 있는 음원의 종류는 OS에 따라 결정됩니다.
Inherited from baseObject
Related
iOS:
AVFoundation.framework
[func] int createSound(path, option, endFunction)
음악 파일 정보를 생성, sound uique id 리턴
| Parameter | Type | 설명 |
|---|---|---|
| path | "[file path]" | 음악 파일 경로 |
| option | "autoPlay:["true" ⎮ "false"] ⎮ loop:["true" ⎮ "false"] shareResource:["true" ⎮ "false"]" | 옵션 |
| endFunction | "[end function id]" | 재생 종료 후 호출 함수 설정 |
Related sound.Play(1)
[func] void loop(id, loop)
반복 재생 설정
| Parameter | Type | 설명 |
|---|---|---|
| id | "[sound unique identifier]" | sound unique id |
| loop | "true" ⎮ "false" | 반복 재생 |
Related sound.createSound(3)
[func] bool isPlay (id)
재생중인지 여부를 리턴합니다.
| Parameter | Type | 설명 |
|---|---|---|
| id | "[sound unique identifier]" | sound unique id |
[func] void pause(id)
일시 정지
| Parameter | Type | 설명 |
|---|---|---|
| id | "[sound unique identifier]" | sound unique id |
Related sound.createSound(3), sound.play(1)
[func] void play(id)
재생
| Parameter | Type | 설명 |
|---|---|---|
| id | "[sound unique identifier]" | sound unique id |
Related sound.createSound(3), sound.pause(1), sound.stop(1)
[func] void stop(id)
정지
| Parameter | Type | 설명 |
|---|---|---|
| id | "[sound unique identifier]" | sound unique id |
Related sound.createSound(3), sound.play(1)
[func] void stopAll()
음악 파일 전체 정지
▹ string
<?xml version="1.0" encoding="UTF-8"?>

<MOML>
   <UILAYOUT portrait="320,480">
       <LABEL layout="0,0,200,30" text="string concatenation: {string.add('abc','def','ghi')}" defaultImg="#ffffff" textAlign="left"/>
       <LABEL layout="0,30,200,30" text="{string.cmp('abc','abc')}" defaultImg="#ffffff" textAlign="left"/>
       <LABEL layout="0,60,200,30" text="string length: {string.len('abcdef')}" defaultImg="#ffffff" textAlign="left"/>
       <LABEL layout="0,90,200,30" text="{string.sub('abcdef',0,2)}" defaultImg="#ffffff" textAlign="left"/>
       <LABEL layout="0,120,200,30" text="{string.format('%04d','30')}" defaultImg="#ffffff" textAlign="left"/>
       <LABEL layout="0,150,200,30" text="{string.comma('130000')}" defaultImg="#ffffff" textAlign="left"/>
       <LABEL layout="0,180,200,30" text="{string.replace('The abc of math','abc','123')}" defaultImg="#ffffff" textAlign="left"/>
       <LABEL layout="0,210,200,30" text="{string.splitCount('a,b,c,d',',')}" defaultImg="#ffffff" textAlign="left"/>
       <LABEL layout="0,240,200,30" text="{string.getSplitString('a,b,c,d',',','2')}" defaultImg="#ffffff" textAlign="left"/>
   </UILAYOUT>
</MOML>
문자열 관련 연산을 하기 위한 기능을 제공합니다.
Inherited from baseObject
[func] string add(strs...)
문자열 여러개를 붙입니다.
| Parameter | Type | 설명 |
|---|---|---|
| strs | "[string]", "[string]", ... |
[func] string cmp(str1, str2)
문자열 2개를 비교한 결과를 리턴합니다.
| 리턴 값 | 설명 |
|---|---|
| 0 | str1 == str2, 문자열이 정확히 같은 경우 |
| -1 | str1 < str2 , 첫 번째 다른 문자의 코드 값이 str1이 작은 경우이거나 str1 이 str2의 prefix인 경우 |
| 1 | str1 > str2, 첫 번째 다른 문자의 코드 값이 str1이 큰 경우이거나 str2가 str1의 prefix인 경우 |
| Parameter | Type | 설명 |
|---|---|---|
| str1 | "[string]" | |
| str2 | "[string]" |
[func] string comma(str)
"," 를 3자리마다 넣은 문자열을 리턴합니다.
| Parameter | Type | 설명 |
|---|---|---|
| str | "[string]" |
[func] string decode(str, type)
인코딩한 문자열을 디코딩합니다.
디코딩에 실패하면 빈문자열을 리턴합니다.
| Parameter | Type | 설명 |
|---|---|---|
| str | "[string]" | 작업할 문자열 |
| type | "base64" ⎮ "script" ⎮ "urlQuery" | 인코딩 방식 |
[func] string encode(str, type)
문자열을 다른 형식으로 인코딩합니다.
인코딩에 실패하면 빈문자열을 리턴합니다.
(예제)
type | str | return
---- | --- | ------
base64 | abcd | YWJjZA==
script | func('a') | func(\'a\')
urlQuery | 10% increased | 10%25+increased
| Parameter | Type | 설명 |
|---|---|---|
| str | "[string]" | 작업할 문자열 |
| type | "base64" ⎮ "script" ⎮ "urlQuery" | 인코딩 방식 |
[func] bool ends(str, suffix)
문자열의 뒷부분 일치하는지 확인합니다.
| Parameter | Type | 설명 |
|---|---|---|
| str | "[string]" | 작업할 문자열 |
| suffix | "[string]" | 비교할 부분 문자열 |
[func] bool equals(str1, str2)
문자열 2개를 비교해 같은지 여부를 리턴합니다.
| Parameter | Type | 설명 |
|---|---|---|
| str1 | "[string]" | |
| str2 | "[string]" |
[func] bool equalsIgnoreCase(str1, str2)
문자열 2개를 대소문자 구분없이 비교해 같은지 여부를 리턴합니다.
| Parameter | Type | 설명 |
|---|---|---|
| str1 | "[string]" | |
| str2 | "[string]" |
[func] int find(str, subStr)
문자열을 검색한 후 위치를 리턴합니다.
검색할 대상에 문자열이 포함되어 있지 았으면 -1을 리턴합니다.
| Parameter | Type | 설명 |
|---|---|---|
| str | "[string]" | 검색할 문자열이 포함되어 있는 대상 문자열 |
| subStr | "[string]" | 검색할 문자열 |
** related ** reverseFind(2,3)
[func] int find(str, subStr, startIndex)
문자열을 검색한 후 위치를 리턴합니다.
검색할 대상에 문자열이 포함되어 있지 았으면 -1을 리턴합니다.
| Parameter | Type | 설명 |
|---|---|---|
| str | "[string]" | 검색할 문자열이 포함되어 있는 대상 문자열 |
| subStr | "[string]" | 검색할 문자열 |
| startIndex | "[number]" | 검색을 시작할 위치 |
** related ** reverseFind(2,3)
[func] string format(format, args...)
지정한 형식으로 문자열을 만듭니다.
| Parameter | Type | 설명 |
|---|---|---|
| format | "[format]" | 아래 표 참조 |
| args | "[string]", "[string]",… | format 문자열에 순서대로 대입할 문자열 |
| format character | 설명 |
|---|---|
| %c | 문자 코드 값에 해당하는 문자로 표현합니다. |
| %s | 문자열로 표현합니다. |
| %d | 10진수형으로 표현합니다. |
| %x | 16진수형으로 표현합니다. |
| %f | 실수형으로 표현합니다. |
** related ** reverseFind(2,3)
[func] int len(str)
문자열의 길이를 리턴합니다.
| Parameter | Type | 설명 |
|---|---|---|
| str | "[string]" |
[func] string lower(str)
소문자로 변경합니다.
| Parameter | Type | 설명 |
|---|---|---|
| str | "[string]" |
[func] string replace(str, org, new)
문자열 str에서 org 문자열을 new 문자열로 변경한 결과를 리턴합니다.
| Parameter | Type | 설명 |
|---|---|---|
| str | "[string]" | 작업할 문자열 |
| org | "[string]" | 기존 문자열 |
| new | "[string]" | 새로 치환할 문자열 |
[func] int reversefind(str, subStr)
문자열을 뒤에서부터 검색한 후 위치를 리턴합니다.
검색할 대상에 문자열이 포함되어 있지 았으면 -1을 리턴합니다.
| Parameter | Type | 설명 |
|---|---|---|
| str | "[string]" | 검색할 문자열이 포함되어 있는 대상 문자열 |
| subStr | "[string]" | 검색할 문자열 |
** related ** find(2,3)
[func] int reversefind(str, subStr, startIndex)
문자열을 뒤에서부터 검색한 후 위치를 리턴합니다.
검색할 대상에 문자열이 포함되어 있지 았으면 -1을 리턴합니다.
| Parameter | Type | 설명 |
|---|---|---|
| str | "[string]" | 검색할 문자열이 포함되어 있는 대상 문자열 |
| subStr | "[string]" | 검색할 문자열 |
| startIndex | "[number]" | 검색을 시작할 위치 |
** Related ** find(2,3)
[func] string split(str, separator, index)
문자열에서 구분자로 잘라냈을 경우 결과 문자열을 리턴합니다.
| Parameter | Type | 설명 |
|---|---|---|
| str | "[string]" | 작업할 문자열 |
| separator | "[string]" | 구분자 문자열 |
| index | "[number]" | 리턴 받을 문자열의 순번 |
description | example | split strings | splitCount | return empty separator | string.split('abc', '', 0) | 'abc' | 1 |'abc' separator not found | string.split('a', '#', 0) | 'a' | 1 | 'a' out of index | string.split('a#b#c', '#', 3) | 'a' , 'b' , 'c' | 3 | '' separator equals str | string.split('#', '#', 0) | '' , '' | 2 | '' empty field | string.split('a##c', '#', 1) | 'a' , '' , 'c' | 3 | '' begin with separator | string.split('#a', '#', 0) | '' , 'a' | 2 | '' end with separator | string.split('a#', '#', 0) | 'a' , '' | 2 | 'a'
** Related ** splitCount(2)
[func] string splitCount(str, separator)
문자열을 구분자로 잘라낸 개수를 리턴합니다.
separator가 빈문자열이면 1을 리턴합니다.
split 동작은 tokenize 동작과 달리 나눠진 결과의 각 필드의 문자열이 빈문자열인 경우에도 무시하지 않습니다. 결과적으로 splitCount는 문자열에 포함된 "separtor 개수 + 1" 을 항상 리턴하게 됩니다.
| Parameter | Type | 설명 |
|---|---|---|
| str | "[string]" | 작업할 문자열 |
| separator | "[string]" | 구분자 문자열 |
** Related ** split(3)
[func] bool starts(str, prefix)
문자열의 앞부분 일치하는지 확인합니다.
| Parameter | Type | 설명 |
|---|---|---|
| str | "[string]" | 작업할 문자열 |
| prefix | "[string]" | 비교할 부분 문자열 |
[func] string sub(str, startIndex, count)
문자열의 일부분을 리턴합니다.
count가 0보다 작거나 범위를 벗어나면 끝까지 검색합니다.
startIndex가 0보다 작으면 0으로 간주합니다.
startIndex가 문자열 길이보다 크면 빈 문자열을 리턴합니다.
| Parameter | Type | 설명 |
|---|---|---|
| str | "[string]" | 작업할 문자열 |
| startIndex | "[number]" | 리턴할 부분 문자열의 시작 위치 |
| count | "[number]" | 리턴할 부분 문자열의 길이 |
[func] string upper(str)
대문자로 변경합니다.
| Parameter | Type | 설명 |
|---|---|---|
| str | "[string]" | 작업할 문자열 |
▹ userVariable
전 화면에서 userVariable.title='MOSPI' 로 한 후 다음 화면에서 LABEL text에 userVariable.title 값을 넣어주게 되면 LABEL에는 'MOSPI'가 표시됩니다.
<?xml version="1.0" encoding="utf-8"?>

<MOML version="1.1.4">
   <UILAYOUT portrait="320,300" landscape="320,300">
      <WINDOW layout="320,480" align="relative">
        <LABEL id="title" layout="145,2,25,28" text="{userVariable.title}" />
      </WINDOW>
   </UILAYOUT>
</MOML>
userVariable은 momlView 내에서 전역변수들을 관리하는 object 입니다. userVariable 개체의 attribute 명은 사용할 때 동적으로 생성되며 기본값은 empty string("")입니다.
Inherited from baseObject
Related saveVariable
▹ xmlProcessing
전 화면에서 userVariable.title='MOSPI' 로 한 후 다음 화면에서 LABEL text에 userVariable.title 값을 넣어주게 되면 LABEL에는 'MOSPI'가 표시됩니다.
<?xml version="1.0" encoding="utf-8"?>

<MOML version="1.1.4">
   <UILAYOUT portrait="320,300" landscape="320,300">
      <WINDOW layout="320,480" align="relative">
        <LABEL id="title" layout="145,2,25,28" text="{userVariable.title}" />
      </WINDOW>
   </UILAYOUT>
</MOML>
xmlProcessing 은 XML data를 가공하기 위한 기능을 제공합니다.
Inherited from baseObject
Related
iOS:
libxml2.2dylib
[func] string groupByOrder(xmlData, groupingPath, count, elementName)
groupByOrder function을 통하여 product_data.xml의 ITEM Node를 2개씩 ITEMGROUP 노드로 묶습니다.
groupByOrder 결과를 LIST의 dataList path에 지정해서 사용 합니다.
<?xml version="1.0" encoding="utf-8"?>

<MOML version="1.1.4">
   <UILAYOUT portrait="300,300" landscape="300,300">
     <LABEL id="testLabel" layout="0,0,320,30" text="xpath Test" textAlign="center" defaultImg="#ffff00">
     <WINDOW layout="0,0,300,300" align="linear:">
       <LIST id="list" layout="320,300" dataSource="{xmlProcessing.groupByOrder('product_data.xml', '/DATA/ITEMLIST/ITEM', 2, 'ITEMGROUP')}" dataList="/DATA/ITEMLIST/ITEMGROUP">
         <LISTLAYOUT>
           <WINDOW layout="0,0,320,80" defaultImg="#ff00ff"/>
             <LABEL layout="0,0,320,40" text="{xpath.evaluate('./ITEM[1]/NAME/text()')}" />
             <LABEL layout="0,40,320,40" text="{xpath.evaluate('./ITEM[2]/NAME/text()')}" />
           </WINDOW>
         </LISTLAYOUT>
       </LIST>
     </WINDOW>
   </UILAYOUT>
</MOML>
XML 리소스나 문자열을 읽어와서 원하는 개수 만큼 지정해준 노드들을 묶은 결과를 XML 문자열로 리턴합니다.
| Parameter | Type | 설명 |
|---|---|---|
| xmlData | "[url]" ⎮ "[xml text]" | XML data 파일이나 XML 문자열 |
| groupingPath | "[xml element path]" | 묶을 노드들의 위치 |
| count | "[number]" | 묶을 개수 단위 |
| elementName | "[string]" | 새로 삽입할 element노드의 이름 |
▹ xpath
listData.xml
<?xml version="1.0" encoding="UTF-8"?>

<DATA>
    <ITEM group="1">
        <NAME>John</NAME>
    </ITEM>
    <ITEM group="2">
        <NAME>Tom</NAME>
    </ITEM>
    <ITEM group="1">
        <NAME>Jane</NAME>
    </ITEM>
</DATA>
listUi.xml
<?xml version="1.0" encoding="UTF-8"?>

<MOML version="1.1.4">
    <UILAYOUT portrait="320,300" landscape="320,300" >
        <WINDOW id="list" layout="0,0,320,300" >
            <LIST id="list" layout="320,300" dataSource="listData.xml" dataList="/DATA/ITEM" >
                <LISTLAYOUT condition="xpath.evaluate('./@group')=='1'">
                    <LABEL layout="0,0,320,80" defaultImg="g1_bg.png" text="{xpath.evaluate('./NAME/text()')}" />
                </LISTLAYOUT>
                <LISTLAYOUT condition="xpath.evaluate('./@group')=='2'">
                    <LABEL layout="0,0,320,80" defaultImg="g2_bg.png"  text="{xpath.evaluate('./NAME/text()')}" />
                </LISTLAYOUT>
            </LIST>
        </WINDOW>
    </UILAYOUT>
</MOML>
xpath는 xpath를 이용하여 xml 데이터의 특정 노드 데이터를 추출하는 기능을 제공하는 object입니다.
Inherited from baseObject
Related
iOS:
libxml2.2dylib
[func] string evaluate(xpath)
부모에서 설정한 xml dataSource의 dataList위치에서 xpath에 해당하는 문자열을 추출합니다.
리턴 값으로 단일 문자열을 리턴하므로 xpath로 노드 집합을 표현하는 식은 사용할 수 없습니다.
evaluate(1)은 LIST/LISTLAYOUT 처럼 부모의 UI element가 xml dataSource에서 dataList를 지정하여 xml을 목록상태로 분리하여 가지고 있을 때만 동작합니다.
| Parameter | Type | 설명 |
|---|---|---|
| xpath | "[string]" | 추출할 문자열의 위치를 나타내는 xpath |
Related evaluateEx(2)
[func] string evaluateEx(dataSource, xpath)
부모에서 설정한 xml dataSource의 dataList위치에서 xpath에 해당하는 문자열을 추출합니다.
리턴 값으로 단일 문자열을 리턴하므로 xpath로 노드 집합을 표현하는 식은 사용할 수 없습니다.
evaluate(1)은 LIST/LISTLAYOUT 처럼 부모의 UI element가 xml dataSource에서 dataList를 지정하여 xml을 목록상태로 분리하여 가지고 있을 때만 동작합니다.
| Parameter | Type | 설명 |
|---|---|---|
| dataSource | "[identifier]" ⎮ "[xml text]" | document의 DATASOURCE id 나 xml 문자열 자체 |
| xpath | "[string]" | 추출할 문자열의 위치를 나타내는 xpath |
Related evaluate(1)
▹ xslt
xsl을 사용하여 xml 문서를 다른 문서로 변환합니다.
Inherited from baseObject
Related
iOS:
libxml2.2dylib
[func] void clearParameters()
저장된 parameter를 모두 지웁니다.
Related setParameter(2), getParameter(1)
[func] string getParameter(name)
지정한 이름으로 저장된 parameter 값을 리턴합니다.
| Parameter | Type | 설명 |
|---|---|---|
| name | "[identifier]" | parameter 이름 |
| xpath | "[string]" | 추출할 문자열의 위치를 나타내는 xpath |
Related setParameter(2), clearParameters()
[func] string setParameter(name, value)
지정한 이름과 값으로 parameter를 저장합니다.
parameter는 transform(2)을 사용해 문서를 변환할 때 사용합니다.
| Parameter | Type | 설명 |
|---|---|---|
| name | "[identifier]" | parameter 이름 |
Related getParameter(1), clearParameters()
[func] string transform(xml, xsl)
xml문서를 xsl을 사용해 다른 문서로 변환합니다.
문서를 변환할 때는 setParameter(2)를 사용해 저장한 parameter들이 사용됩니다.
문서 변환이 끝나더라도 parameter는 그대로 유지됩니다.
| Parameter | Type | 설명 |
|---|---|---|
| xml | "[string]" | xml 문서 데이터 문자열 |
| xsl | "[string]" | xsl 문서 데이터 문자열 |
Related setParameter(2)
MOML file types
▹ Application info XML file
<?xml version="1.0" encoding="utf-8"?>

<MOML>
  <APPLICATIONINFO>
    <NAME name="[application name]" appFolder="[APP_Folder]" />

    <!--BASE url=[server base path] -->
    <BASE url="http://mospi.org/moml/sample/test1/"/>

    <!--DATAPATH path=[data save path] [default]==[device_default]/[appFolder]/MOML/, device_default=iOS:~/Document, Android:/mnt/sdcard -->
    <DATAPATH path="[default]"/>

    <!--START url=[start UI XML file] -->
    <START url="/xml/intro.xml"/>

    <!--THEME default=[moml | system | iOS | Android] -->
    <THEME default="moml" iOS="system" />

    <!--ORIENTATION effect=[none | rotate | resize] -->
    <ORIENTATION effect="resize" /><!--ORIENTATION effect=[none | rotate | resize] -->

   <!--STRING src=[application string table file] -->
   <STRING src="res/{device.os.language}/strings.xml"/>
  </APPLICATIONINFO>
</MOML>
Application info XML file은 어플리케이션 전반에 관한 설정을 하는 파일로 Native함수 MOMLView.loadApplication(1)을 사용하여 로딩할 수 있습니다.
처음 로딩 될 화면을 지정하는 APPLICATIONINFO/START.url 은 반드시 존재해야 합니다.
Inherited from baseObject
AUTOFIT
[attr] AUTOFIT toleranceRatio
<AUTOFIT toleranceRatio="20" backgroundImg="embed:/img/fitbg.png" />
Fit을 적용하기 위한 최소 비율 차
비율 차가 지정된 비율 이하일 경우에는 fill을 적용하고, 비율 초과로 차이가 날 때만 fit을 적용합니다.
항상 fill로 동작하기를 원하면 100을 사용하고, 항상 정확한 비율로 동작하기를 원하면 0을 사용해야 합니다.
Values
"[0-100]", default: "100"
[attr] AUTOFIT backgroundImg
<AUTOFIT backgroundImg="#FFFFFF" />
빈 공간에 대한 채움 방법
[image url]은 embed 만 허용합니다. image는 tile 형태로 반복하여 그립니다.
Values
"[#RGB]" | "[#ARGB]" | "[#RRGGBB]" | "[#AARRGGBB]" | "[color name]" | "[image url]"
default: "embed:/org.mospi.moml.framework/application/autoFitBackground.png"
BASE
[attr] BASE url
base 프로토콜의 루트 위치를 설정합니다.
UI xml file에서 attribute 값으로 [url]을 사용할 때 "/" 로 시작하는 경우 base 프로토콜로 간주합니다.
embed:/의 위치는 Android의 경우 APK 내의 asset 폴더의 경로를 가르키며, iOS의 경우 프로그램이 설치된 폴더의 경로를 가리킵니다.
Values
"http://[http url]" | embed:/[internal embeded resource path]
default: application info file을 로딩한 위치
DATAPATH
[attr] DATAPATH path
내부적인 용도로 파일을 생성할 때 루트로 사용될 위치 설정
"[default]"는 "[device_default]/[appFolder]/MOML/" 과 동일합니다.
"[device_default]"는 각 플랫폼의 기본 사용자 데이터 저장소의 위치를 가리킵니다.
iOS: ./Document
Android: /mnt/sdcard
Values
"[data save path]" | "[default]", default: "[default]"
DEBUG
[attr] DEBUG suppressError
무시할 에러 메시지를 지정합니다.
error id는 에러가 발생시 로그에 표시가 됩니다.
Values
"all" | "[error id] | [...]"
[attr] DEBUG log
application.logFilter의 기본값을 설정합니다.
logFilter는 로그의 앞부분에 [ ] 안에 표시가 됩니다.
logFilter로 all 을 사용하면 모든 로그를 볼 수 있습니다.
logFilter는 | 문자를 사용하여 여러개를 설정할 수 있습니다.
logFilter의 마지막에 * 문자를 붙여서 특정 단어로 시작하는 log를 여러개 설정할 수 있습니다. ex) "net*"
Values
"all" | "[logFilter] | [...]"
Related application.log(2), application.logFilter
NAME
[attr] NAME name
application의 이름을 설정합니다.
Values
"[string]", default: package 명의 마지막 부분
[attr] NAME appFolder
폴더 이름으로 사용할 이름을 설정합니다.
appFolder를 지정하지 않으면 name과 동일한 값을 사용합니다.
Values
"[string]", default: [NAME.name attribute]
NETWORK
[attr] NETWORK requestMethod
http와 https 의 기본 통신 방식을 설정합니다.
Values
"get" | "post", default: "get"
[attr] NETWORK timeout
통신 timeout을 설정합니다.
Values
"millisecond"
ORIENTATION
[attr] ORIENTATION effect
화면의 회전 효과를 설정합니다.
| effect | 설명 |
|---|---|
| none | 아무런 효과를 주지 않습니다. |
| rotate | 회전 효과를 줍니다. |
| resize | 좌표 크기 보간법(Interpolation)에 의해서 화면 회전 후에 UI 개체들의 크기나 위치가 서서히 변합니다. |
| rotate⎮resize | 회전 후 보간법(Interpolation)을 사용합니다. |
Values
"none" | "rotate" | "resize" | "rotate|resize", default: "none"
[attr] ORIENTATION type
화면방향을 설정합니다.
portrait나 landscape는 장치나 사용자 설정에 따라 양쪽 방향을 지원하지 못하고 기본 방향만 지원하는 defaultPortrait나 defaultLandscape와 동일하게 동작할 수 있습니다.
| type | 설명 |
|---|---|
| default | native 설정을 따라갑니다. Android : AndroidManifest.xml 파일의 iOS : info.plist 파일의 Supported interface orientations 값 |
| all | 모든 방향으로 회전 가능하도록 설정합니다. |
| defaultPortrait | 기본 세로 방향으로 설정합니다. |
| defaultLandscape | 기본 가로 방향으로 설정합니다. |
| portrait | 세로 방향으로만 회전 가능하도록 설정합니다. |
| landscape | 가로 방향으로만 회전 가능하도록 설정합니다. |
Values
"default" | "all" | "defaultPortrait" | "defaultLandscape" | "portrait" | "landscape"
default: "default"
Related application.orientation
START
[attr] START url
첫 시작 UI XML 페이지를 설정합니다.
Values
"[url]"
Related application.orientation
STRING
[attr] STRING src
<?xml version="1.0" encoding="utf-8"?>

<MOML>
    <APPLICATIONINFO>
        <START url="start.xml"/>
        <STRING src="res/{device.os.language}/strings.xml"/>
    </APPLICATIONINFO>
</MOML>
어플리케이션 문자 테이블에 기본으로 로딩할 STRING XML 파일을 지정합니다.
src 값으로 scripted text를 사용할 수 있습니다.
Values
STRING XML 파일의 상대 경로
"[url]"
THEME
[attr] THEME default
기본으로 사용할 테마 설정
system을 사용할 경우 OS를 판별하여 "iOS"나 "android"로 지정됩니다.
Values
"moml" | "iOS" | "android" | "system", default: "system"
[attr] THEME iOS
OS가 iOS 인 경우 테마 설정
system을 사용할 경우 OS를 판별하여 "iOS"나 "android"로 지정됩니다.
Values
"moml" | "iOS" | "android" | "system", default: "system"
[attr] THEME android
OS가 android 인 경우 테마 설정
system을 사용할 경우 OS를 판별하여 "iOS"나 "android"로 지정됩니다.
Values
"moml" | "iOS" | "android" | "system", default: "system"
UPDATEINFO
어플리케이션이 서버의 resource를 사용하는데 있어 서버의 resource가 업데이트 될 경우를 처리하기 위한 태그입니다.
url속성으로 지정된 server_res_ver_info.xml은 서버로부터 미리 다운로드 받을 파일들의 파일명과 버젼이 나열되어 있습니다. 최초 어플리케이션이 시작될 때 나열된 파일들을 모두 다운로드 하여 sd카드에 저장 한 후 실제 요청이 있을 때는 서버의 resource를 사용하는 대신 다운로드하여 저장된 resource를 사용합니다.
어플이 시작 될 때 마다 server_res_ver_info.xml의 내용을 읽어 들여 업데이트 된 파일이 있나 확인 후 업데이트 된 resource가 있으면 다운로드 받아 sd카드에 다시 저장합니다.
[attr] UPDATEINFO url
applicationInfo.xml
<?xml version="1.0" encoding="utf-8"?>

<MOML>
   <APPLICATIONINFO>
       <BASE url="http://mospi.org/demos/" />
       <UPDATEINFO url="/server_res_ver_info.xml" />
       <NETWORK requestMethod="post" />
       <START url="spit.xml" />
   </APPLICATIONINFO>
</MOML>
server_res_ver_info.xml
<application_info version="001" date="201100530146000">
   <update_list version="001" date="201100530146000"/>
   <file path="skirt_7.jpg" version="1001002" date="201100531146000"/>
</application_info>
서버의 업데이트 정보 파일의 경로를 설정합니다.
주로BASE.url에 서버의 폴더 위치를 설정하고, 업데이트 정보 파일은 base 프로토콜을 사용하여 /server_res_ver_info.xml로 설정합니다.
서버의 파일이 변경되어 업데이트가 필요한 경우 server_res_ver_info.xml 에서 변경된 파일의 version속성의 값을 바꿔줍니다.
Values
"[url]"
[attr] UPDATEINFO realTimeType
UPDATEINFO.url 에 존재하지 않는 파일들에 대한 실시간 리소스 판단 방법을 지정합니다.
| realTimeType | 설명 |
|---|---|
| all | 모든 리소스를 실시간 리소스로 간주합니다. 매번 필요할 때마다 다운로드 받습니다. |
| none | 모든 리소스를 실시간 리소스가 아닌 것으로 간주합니다. 한번 다운로드 받은 리소스는 다시 다운로드 받지 않습니다. |
| qMark | 리소스 url에 "?"가 있는 경우만 실시간으로 간주하고, 매번 다운로드 받습니다. ex) http://www.mospi.org/form/search.jsp?key=word |
Values
"all" | "none" | "qMark", default: "none"
▹ UI XML file
<?xml version="1.0" encoding="utf-8"?>

<MOML>
  <UILAYOUT portrait="300,300" landscape="300,300">
    <LABEL id="testLabel" layout="0,0,320,30" text="{function.priceText(userVriable.price)}" textAlign="center" >
  </UILAYOUT>

  <FUNTION id="priceText(price)">
    <FUNTIONITEM condition="price == 0" cmd="''" elseCmd="price +'원'"/>
  </FUNTION>
</MOML>
UI 화면의 모양과 동작을 정의합니다.
UILAYOUT, FUNCTION, THEMES, DATASOURCE 의 순서는 서로 다른 종류의 element에 영향을 주지 않습니다.
기능 | 세부 기능 | 관련 element 함수 관련 기능 | UI에서 사용할 함수를 정의 | FUNCTION | UI 로딩 후 바로 실행 | CMD, LOOP UI 관련 기능 | UI element 배치 | UILAYOUT | UI theme 정의 | THEMES 데이터 관련 | data source 정의 | DATASOURCE
DATASOURCE
<?xml version="1.0" encoding="utf-8"?>

<MOML version="1.1.4">
  <DATASOURCE id="mainItem" src="http://www.mospi.org/test/data1.xml"/>
  <DATASOURCE id="subItem" src="http://www.mospi.org/test/data2.xml"/>

  <UILAYOUT portrait="300,300" landscape="300,300">
    <LABEL id="testLabel" layout="0,0,300,30" text="{xpath.evaluateEx('mainItem', '/DATA/MAINITEM[1]/TITLE/text()')}" />
    <LABEL id="testLabe2" layout="0,30,300,30" text="{xpath.evaluateEx('subItem', '/DATA/SUBITEM[1]/TITLE/text()')}" />
  </UILAYOUT>
</MOML>
로드할 data source 들을 정의 합니다.
[attr] DATASOURCE id
DATASOURCE 객체 식별자
DATASOURCE 객체 식별자는 container내에서 중복되지 않아야 합니다.
Values
"[identifier]"
[attr] DATASOURCE src
DataSource를 로드할 path 지정
Values
"[url]"
FUNCTION
[attr] FUNCTION id
함수 식별 id로 함수 명을 정의하거나 괄호"(", ")"와 함께 사용하여 함수 인자의 이름을 정의할 수 있습니다.
FUNCTION.id는 FUNCTIONLIST 내에서 중복되지 않아야 합니다.
FUNCTION내의 자식 element들은 순서대로 실행되며 가장 마지막 실행된 cmd나 elseCmd의 결과가 해당 함수의 리턴 값이 됩니다.
함수 호출 시 사용한 함수 인자는 parameter.param 배열 개체로 접근할 수 있습니다. (ex. parameter.param[0], parameter.param[2])
함수 호출 시 사용한 함수 인자의 총 개수는 parameter.count에 저장됩니다.
FUNCTION.id에 괄호를 사용하여 함수 인자의 이름을 정의하는 경우 parameter.param 개체에 순서대로 매핑됩니다. (ex. <FUNCTION id="exec(id, name)"> ...</FUNCTION> 일 경우 id는 parameter.param[0] 와, name는 parameter.param[1] 와 같습니다.)
함수 인자를 정의하는 것은 단순히 parameter.param과 매핑하는 것이므로 함수 호출 시 인자의 개수와 정의한 개수가 정확히 일치하지 않아도 됩니다.
Values
"[identifier]" | "identifier"
FUNCTION/CMD
CMD는 명령 실행의 최소 단위입니다.
CMD나 LOOP를 FUNCTION 없이 최상위 element MOML 밑에 바로 사용하면 모든 UI element가 로딩된 후에 자동으로 순차적으로 실행됩니다.
[attr] FUNCTION/CMD condition
조건문이 참이면 cmd 를 실행하고 거짓이면 elesCmd 를 실행합니다.
condtion 이 참일 조건은 false 가 아닌 모든 경우입니다. 즉. 식의 결과가 빈문자열('')이거나 0, false, 'false'인 경우에는 거짓으로 간주하며 그외 일반적인 문자열이거나, 0이 아닌 수인 경우는 전부 참으로 간주합니다.
condition Attribute가 없을 경우는 "true"가 기본값이므로 cmd를 실행합니다.
cmd를 실행하고 난 다음에는 ELSECMD가 아닌 자식 element들을 차례로 실행합니다.
condition이 거짓인 경우에는 자식 element중 ELSECMD만 차례로 실행합니다.
cmd나 elseCmd 없이 자식 element만 존재하더라도 condition에 따라 자식 element들을 실행합니다.
Values
"[script]", default: "true"
[attr] FUNCTION/CMD cmd
condition이 참이거나 condition이 없을 경우 실행
MOML 1.0 버전에 대한 하위 호환을 위해 아래 형식도 지원하지만, 사용하지 않기를 권장합니다. MOML 1.1 형식을 사용하십시오.
| deprecated syntax | MOML 1.0 example (deprecated) | MOML 1.1 example |
|---|---|---|
| "{[script]}" | cmd="{btn1.text='test'}" | cmd="btn1.text='test'" |
| "url:[url]" | cmd="url:page1.xml" target="con1" | cmd="container.open('page1.xml', 'con1')" |
| "action:go([navigationId], [item])" | cmd="action:go(root.mainNav, 'main')" | cmd="root.mainNav.selectedItem='main'" |
| "action:back([navigationId])" | cmd="action:back('root.mainNav')" | cmd="root.mainNav.back()" |
| "action:close()" | cmd="action:close()" | cmd="container.close()" |
Values
"[script]"
[attr] FUNCTION/CMD delay
delay 시간지정 millisecond (ex. 2500 (2.5초))
delay <= 0 이면 즉시 실행합니다. delay > 0 이면 현재의 FUNCTION 내의 delay<=0 인 모든 CMD의 실행이 끝난 후에 delay 값이 있는 함수들이 같은 쓰레드 내에서 동기적으로 처리되므로 시간이 오래 걸리는 함수가 섞여 있거나 delay 값이 작은 경우 다소 부정확해 보일 수 있습니다.
Values
"[millisecond]", default: "0"
[attr] FUNCTION/CMD elseCmd
condition이 거짓일 경우 실행.
FUNCTION/ELSECMD
부모 element condition이 거짓일 때 실행합니다.
Inherited from CMD
FUNCTION/LOOP
- condition LOOP
init, condition, increment 3가지 속성을 사용합니다.
일반적인 for 문과 유사하며 condition 이 true인 동안 LOOP를 실행합니다.
<FUNCTION id="sum(num)">
   <LOOP init="i=1" condition="i le num" increment="++i">
       <CMD cmd="sum = sum + i" />
   </LOOP>
   <RETURN cmd="sum" />
</FUNCTION>
- index LOOP
index, from, to, step 4가지 속성을 사용합니다.
index 가 to를 넘지 않는 동안 LOOP를 실행합니다.
<FUNCTION id="sum(num)">
   <LOOP index="i=1" to="num">
       <CMD cmd="sum = sum + i" />
   </LOOP>
   <RETURN cmd="sum" />
</FUNCTION>
- count LOOP
count 속성만 사용합니다.
반복 회수가 count 이하인 동안 LOOP를 실행합니다.
<FUNCTION id="sum(num)">
   <LOOP count="num">
       <CMD cmd="++i" />
       <CMD cmd="sum = sum + i" />
   </LOOP>
   <RETURN cmd="sum" />
</FUNCTION>
명령을 반복하여 실행합니다.
* LOOP는 CMD element의 속성을 그대로 상속받으므로 condition, cmd, delay, elseCmd 를 사용할 수 있습니다.
LOOP.delay는 두번째부터 반복문 실행을 지연시킵니다. LOOP의 첫번째 실행을 지연시키기 위해서는 LOOP의 부모 CMD에 delay를 줘야 합니다.
LOOP.elseCmd는 CMD.elseCmd와 동일하게 condition이 거짓이 되었을 때 실행되므로 LOOP가 종료될 때 항상 실행됩니다. 이같은 특성은 LOOP.elseCmd를 반복 후 마지막에 실행할 명령으로 사용할 때 유용합니다.
LOOP는 매 반복마다 condition, index, count 3가지 반복 조건을 모두 체크하며 하나라도 만족하지 않으면 반복을 종료합니다. 각 조건의 기본값은 true이므로 아무 조건도 없는 경우 무한루프가 됩니다.
Inherited from CMD
[attr] condition LOOP increment
condition LOOP의 증가문을 실행합니다.
Values
"[script]"
[attr] condition LOOP init
condition LOOP 시작전 초기화문을 실행합니다.
delay나 condition과 상관없이 init은 바로 실행됩니다.
Values
"[script]"
[attr] index LOOP from
index LOOP의 초기값을 지정합니다.
Values
"[script]", default: 0
[attr] index LOOP index
index LOOP에서 사용할 변수를 지정합니다.
index 변수를 지정하지 않더라도 (to – from)/step 회수만큼 loop는 실행됩니다.
index로 사용한 변수는 local 변수와 동일하게 취급되며 from부터 시작하여 매 실행마다 step 만큼 증감합니다.
index="i=0" 과 같이 대입 연산자를 사용하여 초기화할 수 있습니다.
Values
"[variable name]" | "[variable name]=[initial value]"
[attr] index LOOP step
index LOOP의 증가문을 실행합니다.
기본값이 1이므로 increment attribute가 없더라도 index는 매 실행마다 1씩 증가합니다.
Values
"[script]", default: 1
[attr] index LOOP to
index LOOP의 반복을 끝낼 마지막 값을 지정합니다.
반복조건은 step이 양수인 경우 from <= index <= to, step이 음수인 경우 from >= index >= to 입니다.
- 기본값이 무한대이므로 to를 지정하지 않으면 index를 step 만큼 계속 증가시키는 무한루프가 됩니다.
Values
"[script]", default: "[infinity]"
[attr] count LOOP count
count LOOP를 반복할 회수를 지정합니다.
Values
"[script]", default: "[infinity]"
FUNCTION/LOOP/BREAK
LOOP의 반복을 중단합니다.
BREAK.condition attribute를 사용하여 중단 조건을 지정할 수 있습니다.
가장 인접한 부모 LOOP를 대상으로 동작하므로 CMD와 같은 다른 FUNCTION child element 안에 있어도 동작합니다.
Inherited from CMD
FUNCTION/LOOP/CONTINUE
LOOP의 다음 반복을 바로 실행합니다.
CONTINUE.condition attribute를 사용하여 조건을 지정할 수 있습니다.
가장 인접한 부모 LOOP를 대상으로 동작하므로 CMD와 같은 다른 FUNCTION child element 안에 있어도 동작합니다.
Inherited from CMD
FUNCTION/RETURN
함수를 즉시 리턴합니다.
RETURN.cmd를 사용하여 리턴값을 지정할 수 있습니다.
RETURN.condition attribute를 사용하여 리턴 조건을 지정할 수 있습니다.
RETURN.condition이 거짓인 경우 elseCmd는 실행되지만 함수를 리턴하지는 않습니다.
Inherited from CMD
MOML/CMD, INIT, LOOP, RETURN
CMD, LOOP, RETURN element를 FUNCTION element없이 최상위 MOML element 밑에 바로 사용하면 모든 UI element가 로딩된 후에 자동으로 순차적으로 실행됩니다.
보통 element를 표현할 때는 최상위 MOML을 생략하지만, 이 경우에는 FUNCTION/CMD와 구분하기 위해 MOML/CMD로 표현합니다.
MOML/INIT
초기화 작업을 수행합니다.
INIT element는 CMD element와 유사하지만 UI element를 로딩하기 전에 실행되므로 주로 UI element에서 사용할 값들이나 userVariable나 saveVariable의 변수들을 초기화 하는 데 사용합니다.
STRING
문자열 테이블을 정의합니다. STRING XML file의 STRING을 참고하십시오.
Related STRINGS, STRING XML file
STRINGS
문자열 테이블을 정의합니다. STRING XML file의 STRING을 참고하십시오.
Related STRING, STRING XML file
UILAYOUT
<?xml version="1.0" encoding="utf-8"?>

<MOML version="1.1.4">
  <UILAYOUT portrait="480,776">
      <WINDOW id="main"/>
      ...
  </UILAYOUT>
</MOML>
MOML XML에서 layout 이 정의되는 시작과 끝을 나타내는 요소입니다.
UILAYOUT element에는 portrait 과 landscape 속성이 있습니다. 이 속성들은 가로, 세로 layout이 그려지는 기준 크기(width 와 height)를 나타냅니다.
UI XML을 로딩하는 컨테이너의 크기가 속성에 정의된 크기와 다를 경우 해당 비율에 맞춰 자동으로 확대/축소합니다.
단 ui element의 resize 속성을 지정한 경우 확대/축소 비율은 무시됩니다.
[attr] UILAYOUT landscape
가로 기준 UI Layout 크기를 지정
landscape 속성 없을 경우에는 화면이 landscape 상태에서도 portrait에서 지정한 크기 그대로 표시됩니다.
Values
"[width],[height]" | "[width],fixed" | "fixed,[height]", default: "fixed,fixed"
[attr] UILAYOUT portrait
세로 기준 UI Layout 크기를 지정
portrait 속성 없을 경우에는 화면이 portrait 상태에서도 landscape에서 지정한 크기 그대로 표시됩니다.
Values
"[width],[height]" | "[width],fixed" | "fixed,[height]", default: "fixed,fixed"
[attr] UILAYOUT theme
UI element들에서 themeId로 지정한 테마 항목을 찾을 때 사용할 Layout Theme를 정의합니다.
Layout Theme는 "|" 구분자로 여러 개를 지정해줄 수 있으며 Theme xml file 이나 Layout 내의 THEMES id를 사용할 수 있습니다.
UI 개체가 테마를 통해 attribute 값을 찾는 순서는 다음과 같습니다.
1) 스크립트나 사용자의 동작에 의해 바뀐 값. 예) EDIT에서 사용자가 직접 입력한 값
2) UI xml의 attribute에 지정된 값
3) Theme에서 themeId와 ELEMENT가 일치하는 항목 검색(Layout Theme -> Application Theme -> System Theme 순으로 검색)
4) Theme에서 themeId가 일치하는 항목 검색(Layout Theme -> Application Theme -> System Theme 순으로 검색)
5) Theme에서 ELEMENT가 일치하는 항목 검색(Layout Theme -> Application Theme -> System Theme 순으로 검색)
6) UI element 자체의 기본값Theme의 종류
1) System Theme(or OS Theme) : 가장 기본이 되는 테마로 Framework에서 제공하는 것들 중 하나를 선택할 수 있다.에서 default, iOS, android 속성으로 지정한다.
2) Application Theme : 기본으로 사용할 사용자 정의 테마.의 src 속성으로 지정한다.
3) Layout Theme : 현재 UI XML에서 사용할 사용자 정의 테마로 여러 개를 병합하여 사용할 수 있다.의 theme 속성으로 지정한다. "[THEME xml file] | [THEMES id] | ..." 와 같이 여러 항목을 나열했을 때 일치하는 항목에 대해서 가장 우측에 정의된 내용이 최우선 순위로 사용됩니다.
Values
"[THEME xml file] | [THEMES id] | ..."
Related APPLICATIONINFO/THEME, THEME XML file, THEMES
THEMES
[attr] THEMES id
UILAYOUT.theme에 사용할 theme 식별자
THEMES.id는 UI XML file 내에서 중복되지 않아야 합니다.
Values
"[identifier]"
Related UILAYOUT.theme,
THEMES/THEME
THEME 항목을 정의합니다. THEME XML file의 THEME를 참고하십시오.
Related THEMES, THEME XML file
▹ THEME XML file
<?xml version="1.0" encoding="utf-8"?>

<MOML>
   <THEME id="textLabel" fontSize="12" fontColor="#753300" />
   <THEME id="defaultButton" parent="textLabel" fontColor="#333333" defaultImg="/img/btn.png" />
   <THEME element="BUTTON" parent="defaultButton" />
   <THEME element="LABEL" parent="textLabel" />
   <THEME element="CHECKBOX" parent="textLabel" style="android" />
   <THEME element="RADIO" parent="textLabel" />
</MOML>
UI element들에 사용할 application theme나 layout theme를 정의 합니다.
- UI element에서 자주 사용하는 attribute 값들을 THEME 항목으로 만들면 UI element에서는 themeId만을 설정하는 것만으로 THEME 항목에 설정된 attribute를 모두 사용한 것과 동일한 결과를 나타낼 수 있습니다.
- THEME의 attribute중 element, id, parent만 THEME의 고유한 attribute이며, UI element의 일반적인 attribute를 사용할 수 있습니다.
- Theme의 종류
1) System Theme(or OS Theme) : 가장 기본이 되는 테마로 Framework에서 제공하는 것들 중 하나를 선택할 수 있다.<APPLICATIONINFO><THEME>에서 default, iOS, android 속성으로 지정한다.
2) Application Theme : 기본으로 사용할 사용자 정의 테마.<APPLICATIONINFO><THEME>의 src 속성으로 지정한다.
3) Layout Theme : 현재 UI XML에서 사용할 사용자 정의 테마로 여러 개를 병합하여 사용할 수 있다.<UI><UILAYOUT>의 theme 속성으로 지정한다.
THEME
TEHEME element는 테마 항목 하나를 정의합니다.
[attr] THEMES element
UI element 명과 THEME.element가 일치하면 테마 항목을 적용합니다.
id와 element를 같이 선언하면 UI element의 element 명과 themeId가 정확히 일치하는 항목에 대해서만 적용됩니다.
element만 단독으로 사용하면 해당 UI element가 themeId를 사용하지 않았을 때도 기본으로 테마 항목이 적용됩니다.
"all" keyword를 사용하면 지원되는 모든 UI element에 대해서 테마 항목이 적용 됩니다.
Values
"[UI element name]"
[attr] THEMES id
UI element의 themeId가 THEME.id와 일치 하는 경우에만 테마 항목을 적용합니다.
id와 element를 같이 선언하면 UI element의 element 명과 themeId가 정확히 일치하는 항목에 대해서만 적용됩니다.
id만 단독으로 사용하면 UI element의 element 명과는 상관없이 themeId만 일치하면 테마 항목이 적용됩니다.
Values
"[identifier]"
[attr] THEMES parent
속성을 병합할 THEME.id
application theme의 id는 layout theme file에서도 parent로 사용할 수 있습니다.
layout theme간의 parent 참조는 불가능합니다.
Values
"[identifier]"
▹ STRING XML file
<?xml version="1.0" encoding="utf-8"?>

<MOML>
   <!-- basic format -->
   <STRING key="Back" lang="en" value="Back"/>
   <STRING key="Back" en="Back"/>
   <STRING key="Back" lang="zh-CN" value="返回"/>

   <!-- using language value as attribute name -->
   <STRING key="English" en="English" zh-CN="繁體中文"/>

   <!-- group by language -->
   <STRINGS lang="en">
       <STRING key="Setting" value="Setting"/>
   </STRINGS>

   <STRINGS lang="zh-CN">
       <STRING key="Setting" value="设置"/>
   </STRINGS>

   <!-- group by key -->
   <STRINGS key="Language:">
       <STRING lang="en" value="Language:" />
       <STRING lang="zh-CN" value="语言:" />
   </STRINGS>
</MOML>
다국어 처리를 위한 문자열 리소스를 정의합니다.
문자열 테이블을 별도의 파일로 정의한 경우 res.load(1)함수를 사용해 어플리케이션 문자열 테이블에 로드할 수 있습니다.
문자열 테이블을 UI XML 파일에 정의한 경우 해당 document와 자식 document에서 문자열을 사용할 수 있습니다.
lang이나 key값이 같은 여러 STRING elment를 STRINGS를 사용해 묶을 수 있습니다.
STRING element의 lang와 value 속성 2개를 사용하는 대신 lang의 값을 속성이름으로 value값을 사용하여 1개의 속성으로 사용할 수 있습니다.
STRING
다국어 처리를 위한 문자열 테이블을 정의합니다.
[attr] STRING key
문자열 리소스의 키
key속성을 지정하지 않은 경우 부모의 STRINGS element의 key 값을 사용합니다.
Values
"[string]"
[attr] STRING lang
문자열 리소스의 언어 코드
일반적인 언어 코드외에 사용자 언어를 사용할 수 있습니다.
사용자 언어 코드를 새로 정의하는 경우 en="English" 와 같은 약식 표현을 사용하기 위해서는 XML 속성 명으로 사용 불가능한 문자를 사용하지 않아야 합니다.
lang 속성을 지정하지 않은 경우 부모의 STRINGS element의 lang 값을 사용합니다.
Values
"[string]"
[attr] STRING value
lang와 key에 해당하는 문자열.
Values
"[string]"
STRINGS
key값이나 lang 값이 같은 여러 STRING element를 묶습니다.
[attr] STRING key
자식 STRING element의 기본 key 값
Values
"[string]"
[attr] STRING lang
자식 STRING element의 기본 key 값
Values
"[string]"
▹ MOML grammar
Attribute value
[script]
<BUTTON onClick="container.close()" ... />
<CMD condition="userVariable.confirm == 'yes'" ... />
[scripted text]
<BUTTON text="Total : {math.add(userVariable.prevSum, price1.text) } " ... />
<IMAGE defaultImg="/img/thumb{userVariable.index}.png" />
[xml file text]
<LIST dataSource="<?xml version="1.0" encoding=" ......
- 주요 value type
1) [identifier]
식별자로 영문으로 시작해야 하며, 영문, 숫자, _ 를 사용할 수 있습니다.
ex) WINDOW.id, WINDOW.themeId,
2) [script]
스크립트 문을 그대로 씁니다.
ex) BUTTON.onClick, CMD.condition
3) [layout values]
layout 속성의 값은 "," (comma)로 구분하여 사용하며, 부모의 align 타입에 따라 개수는 다릅니다.
부모의 align이 relative 인 경우 4개의 값을 사용합니다. ex) layout="100,100,200px,auto"
부모의 align이 flow이거나 linear인 경우 2개의 값을 사용합니다. ex) layout="100,30"
4) [scripted text]
일반적인 문자열이거나 {}로 스크립트 문을 묶어서 문자열 사이에 끼워 넣을 수 있습니다. 대부분의 attribute가 이 형식을 사용하므로 따로 표시하지 않습니다.
5) [xml file text]
XML file 의 내용을 그대로 문자열로 받습니다. 반드시 "<?xml"로 시작해야 합니다. 주로 [url] 형식을 입력받을 때 파일의 위치 대신 파일 내용 자체를 바로 지정할 때 사용합니다.
- 자주 사용하는 value type
UI element에서 일반적으로는 많이 사용하는 value의 형식들은 아래와 같습니다.
• [url] : http://, embed: , /, storage: 등으로 시작하거나 상대경로로 특정 리소스 주소를 나타냄
• #[RGB] : 12bit RGB (Red, Green, Blue)16진수 표기
• #[ARGB] : 16bit ARGB (Alpha, Red, Green, Blue) 16진수 표기
• [#RRGGBB] : 24bit RGB (Red, Green, Blue)16진수 표기
• [#AARRGGBB] : 32bit ARGB (Alpha, Red, Green, Blue) 16진수 표기
• [color name] : 148 색상 이름 ( http://www.w3.org/TR/css3-color/#svg-color 의 147개 색상 이름 + transparent)
• [bool] : "true" 나 "false" 값을 갖음.
• [0~100], [0~], [integer] : 정수의 범위를 지정
• [0.0~100.0], [0.0~], [float] : 소수의 범위를 지정
• [type:opt1|opt2|opt3=val3] : 옵션 지정 ex) NAVIGATIONCONTAINER.VIEWITEM.transitionInEffect, WINDOW.align,
Escape string
{ 와 ' 를 string.cmp로 비교한 결과는 "1"입니다.
<LABEL text="\{ 와 ' 를 string.cmp로 비교한 결과는 "{string.cmp('\{', '\'')}"입니다." />
조건이나 명령으로 사용하는 경우
<LABEL text="\{ 와 ' 를 string.cmp로 비교한 결과는 "{string.cmp('\{', '\'')}"입니다." />
- XML file에 쓰여진 attribute를 내부의 UI element 함수로 전달하기까지는 일반적으로([scripted text]의 경우) 아래와 같이 3단계를 거치게 됩니다.
1) XML parser
2) scripted text parser
3) Function script parser
따옴표나 엔터와 같은 특수 문자 출력을 위해 사용하는 escape string 규칙이 각 parser 별로 다르므로 주의해야 합니다.
스크립트를 바로 쓰는 경우(ex: FUNCTION.condition, BUTTON.onClick, ..)는 1. XML parser와 3. Function script parser 두가지만 거치게 되므로 2. scripted text parser의 escape string 규칙이 적용되지 않습니다.
XML parser escape string
XML element의 attribute에 사용하는 문자열들은 XML parser를 거치면서 표준 escape string 규칙이 적용됩니다.
• &# 10진수; 표현
ex) 엔터: 탭:	
• &#x 16진수; 표현
ex) 엔터:
탭:	
• 미리 정의된 5가지 & escape:
<: <
>: >
&: &
': '
": "Scripted text parser escape string
•\{ \}escape
scripted text에서는 (attribute의 value type은 대부분 scripted text입니다.) {, }가 스크립트 문의 시작과 끝을 나타내는 용도로 사용하므로, {,}를 문자열 그대로 사용하고 싶은 경우는\{,\}를 사용해야 합니다.Function Script escape string
• function script에서는 문자열의 시작과 끝을 나타내는 작은 따옴표(') 사이에서는 아래의 규칙이 적용됩니다.
• 미리 정의된 5가지 \ escape
\\:\
\r: line feed, 0x0d
\n: carriage return, 0x0a
\t: tab, 0x09
\': '
Hierarchy keywords
어떤 UI element를 지칭할 때 WINDOW.fullId와 같이 절대적인 위치를 사용하여 지정하는 것처럼 자식이나 부모와 같은 hierachy keyword를 사용하여 상대적인 위치를 지정할 수 있습니다.
caller 기준 키워드 예
<?xml version="1.0" encoding="utf-8"?>

<MOML>
   <FUNCTION id="exec">
       <CMD cmd="device.toastPopup(caller.fullId())" />
   </FUNCTION>

   <UILAYOUT portrait="300,300" landscape="300,300">
       <WINDOW id="win" layout="0,0,300,300" align="linear:vertical|center">
           <BUTTON id="btn1" layout="100,50" text="btn1" onClick="device.toastPopup(caller.fullId())" />
           <BUTTON id="btn2" layout="100,50" text="btn2" onClick="device.toastPopup(caller.prev.fullId())" />
           <BUTTON id="btn3" layout="100,50" text="btn3" onClick="device.toastPopup(caller.next.fullId())" />
           <BUTTON id="btn4" layout="100,50" text="btn4" onClick="function.exec " />
       </WINDOW>
   </UILAYOUT>

   <CMD cmd="device.toastPopup(caller.fullId())" />
</MOML>
- caller 기준 키워드
• caller : 호출 윈도우
FUNCTION element에서는 마지막으로 event 가 발생한 UI element(window)
MOML/CMD element에서는 해당 CONTAINER가 caller가 됨.
• prev : 현재 윈도우의 형제 레벨의 이전 윈도우
맨 처음 prev를 사용하면 caller.prev 와 동일함.
• next : 현재 윈도우의 형제 레벨의 다음 윈도우
맨 처음 next를 사용하면 caller.next 와 동일함.
root CONTAINER에 다음 xml을 로딩하였을 때 각 event 가 발생한 기준에 따른 caller, prev, next는 다음 표와 같습니다.
| 기준 | caller | Prev | next |
|---|---|---|---|
| btn1 | btn1 | - | btn2 |
| btn2 | btn2 | btn1 | btn3 |
| btn3 | btn3 | btn2 | btn4 |
| FUNCTION/CMD | btn4 | btn3 | - |
| MOML/CMD | root | - | - |
parent 기준 키워드 예
<?xml version="1.0" encoding="utf-8"?>

<MOML>
   <FUNCTION id="exec">
       <CMD cmd="device.toastPopup(container.fullId())" />
   </FUNCTION>

   <UILAYOUT portrait="300,300" landscape="300,300">
       <CONTAINER id="subCon" layout="0,0,300,300">
           <WINDOW id="win" layout="0,0,300,300" align="linear:vertical|center">
               <BUTTON id="btn1" layout="100,50" text="btn1" onClick="device.toastPopup(container.fullId())" />
               <BUTTON id="btn2" layout="100,50" text="btn2" onClick="function.exec()" />
           </WINDOW>
       </CONTAINER>
   </UILAYOUT>

   <CMD cmd="device.toastPopup(container.fullId())" />
</MOML>
- parent 기준 키워드
• parent : 부모 윈도우
UI event attribute(ex:BUTTON.onClick)에서는 caller의 부모 window. parent == caller.parent
FUNCTION element 내에서는 FUNCTION의 CONTAINER. parent == container == document
MOML/CMD element 내에서는 MOML/CMD의 CONTAINER. parent == container == document == caller
• container : 현재 윈도우나 FUNCTION이 속한 컨테이너
• document : 키워드가 쓰인 현재 개체 기준(function or ui)이 정의된 xml 파일을 로딩한 컨테이너, parent 중에 동일한 파일 내의 최상위 container
root CONTAINER에 다음 xml을 로딩하였을 때 각 기준에 따른 parent, container, document는 다음 표와 같습니다.
| 기준 | parent | container | document |
|---|---|---|---|
| btn1 | win | subCon | root |
| MOML/CMD | root | root | root |
| FUNCTION/CMD | root | root | root |
특수 키워드
• root : 최상위 컨테이너
• new : target으로 지정할 때 임의의 새로운 컨테이너를 생성 시키기 위한 예약어기본 규칙
• parent 와 caller를 알면 모든 키워드를 구할 수 있다.
• prev, next는 caller로부터 구한다.
• container, document는 parent로부터 구한다.
• FUNCTION/CMD이나 MOML/CMD에서의 parent는 function이 속한 container 즉 해당 document다. 따라서 parent == container == document 다.
• FUNCTIONCALL의 caller는 해당 document다. 따라서 caller == parent == container == document 다.
• 잘못된 키워드의 결과값은 null 이므로 함수 실행이 실패한다.
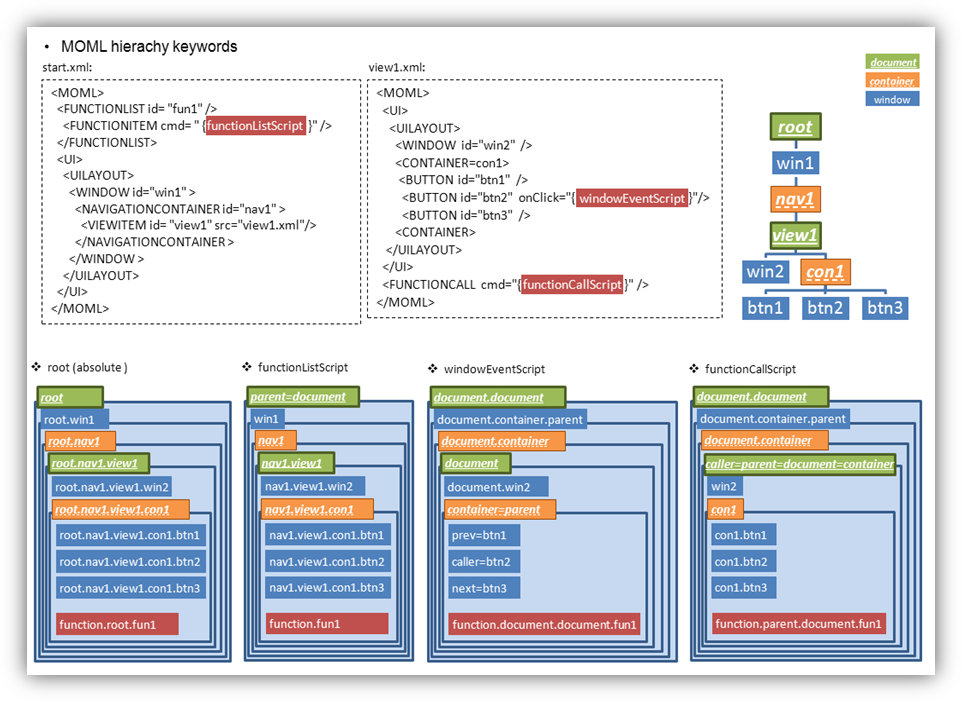
Function Script
⊢ Attribute 의 Function 변환
<CMD cmd="userVariable.year = date.year" />
<CMD cmd="userVariable.year = date.year()" />
- Attribute 읽기 변환
lValue=object.property는 lValue=object.property()와 동일한 의미를 가집니다.
<CMD cmd="date.year='2000'" />
<CMD cmd="date.setYear('2000')" />
- Attribute 쓰기 변환
object.property=rValue는 object.setProperty(rValue)와 동일한 의미를 가집니다.
⊢ Operator
<CMD condition="(countLabel.text > 0) && (nameLabel.text != '' )"/>
<CMD condition="(countLabel.text gt 0) and (nameLabel.text neq '' )"/>
- Alphabetic form
논리 연산자 중 "&", "<", ">" 등의 기호는 XML의 속성값에서는 바로 사용할 수 없습니다.
"&", "<", ">" 를 사용하거나 알파벳 형식의 연산자를 사용할 수 있습니다.
  '1' + '1' == 2
  '1' + 1 == 2
  1 + 1 == 2
  'a' + 1 == 'a1'
- operator+
연산자 "+" 는 자료형이 아닌 값에 따라 숫자 덧셈 연산을 하거나 문자열 연결을 합니다.
따라서 알 수 없는 형식의 문자열을 더하는 것은 원치 않는 결과가 발생할 수 있습니다.
값에 상관없이 항상 문자열 연결을 해야 하는 경우에는 string.add()를 사용하십시오.
항상 숫자 덧셈을 해야 하는 경우에는 math.add(2)를 사용하십시오.
0 == 0.0 == '0' == '0.0' == false == 'false' == null == ''
1 == 1.0 == '1' == '1.0' == true == 'true'
- operator==
연산자 "==" 는 자료형과 무관하게 값에 따라 비교를 합니다.
정확한 문자열 비교를 위해서는 string.cmp(2)를 사용하십시오.
⊢ Local variable
<FUNCTION id="test">
    <CMD cmd="a = 1" />
    <CMD cmd="b = 2" />
    <CMD cmd="sum = a + b" />
</FUNCTION>
- Declaration
• 일반적인 object.attribute 형식에서 object 없이 attribute 만 사용하면 Local variable로 간주합니다.
• 최초로 assign이 이루어질 때 자동으로 생성됩니다.
• 아직 생성되지 않은 variable을 읽으면 null을 리턴합니다.
(null : 아무런 값도 없고, 내부 자료형도 결정되지 않은 값으로 문자열에 사용하면 빈문자열 ' '로 숫자로 사용하면 0이 됩니다.)
<FUNCTION id="test2">
    <CMD cmd="a = 1" >
        <CMD cmd="b = 2" />
    </CMD>
    <CMD cmd="sum = a + b" />
</FUNCTION>
- Variable scope
• FUNCTION 은 각 FUNCTION 단위로 Local variable이 존재합니다.
• FUNCTION 실행이 끝나면 생성되었던 Local variable은 전부 소멸됩니다.
• UI XML file에서 FUNCTION 없이 바로 사용된 CMD나 LOOP element들은 해당 document 내에서 서로 값을 공유합니다.
• onClick attribute 등의 script 문에서는 각 attribute 단위로 유효합니다.
• text attribute 등의 scripted text 문에서도 마찬가지로 attribute 단위로 유효하므로 {}를 사용해 여러 script를 함께 사용하면 서로 값을 공유합니다.
ex)
∟ Script grammar
Regular expressions of identifiers
digit:         [0-9]
letter:        [A-Z_a-z]
floatnumber:   (\.?{digit}({digit}|\.)*)
string_lit:    (\'([^\'\\\n]|\\.)*)
string_literal:    ({string_lit}\')
identifier:    ({letter}({letter}|{digit}|\.)*)
Summary of tokens
TRUE:
   "true"

FALSE:
   "false"

NULL:
   "null"

NUMBER:
   floatnumber

STRING:
   string_literal

IDENTIFIER:
   identifier
Summary of statements
statement:
  statement_list
  error

statement_list:
  expr
  statement_list ‘;’
  statement_list’ statement_list

primary_expr:
  NUMBER
  STRING
  ( expr )
  TRUE
  FALSE

postfix_expr:
  primary_expr
  identifier_expr ( assign_expr_list )
  identifier_expr ++
  identifier_expr --

assign_expr_list:
  assign_expr
  assign_expr_list, assign_expr

identifier_expr:
  IDENTIFIER
  identifier_expr [ assign_expr ]
  identifier_expr . identifier_expr

unary_expr :
  postfix_expr
  - unary_expr
  ! unary_expr
  not unary_expr
  ++ unary_expr
  -- unary_expr

muldiv_expr:
  unary_expr
  muldiv_expr * muldiv_expr
  muldiv_expr / muldiv_expr
  muldiv_expr % muldiv_expr

addsub_expr:
  muldiv_expr
  addsub_expr + addsub_expr
  addsub_expr - addsub_expr

greater_expr:
  addsub_expr
  greater_expr < greater_expr
  greater_expr > greater_expr
  greater_expr <= greater_expr
  greater_expr >= greater_expr
  greater_expr lt greater_expr
  greater_expr gt greater_expr
  greater_expr le greater_expr
  greater_expr ge greater_expr

equal_expr:
  greater_expr
  equal_expr == equal_expr
  equal_expr != equal_expr
  equal_expr eq equal_expr
  equal_expr neq equal_expr

logicaland_expr:
  equal_expr
  expr && expr
  expr and expr

logicalor_expr:
  logicaland_expr
  logicalor_expr || logicalor_expr
  logicalor_expr or logicalor_expr

condition_expr:
  logicalor_expr
  expr ? expr : expr

assign_expr:
  condition_expr
  identifier_expr = assign_expr

expression_list:
  assign_expr
  expression_list , assign_expr

expr:
  expression_list
▹ Project Setting
Android
Requirements
android 2.3.3 (Gingerbread)
Remarks
MOML 은 android 2.3.3부터 지원하므로 android project 생성시 Minimum Required SDK 는 Android 2.3.3 (Ginerbread) 이상이 필요합니다.
android project에서 웹을 연동한 MOML 을 사용하기 위해서는 다음 permission 들이 필수적으로 필요합니다.
android project – AndroidManifest.xml – Permissions tab – Add button – Uses Permission – select name 메뉴를 통하여 다음 permission 을 추가합니다.
android.permission.INTERNET
android.permission.WRITE_EXTERNAL_STORAGE
iOS
Requirements
iOS 5.0
Remarks
iOS project에서 MOML 을 사용하기 위해서는 다음 frameworks 들이 필수적으로 필요합니다.
iOS project – TARGETS – Build Phases tab – Link Binary With Libraries – (+) 메뉴를 통하여 다음 framework 들을 추가합니다.
AddressBook.framework
AssetsLibrary.framework
AudioToolbox.framework
AVFoundation.framework
CFNetwork.framework
CoreGraphics.framework
CoreLocation.framework
CoreMotion.framework
CoreText.framework
Foundation.framework
libsqlite3.dylib
libstdc++.6.dylib
libxml2.dylib
MapKit.framework
MediaPlayer.framework
MessageUI.framework
MobileCoreServices.framework
OpenGLES.framework
QuartsCore.framework
Security.framework
SystemConfiguration.framework
UIKit.framework
iOS project – TARGETS – Build Settings – Other Linker Flags 에 다음을 추가합니다.
-all_load